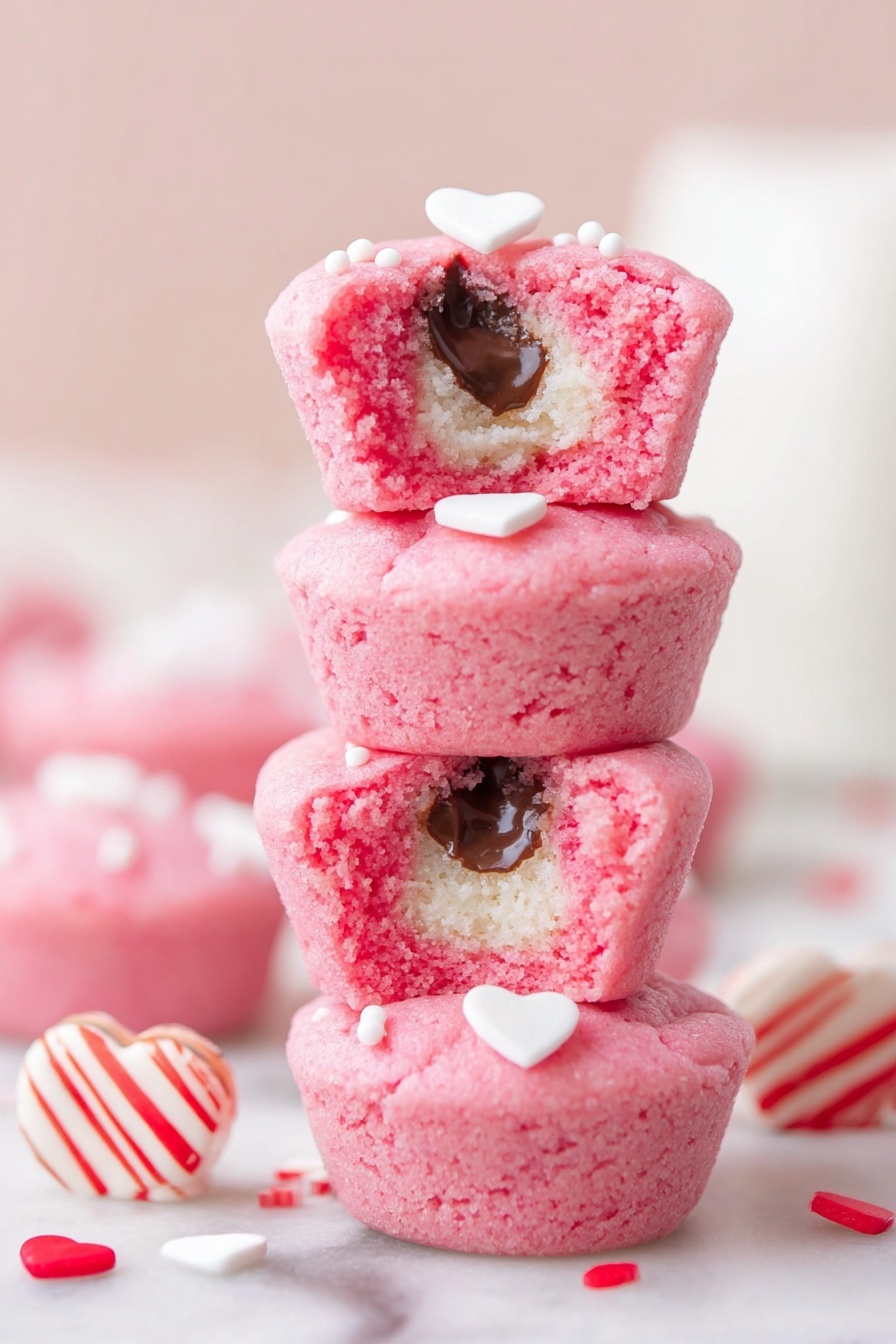
If you’re looking to wow your sweetheart or just have some cozy fun in the kitchen, these Valentine’s Day Cookie Cups with Hershey’s Hugs Recipe are absolute magic. Soft, chewy sugar cookie cups hiding a sweet little chocolate and white hug surprise inside? Yes, please!

Jump to:
- Why You'll Love This Recipe
- Ingredients & Why They Work
- Make It Your Way
- Step-by-Step: How I Make Valentine’s Day Cookie Cups with Hershey’s Hugs Recipe
- Top Tip
- How to Serve Valentine’s Day Cookie Cups with Hershey’s Hugs Recipe
- Make Ahead and Storage
- Frequently Asked Questions:
- Final Thoughts
- Valentine’s Day Cookie Cups with Hershey’s Hugs Recipe
Why You'll Love This Recipe
Honestly, these little cookie cups quickly became a go-to in my kitchen for Valentine’s Day treats. They’re adorable, fuss-free, and perfect for sharing. Plus, they bring that sweet Hershey’s Hugs surprise that everyone loves!
- Perfectly portable: These bite-sized cookie cups are great for gifting or packing in lunchboxes.
- Easy to make: No fancy techniques here—just simple ingredients mixed and baked.
- Customizable: Add your favorite food coloring shades and sprinkles to personalize each batch.
- All ages adore them: Kids love the hidden candy, and adults appreciate the chewy buttery cookie base.
Ingredients & Why They Work
Gathering your ingredients for these Valentine’s Day cookie cups is a breeze, and they’re mostly pantry staples with a festive twist. A good quality sugar cookie mix saves time without sacrificing flavor, and the Hershey’s Hugs add just the right amount of melty sweetness inside each cup.
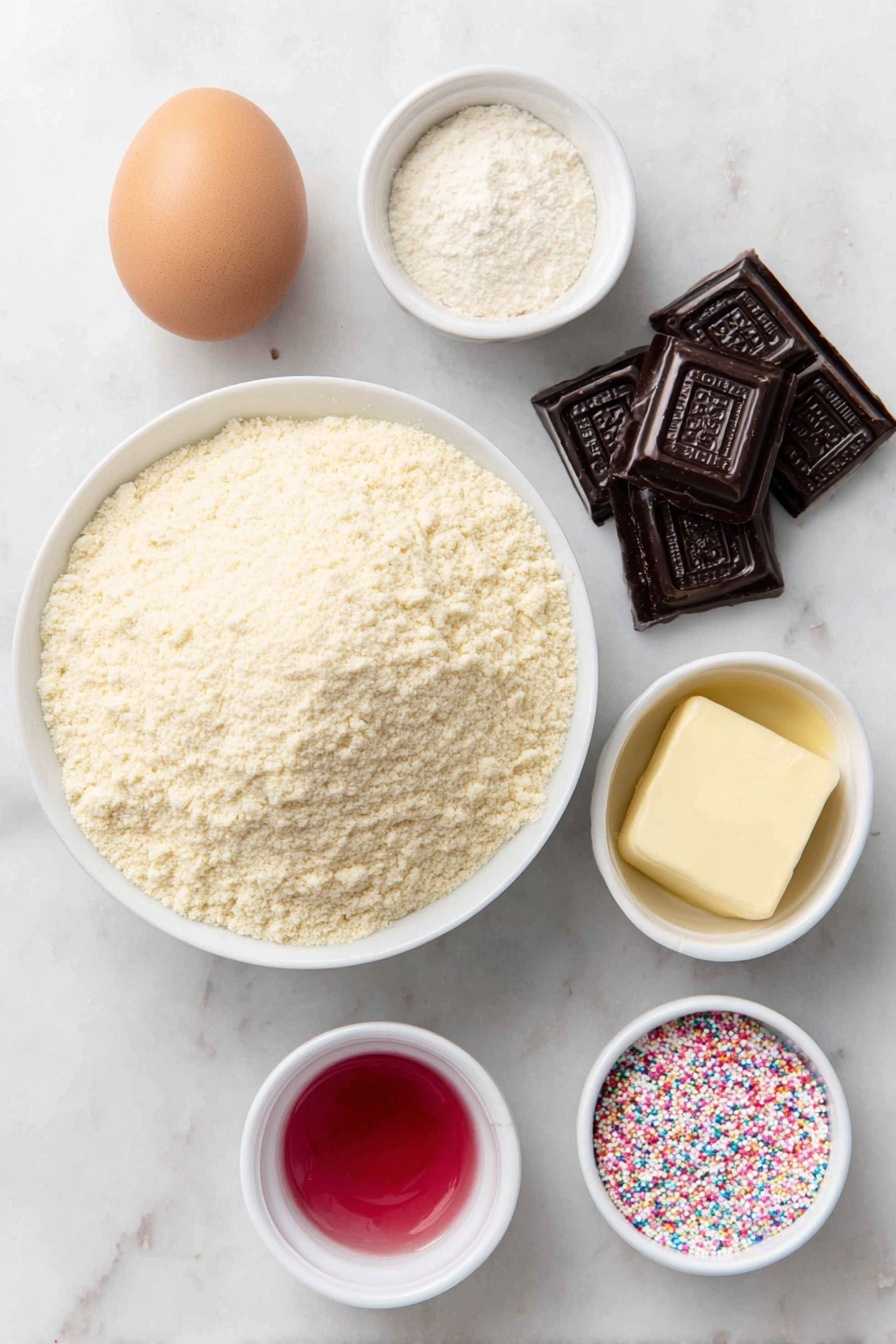
- Sugar cookie mix: This is the base of our cookie cups, providing delicious flavor and easy prep.
- Salted butter: Melted for richness and helps create that soft, chewy texture.
- All-purpose flour: Added for a slight extra structure, so the dough holds up well around the candy.
- Large egg: Binds everything together and adds moisture for a tender crumb.
- Pink/red food coloring: For that festive Valentine’s Day pop—feel free to adjust the shade to your liking.
- Hershey’s Hugs: The sweet surprise inside—white and milk chocolate swirled together for a creamy melt.
- Decorative sprinkles: Totally optional, but they add a fun splash of color on top once the cups come out warm from the oven.
Make It Your Way
One of the best things about these Valentine’s Day Cookie Cups with Hershey’s Hugs Recipe is how easy they are to personalize. Whether you want to tweak the colors, add new flavors, or switch up the toppings, you can make these treats uniquely yours!
- Flavor Boost: I love adding a teaspoon of vanilla or almond extract to the dough for an extra depth of flavor. It makes the cookie cups even more fragrant and cozy, perfect for Valentine’s celebrations.
- Color Play: While pink or red food coloring is traditional for Valentine’s Day, try swirling in some purple or pastel colors for a whimsical twist that kids especially adore.
- Sprinkle Fun: Decorative sprinkles aren’t just pretty—they add a fun crunch! I personally go for heart-shaped sprinkles to keep with the Valentine’s vibe, but nonpareils, edible glitter, or even mini chocolate chips work beautifully too.
- Dietary Variation: For a gluten-free version, try using a gluten-free sugar cookie mix. The technique stays the same, and the results are just as delightful.
Step-by-Step: How I Make Valentine’s Day Cookie Cups with Hershey’s Hugs Recipe
Step 1: Prep Your Pan and Oven Like a Pro
Start by spraying your mini cupcake pan generously with cooking spray to prevent sticking—trust me, you'll thank yourself later! Then preheat your oven to 350 degrees Fahrenheit. This ensures the oven is nice and hot, ready to give your cookie cups that perfect bake.
Step 2: Mix the Dough Just Right
In a large bowl, combine your sugar cookie mix, melted butter, all-purpose flour, egg, and pink or red food coloring. Beat everything together just until combined—overmixing can make your cookies tough, so take it easy. Adjust the food coloring until your dough looks perfectly festive. The dough should feel soft but not sticky.
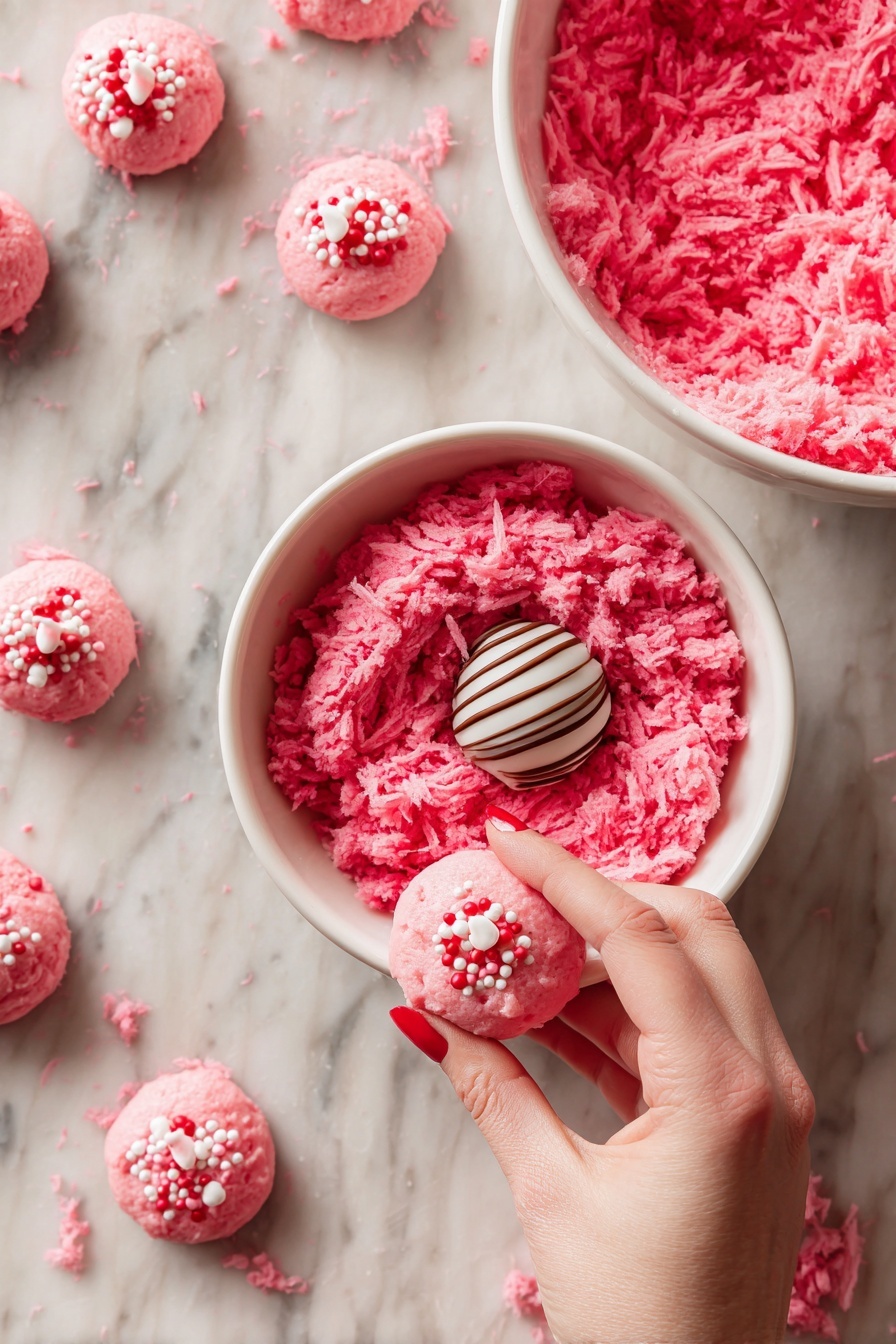
Step 3: Shape the Cookie Cups Around Hershey’s Hugs
Grab about one tablespoon of dough and flatten it with your hand or rolling pin to roughly the size of your palm. Place an unwrapped Hershey’s Hug right in the center, then carefully wrap the dough around the Hug. Use your hands to seal cracks so the chocolate surprise stays perfectly enclosed. Shape it into a smooth ball—this part is fun and a little like playdough!
Step 4: Load and Bake
Set each wrapped dough ball upright into the mini cupcake pan cavities. Once your pan is loaded, bake in the 350°F oven for about 12 minutes. You want to look for lightly golden edges and a set dough surface. The scent of freshly baked cookies will start filling your kitchen—pure comfort!
Step 5: Add the Finishing Touches
As soon as the cookie cups come out of the oven and while they’re still warm, gently press decorative sprinkles on top so they stick nicely. This quick step makes them look festive and gives just the right bit of crunch.
Step 6: Cool and Enjoy
Let the cookie cups cool in the pan for about 15 minutes. This resting time helps them firm up so you can remove them neatly without crumbling. After cooling, serve or package them up as adorable gifts—either way, they’re sure to bring smiles!
Top Tip
Mastering these Valentine’s Day Cookie Cups with Hershey’s Hugs Recipe is easier with a few insider tips that I’ve picked up along the way — they really make all the difference in creating those perfectly soft, chewy bites filled with sweet chocolatey goodness.
- Seal Those Cracks: When wrapping the dough around each Hershey’s Hug, take a moment to smooth out any cracks with your fingers. This prevents the cookie cups from breaking apart during baking and keeps the surprise tucked inside just right.
- Don’t Rush Cooling: Letting your cookie cups cool for about 15 minutes in the pan is key. Hot cookies are delicate and might fall apart, so giving them some time to set ensures they hold their shape beautifully.
- Choose Your Sprinkles Wisely: Festive heart or flower sprinkles add that extra pop of Valentine’s charm. Press them gently onto the warm cookie tops right after baking so they stick nicely without falling off.
- Adjust Food Coloring Gradually: It’s tempting to add loads of pink or red at once, but adding color a little at a time helps you hit that perfect, vibrant shade without overpowering the dough.
How to Serve Valentine’s Day Cookie Cups with Hershey’s Hugs Recipe
Garnishes
For an extra festive touch, top your cookie cups with colorful Valentine-themed sprinkles like tiny hearts, edible glitter, or even crushed candy canes if you want a minty twist. A light dusting of powdered sugar just before serving also adds a delicate, snowy look that’s irresistible.
Side Dishes
These cookie cups are perfect as a standalone sweet treat, but they also pair beautifully with a warm cup of cocoa or a glass of cold milk — classic combos that bring out the buttery, chocolatey goodness. For a brunch or party spread, consider serving alongside fresh fruit or a simple bowl of mixed berries to balance the sweetness.
Make Ahead and Storage
Storing Leftovers
Once cooled, keep your Valentine’s Day Cookie Cups stored in an airtight container at room temperature to maintain their soft, chewy texture. They’ll stay fresh and delicious for up to two weeks, making them ideal to bake well ahead of your celebration.
Freezing
If you want to enjoy these cookie cups later or prepare them in advance, they freeze beautifully. Wrap each cookie individually in plastic wrap or foil, then place them in a freezer-safe container or bag. They’ll keep for 5 to 6 months without losing flavor or texture.
Reheating
To freshen up frozen cookie cups, simply thaw them at room temperature for about an hour. For a warm, melty treat, pop them in the oven at 300 degrees Fahrenheit for 5 minutes—just enough to soften them without melting the Hershey’s Hug inside completely.
Frequently Asked Questions:
Absolutely! Homemade sugar cookie dough works great in this recipe. Just be sure your dough has a consistency that holds together well to wrap around the Hershey’s Hugs without cracking. You might want to chill the dough slightly for easier handling.
You can definitely experiment with other chocolates, but keep in mind Hershey’s Hugs have a unique shape and size that fits perfectly. Smaller chocolates or ones that melt quickly may affect the dough’s texture during baking.
Spraying your mini cupcake pan generously with cooking spray before placing the dough balls helps prevent sticking. Additionally, letting the cookie cups cool for 15 minutes before removing them allows them to firm up and come out more easily.
While the mini cupcake pan is ideal for bite-sized cookie cups, you could try larger muffin tins for bigger treats. Just keep in mind the baking time may need to be adjusted, and larger sizes might make the filling less well-hidden.
Final Thoughts
Making these Valentine’s Day Cookie Cups with Hershey’s Hugs Recipe is truly a joyful experience — from the colorful dough to the sweet surprise tucked inside each bite. Whether you’re celebrating with family, gifting a batch to friends, or just treating yourself, these cookie cups bring warmth and a bit of festive magic to the day. I hope you enjoy every delicious bite as much as I do!
Print
Valentine’s Day Cookie Cups with Hershey’s Hugs Recipe
- Prep Time: 25 minutes
- Cooling Time: 15 minutes
- Cook Time: 12 minutes
- Total Time: 37 minutes
- Yield: 25 servings
- Category: Dessert
- Method: Baking
- Cuisine: American
- Diet: Vegetarian
Description
These Valentine's Day Cookie Cups are adorable bite-sized treats with a soft, chewy, buttery sugar cookie base that hides a sweet Hershey's Hug surprise inside. Perfect for gifting or celebrating the holiday of love with a fun, easy-to-make dessert that's delightful for all ages.
Ingredients
Cookie Dough
- 17.5 ounce package sugar cookie mix
- ½ cup (1 stick) salted butter, melted
- 3 tablespoon all-purpose flour
- 1 large egg, room temperature
- Pink/red food coloring, as needed
Filling & Decoration
- 24-26 Hershey’s Hugs, unwrapped
- Decorative sprinkles, optional topping
Instructions
- Prepare the Pan and Oven: Spray a mini cupcake pan with cooking spray and preheat your oven to 350 degrees Fahrenheit to ensure even baking.
- Mix the Dough: In a large bowl, combine the sugar cookie mix, melted butter, all-purpose flour, egg, and pink/red food coloring. Beat together just until everything is combined, adjusting the food coloring to achieve your desired hue.
- Form the Cookie Cups: Take about 1 tablespoon of the cookie dough and flatten it with your hand or rolling pin to the size of your palm. Place an unwrapped Hershey’s Hug in the center, then carefully wrap the dough around the hug, shaping it into a ball. Use your hands to seal any cracks that may form.
- Place in Pan: Set each filled dough ball upright into the cavities of the prepared mini cupcake pan. Repeat until all dough is used.
- Bake: Bake the cookie cups in the preheated oven for 12 minutes or until the edges appear set and lightly golden.
- Add Sprinkles: Remove the pan from the oven and, while the cookie cups are still warm, press decorative sprinkles gently onto the tops so they adhere well.
- Cool: Allow the cookie cups to cool for 15 minutes in the pan before carefully removing and serving.
Notes
- Store cookie cups in an airtight container at room temperature for up to two weeks.
- For longer storage, freeze cookie cups individually wrapped in a freezer-safe container or bag for 5-6 months.
- Allow cookie cups to cool for about 15 minutes before removing from the pan to prevent them from falling apart.
- When wrapping dough around the Hershey’s Hugs, use your hands to smooth out cracks for a neat finish.
- Choose cute decorative sprinkles like hearts or flowers to enhance the festive look.
Nutrition
- Serving Size: 1 cookie cup
- Calories: 150 kcal
- Sugar: 10 g
- Sodium: 80 mg
- Fat: 7 g
- Saturated Fat: 4 g
- Unsaturated Fat: 3 g
- Trans Fat: 0 g
- Carbohydrates: 20 g
- Fiber: 0.5 g
- Protein: 1.5 g
- Cholesterol: 25 mg


Leave a Reply