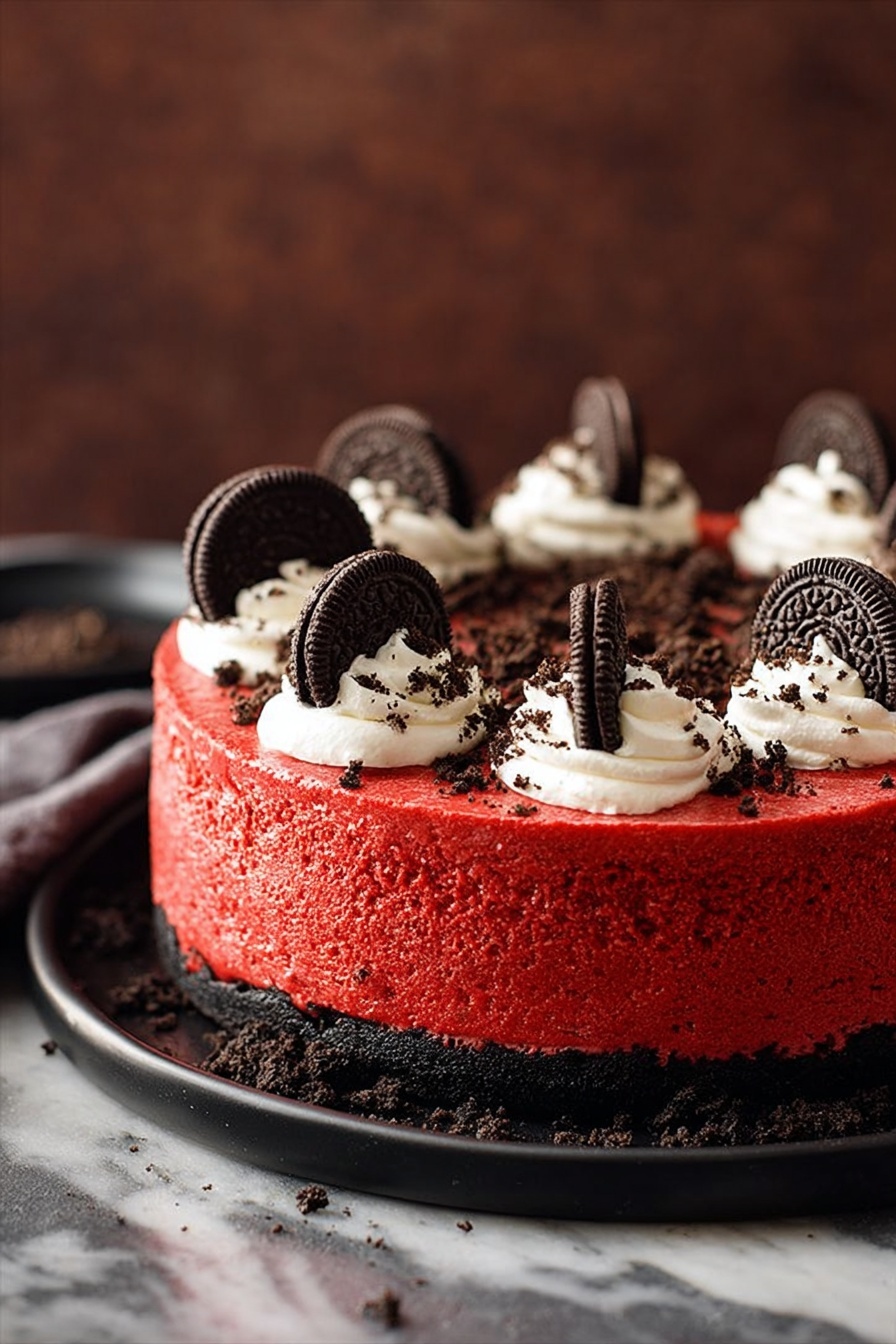
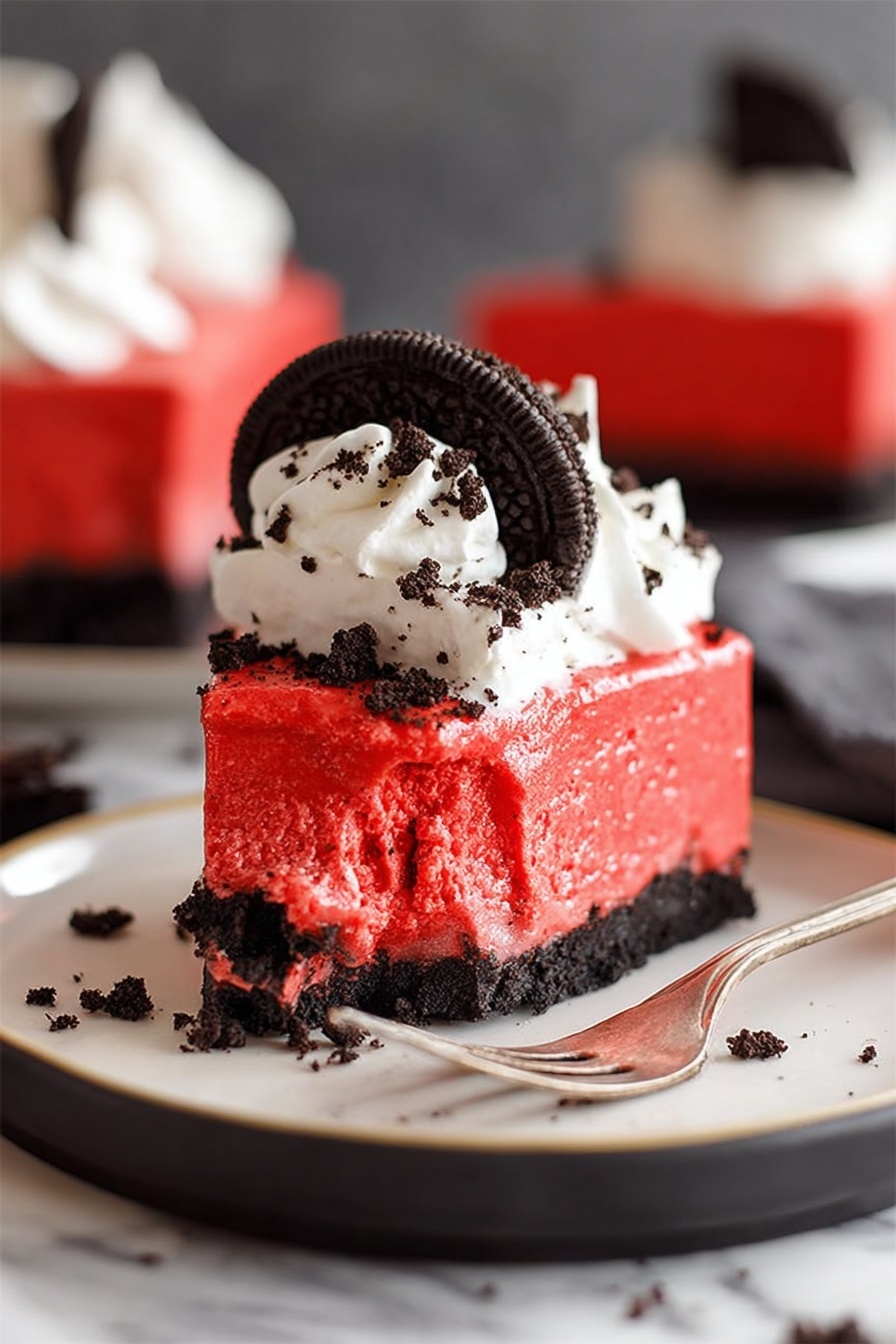
There’s something utterly irresistible about the combo of creamy, tangy cheesecake with the festive flair of red velvet and the crunch of Oreos. This Red Velvet Oreo Cheesecake Recipe is one of those desserts that feels fancy but is actually super doable — perfect for sharing and showing off a bit without the fuss.

Jump to:
Why You'll Love This Recipe
Honestly, this cheesecake hits all the right notes — rich, creamy, a little tangy, and that festive red velvet color paired with classic Oreo crunch is just dreamy. I remember making this for a holiday get-together and everyone asked for seconds — it’s one of those treats that instantly feels special but really comes together with simple steps.
- Rich Flavor Combo: The cream cheese and sour cream balance out the sweetness while the cocoa powder adds depth.
- Textural Delight: Oreo crust gives a perfect crunch against the silky cheesecake.
- Easy Yet Impressive: You get a showstopper dessert with straightforward ingredients and no fancy techniques.
- Great for Any Occasion: Whether it’s Christmas, a birthday, or just because, this cheesecake feels festive and welcoming.
Ingredients & Why They Work
Each ingredient here plays a key role in making this cheesecake luscious and full of flavor. I always recommend using room-temperature dairy because it blends smoother and gives a better texture. Also, grabbing the right red food coloring really makes a difference in that vibrant red velvet hue.
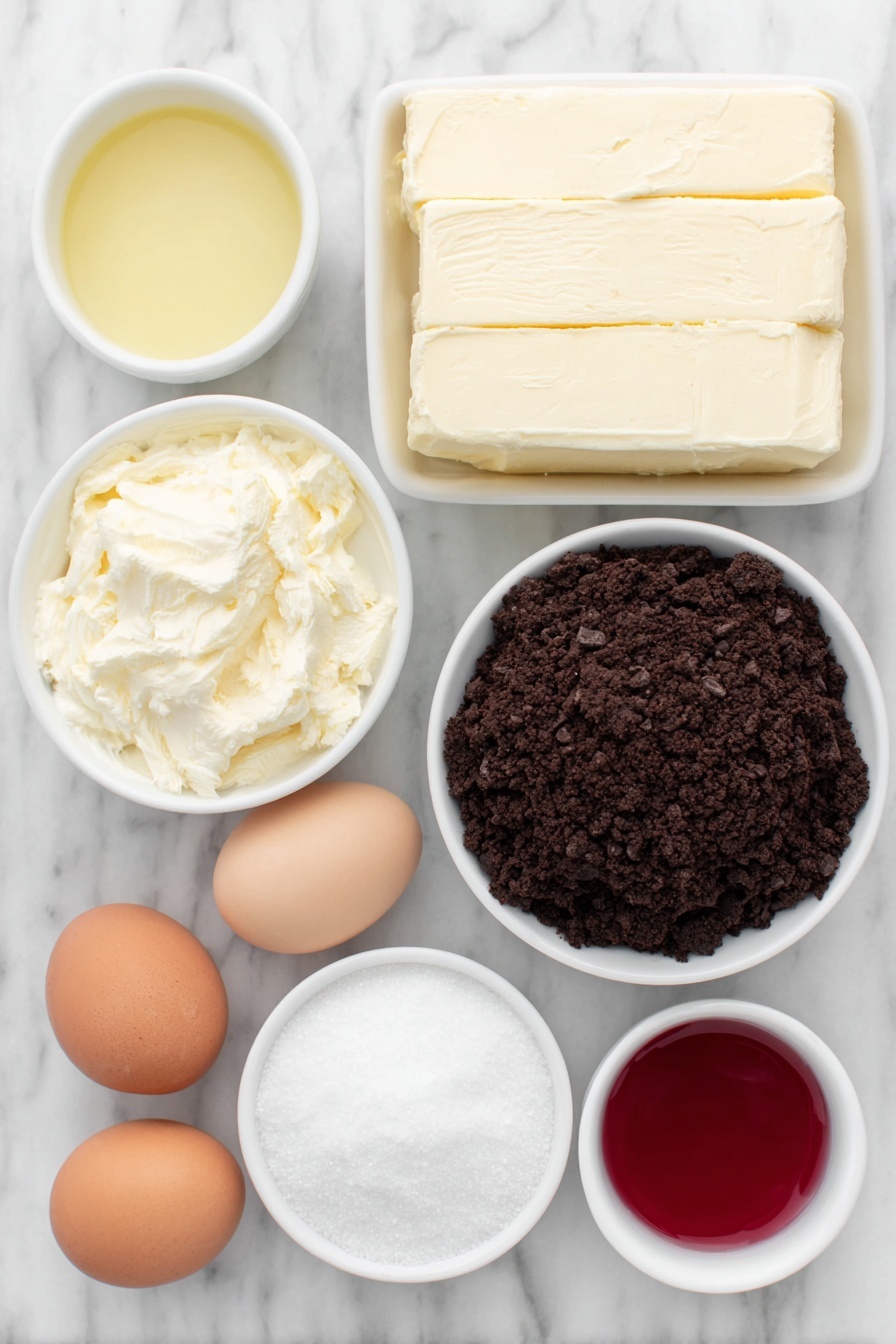
- Chocolate sandwich cookie crumbs: Oreo crumbs add that essential chocolate crunch base. Crushing them finely helps the crust adhere better.
- Unsalted butter: Melted butter binds the crust to a perfect, buttery foundation without overpowering the flavor.
- Cream cheese: Full-fat and room temperature is crucial for a creamy, smooth filling. I never substitute whipped or low-fat here — it just won’t set right.
- Granulated sugar: Sweetens the cheesecake without making it cloying; balances the tanginess of cream cheese and sour cream.
- Full-fat sour cream: Adds moisture and a subtle tang, making the cheesecake extra creamy and less dense.
- Eggs: They’re the binder — using them at room temp helps avoid lumps and ensures a velvety batter.
- Unsweetened cocoa powder: Provides that classic red velvet chocolate undertone, so essential for flavor depth.
- Liquid red food coloring: I like McCormick’s brand for consistency and vibrant color — it transforms the batter to that iconic red velvet shade.
- Vanilla extract: Rounds out the flavor beautifully, giving a warm sweetness that pulls everything together.
- Cream Cheese Whipped Cream or Small Batch Whipped Cream: The perfect topping — light, creamy, and balances the richness underneath.
Make It Your Way
I love tweaking this recipe depending on the occasion. Sometimes I pillow the top with extra crushed Oreos or swap the sour cream for Greek yogurt if I’m feeling a little lighter. You can play around with the food coloring amount to get the shade you love, too!
- Variation: Once, I swirled some cream cheese frosting into the batter before baking for a marbled effect — it was a huge hit at a party.
- Dietary tweak: For a slightly lighter version, substitute half the cream cheese with mascarpone — it’s still rich but less dense.
- Seasonal change: Add a teaspoon of cinnamon and a pinch of nutmeg for an autumnal twist that complements red velvet beautifully.
Step-by-Step: How I Make Red Velvet Oreo Cheesecake Recipe
Step 1: Prep Your Crust Like a Pro
Start by preheating your oven to 325°F and wrapping your springform pan with foil — this water bath method makes a huge difference by preventing cracks. For the crust, mix those chocolate sandwich cookie crumbs with melted butter until combined, then firmly press it into the bottom of your pan. I find patting down with a measuring cup base helps smooth things out perfectly! Bake for 10 minutes to set.
Step 2: Whip Up the Silky Filling
In a large bowl, beat the room temperature cream cheese with sugar and sour cream until it’s light and fluffy – around 2-3 minutes. Scrape down the sides often so everything blends evenly. Then add eggs one at a time, beating carefully so the batter is smooth but not overmixed (overbeating can add air and cause cracks). Finally, mix in the cocoa powder, red food coloring, and vanilla extract until perfectly combined with that gorgeous red hue.
Step 3: Bake It in a Water Bath
Pour your luscious batter over the pre-baked crust in the springform pan, packing it to the edges if using a 6x2 pan. Place this pan inside a larger pan, then carefully pour hot water into the bigger pan until it comes halfway up the sides of your cheesecake pan (watch out not to get water inside). This gentle steam bath ensures your cheesecake stays creamy and crack-free. Bake for 65-75 minutes — you’ll want the edges set but the center to still wiggle a bit.
Step 4: Cool and Chill for Best Results
Remove from oven and carefully run a thin knife around the edges to loosen it (this prevents cracks as it cools). Let it sit in the water bath for 15 minutes before moving it to room temp for another hour. Then cover and refrigerate for at least 4 hours, preferably overnight. This waiting time is key — it lets the cheesecake set perfectly and deepen the flavor.
Top Tip
I’ve learned from countless cheesecake adventures that patience and temperature control are everything. Rushing the process or mixing ingredients cold almost guarantees cracks or grainy texture. Here are my favorite tips to get it just right every time.
- Room Temperature is Key: Always have your cream cheese, sour cream, and eggs at room temp for smooth mixing and no lumps.
- Don’t Overbeat: Mix until smooth but not foamy — overbeating adds air pockets that can create cracks during baking.
- Use a Water Bath: It’s a game-changer for creamy, crack-free cheesecake. Just make sure your foil wrap seals well to keep water out!
- Loosen Edges Right Away: Running a knife along the edge right after baking avoids the cheesecake sticking to the pan and cracking when cooling.
How to Serve Red Velvet Oreo Cheesecake Recipe
Garnishes
I like to keep it classic with a generous dollop of cream cheese whipped cream or lightly sweetened small-batch whipped cream. A sprinkle of crushed Oreos and a few mini chocolate chips or red sprinkles on top add just the right festive touch. If it’s a special occasion, some fresh raspberries or strawberries work beautifully for a pop of freshness.
Side Dishes
This cheesecake pairs beautifully with a cup of freshly brewed coffee or even a rich hot chocolate for cold evenings. I sometimes serve it alongside a scoop of vanilla bean ice cream or a simple fruit salad to lighten up the richness if we're serving a bigger dessert spread.
Creative Ways to Present
For holiday parties, I’ve layered slices of this cheesecake in clear glass trifle bowls with layers of whipped cream and cookie crumbs — it’s stunning and guests love scooping their own portions. Another fun idea is cutting the baked cheesecake into squares and serving them as mini bites topped with a little extra cream and a mini Oreo. Perfect for cocktail parties!
Make Ahead and Storage
Storing Leftovers
Leftover cheesecake keeps beautifully in an airtight container in the fridge for up to 5-7 days — though honestly, it rarely lasts that long at my place! Just make sure it’s covered well so it doesn’t absorb fridge odors.
Freezing
I’ve frozen this cheesecake successfully by wrapping it tightly in plastic wrap and then in foil to prevent freezer burn. Thaw it overnight in the fridge, and it tastes almost as fresh as the day you made it. Just avoid freezing if you’ve topped it with whipped cream beforehand — add that fresh after thawing.
Reheating
This cheesecake is best served chilled, so no reheating necessary. If you prefer it closer to room temp, just take it out of the fridge about 20-30 minutes before serving to soften slightly — that’s my preferred way to get the best flavor and texture.
Frequently Asked Questions:
Yes! While this Red Velvet Oreo Cheesecake Recipe is designed for a 6-inch pan, you can use a 7-inch springform pan without modifying ingredient amounts. For a 9-inch pan, you’ll want to adapt the recipe by following a 9-inch cheesecake base, omitting chocolate, and adjusting cocoa powder and food coloring accordingly.
Using a water bath is the best tip I can share—wrapping the pan in foil and baking it submerged halfway in hot water keeps the temperature gentle and even. Also, avoid overmixing and run a thin knife along the edges immediately after baking to prevent sticking and cracking.
Yes! This cheesecake actually develops better flavor and texture with chilling time. I recommend making it a day in advance and refrigerating at least 4 hours or overnight. Just add toppers like whipped cream right before serving.
You can try natural options like beet juice or powder, but be aware these can slightly alter the flavor and color vibrancy. I personally stick with liquid red food coloring for that crisp red velvet look, especially for special occasions.
Final Thoughts
This Red Velvet Oreo Cheesecake Recipe holds a special place in my heart because it not only tastes incredible but also brings people together — kind of like baking happiness in a pan. Whether it’s your first time making cheesecake or you’re a seasoned pro, I’m confident you’ll love this twist. Try it for your next celebration; it’s a guaranteed crowd-pleaser that feels as good to make as it does to eat.
Print
Red Velvet Oreo Cheesecake Recipe
- Prep Time: 20 minutes
- Cook Time: 1 hour 15 minutes
- Total Time: 6 hours 35 minutes
- Yield: 6 servings
- Category: Dessert
- Method: Baking
- Cuisine: American
- Diet: Vegetarian
Description
This Christmas Red Velvet Oreo Cheesecake is a festive and indulgent dessert featuring a rich, creamy red velvet cheesecake filling atop a crunchy Oreo cookie crust. Perfectly moist with a vibrant color and topped with whipped cream, this cheesecake makes a stunning holiday centerpiece that serves 4-6 people.
Ingredients
Crust
- 1 cup chocolate sandwich cookie crumbs, such as Oreo
- 2 tablespoons unsalted butter, melted
Cheesecake Filling
- 16 ounces (2 blocks or 16 tablespoons) full-fat cream cheese, room temperature and not cold to the touch (do not sub fat free or whipped)
- ½ cup granulated sugar
- 2 tablespoons full-fat sour cream, room temperature and not cold to the touch
- 2 eggs, room temperature and not cold to the touch
- 1 tablespoon unsweetened cocoa powder
- 2 teaspoons liquid red food coloring (McCormick brand or similar)
- 1 teaspoon vanilla extract
Topping
- Cream Cheese Whipped Cream or Small Batch Whipped Cream
Instructions
- Preheat and Prepare Pan: Preheat your oven to 325 degrees Fahrenheit. Wrap the outside of a 6x2 or 6x3 springform pan with foil to prevent water from seeping in during the water bath. Lightly grease the inside of the pan. Alternatively, you can use a 7 inch springform pan without adjusting the recipe.
- Make the Crust: In a large bowl, combine the chocolate sandwich cookie crumbs and the melted unsalted butter. Mix well, then press the mixture firmly into the bottom of the prepared springform pan. Bake the crust for 10 minutes, then remove from oven and set aside.
- Prepare Cheesecake Batter: In a large mixing bowl using a stand mixer fitted with a paddle attachment (or with a hand mixer), beat the room temperature cream cheese, sugar, and sour cream on medium-high speed until light and fluffy, about 2 to 3 minutes. Scrape down the sides of the bowl as needed to ensure even mixing.
- Add Eggs: Beat in the eggs one at a time, mixing about 1 minute after each addition until the batter is smooth. Be careful not to overblend to avoid excess air incorporation.
- Incorporate Flavorings: Scrape down the bowl again. Beat in the unsweetened cocoa powder, liquid red food coloring, and vanilla extract until fully combined and the batter has a consistent red velvet color.
- Assemble and Prepare Water Bath: Pour the cheesecake batter over the baked crust in the springform pan, filling it to the top if using a 6x2 pan. Place the springform pan inside a larger 8x8 or bigger pan. Carefully pour hot water into the outer pan until the water reaches halfway up the sides of the springform pan. Take care to avoid getting water inside the foil wrap.
- Bake Cheesecake: Bake at 325 degrees Fahrenheit for 75 minutes or until the edges are set and slightly browned, the center is mostly set but still wobbly, and the internal temperature reaches 150 degrees Fahrenheit.
- Cool in Water Bath: Remove the cheesecake from the oven and carefully run a knife along the entire edge of the pan to loosen the cake. Let it cool in the water bath for 15 minutes.
- Cool at Room Temperature: Remove the springform pan from the water bath and let the cheesecake cool completely at room temperature for 1 hour.
- Chill: Cover the cheesecake and refrigerate for at least 4 hours or preferably overnight to allow it to fully set and develop flavor.
- Serve: Top the cheesecake with cream cheese whipped cream or small batch whipped cream before serving. Store any leftovers in an airtight container in the refrigerator for 5 to 7 days.
Notes
- For a 9 inch cheesecake, use the 9 Inch Chocolate Cheesecake recipe but omit the chocolate, then add ¼ cup sour cream, 2 tablespoons cocoa powder, and 1 tablespoon red food coloring to achieve a red velvet flavor.
- Try other small cheesecake recipes like 6 Inch Cheesecake, Chocolate Cheesecake with Oreo Crust, Small Pumpkin Cheesecake, and Peanut Butter Cheesecake for variety.
- For more red velvet treats, explore recipes for Small Red Velvet Cake, Red Velvet Cupcakes, Red Velvet Sugar Cookies, and Red Velvet Bars.
- Ensure all dairy ingredients are at room temperature to avoid lumps in the batter and to achieve a smooth texture.
- Use a water bath during baking to prevent cracking and to ensure even cooking of the cheesecake.
- If you don’t have liquid red food coloring, gel food coloring can be used as a substitute.
Nutrition
- Serving Size: 1 slice (⅙ of cheesecake)
- Calories: 450 kcal
- Sugar: 35 g
- Sodium: 300 mg
- Fat: 32 g
- Saturated Fat: 18 g
- Unsaturated Fat: 12 g
- Trans Fat: 0 g
- Carbohydrates: 30 g
- Fiber: 1 g
- Protein: 7 g
- Cholesterol: 120 mg


Leave a Reply