There’s something magically festive about homemade peppermint treats, and this Peppermint Cookies Recipe brings that charm right into your kitchen. These little bites of minty joy melt in your mouth and boast a perfect balance of creamy, sweet, and cool flavors—so worth the effort, especially around the holidays.

Jump to:
Why You'll Love This Recipe
This peppermint cookies recipe is one I’ve come back to festival after festival. What I adore is how incredibly simple it is, yet the result looks so delightful and tastes just like those classic Christmas mints—but homemade, fresher, and customizable.
- Easy-to-make dough: No baking or complicated steps—just mix, color, shape, and chill.
- Customizable colors and flavors: You get to decide how festive or subtle your peppermint treats look and taste.
- A showstopper for any party: These candies are pretty enough to gift and sweet enough to disappear fast.
- Long-lasting freshness: Stored right, they keep well so you can spread holiday joy over days or weeks.

Ingredients & Why They Work
Each ingredient in this Peppermint Cookies Recipe plays a simple but vital role to create that creamy, melt-in-your-mouth texture with a fresh peppermint zing. Shopping tip: grab quality cream cheese and unsalted butter for the best flavor and consistency right from the start.

- Granulated sugar: Adds a subtle crunch and a little coating for firmness on the outside.
- Cream cheese: The secret to that creamy, soft texture that just melts away.
- Unsalted butter: Provides richness and helps balance sweetness.
- Light corn syrup: Keeps the candies smooth and prevents crystallization, aiding that perfect bite.
- Peppermint extract: Pure peppermint flavor that wakes up your taste buds.
- Powdered sugar: The bulk of the candy base, giving structure and sweetness.
- Liquid food coloring (red & green): Classic holiday colors that make these candies visually festive.
Make It Your Way
One of the best parts about this Peppermint Cookies Recipe is that it’s totally flexible. Over the years, I’ve played around with color intensity and even swapped peppermint extract for spearmint or added a hint of vanilla for a unique twist. Feel free to tweak it to your liking.
- Variation: I once added crushed candy canes to the dough for an extra festive crunch—totally recommend trying that for holiday gatherings!
- Dietary Swap: Want to try a dairy-free version? Using vegan cream cheese and butter substitutes works well if you add a touch more powdered sugar to compensate for moisture.
- Seasonal Flair: You can play with pastels or even gold dust for a New Year’s party vibe.
Step-by-Step: How I Make Peppermint Cookies Recipe
Step 1: Beat It Till Smooth
Start by blending room temperature cream cheese, butter, light corn syrup, and peppermint extract with a handheld mixer on low. I give mine a full minute until it’s smooth and creamy—this makes for the softest, most luscious base.
Step 2: Powdered Sugar Magic
Add the powdered sugar gradually, mixing on low speed. As the dough thickens, switch to a spatula to finish kneading by hand. This dough will be thick but pliable—don’t rush it or add too much sugar at once; you can always add more if needed.
Step 3: Color Your Candy Canvas
Divide the dough into three parts. Make a well in two of them to add red and green liquid food coloring, leaving one plain white. Knead each one well—this is where additional powdered sugar might come in handy to tame any stickiness.
Step 4: Shape and Slice
Roll each colored dough into an 18-inch rope, about one inch thick. Slice them into ½-inch pieces, then roll those pieces into balls. The rolling makes the candies perfectly uniform and ready for that classic shape.
Step 5: Sugar Coat and Flatten
Toss the dough balls in granulated sugar for a delicate crunch and place them on parchment-lined trays. Use a fork to gently press each into a disc, creating charming little ridged patterns. Let them air out at room temperature for up to 24 hours to set perfectly.
Top Tip
I've found that the key to these peppermint cookies looking and tasting their best is patience during the kneading and resting stages. Here are the tips I swear by:
- Slow Sugar Addition: Adding powdered sugar gradually protects you from ending up with dry or crumbly dough.
- Food Coloring Balance: Use liquid food coloring sparingly to avoid overly sticky dough—you can always add extra powdered sugar little by little.
- Resting Time is Key: Let your peppermint candies dry at room temperature; it enhances the texture and helps them hold their shape beautifully.
- Use Parchment Paper: I always line my trays to prevent sticking without extra oils or sprays, keeping those crisp edges tender.
How to Serve Peppermint Cookies Recipe

Garnishes
For a festive presentation, I keep it simple with a sprinkle of crushed candy canes or a dusting of powdered sugar right before serving. Sometimes, I dip half of the peppermint treats in dark chocolate for an elegant contrast that guests adore.
Side Dishes
I love pairing these cool peppermint cookies with warm drinks like mulled wine, hot cocoa, or peppermint tea. Their refreshing taste provides such a lovely counterpoint to the cozy beverages, making your holiday table feel extra special.
Creative Ways to Present
For gift-giving, I arrange these peppermint treats in clear jars or festive tins layered with wax paper. Another fun idea I tried was threading them onto twine like little edible garlands—kids loved helping make those at our holiday party!
Make Ahead and Storage
Storing Leftovers
The best way I’ve found to keep these fresh is an airtight container in the refrigerator. They stay perfect for up to two weeks, retaining their buttery texture and peppermint punch without drying out.
Freezing
If I want to bake a big batch in advance, freezing is my go-to. I pop the candies into a freezer-safe container, and they keep beautifully for up to three months. When it’s time to enjoy, just thaw them slowly in the fridge overnight.
Reheating
Since these are no-bake peppermint cookies, reheating isn’t necessary. If they’ve chilled in the fridge or freezer and seem a bit firm, just let them come to room temperature for 20 minutes—that soft, melt-in-your-mouth texture comes right back.
Frequently Asked Questions:
Yes! Gel food coloring works wonderfully for this Peppermint Cookies Recipe. It offers vibrant colors with less moisture, which helps keep the dough from getting too sticky. Just add it sparingly and knead in extra powdered sugar if needed.
Stored properly in an airtight container in the fridge, these peppermint cookies last up to two weeks without losing their texture or flavor. If frozen, they can keep for up to three months.
Absolutely! I often make these peppermint cookies days or even weeks ahead. They store well refrigerated or frozen, so you can prepare in advance with no stress.
The key is adding powdered sugar gradually and kneading carefully. If the dough feels sticky after adding food coloring, sprinkle in small amounts of extra powdered sugar until it's just right. Avoid adding too much to keep the candies tender.
Final Thoughts
This Peppermint Cookies Recipe is one of those cozy traditions I genuinely love to revisit every year. They’re simple to make, full of nostalgic flavor, and bring that extra sparkle to any holiday table. I hope baking these fills your kitchen with as much warmth and joy as it does mine—give them a try, and I promise you won’t be disappointed!
Print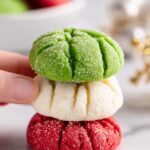
Peppermint Cookies Recipe
- Prep Time: 15 minutes
- Cook Time: 0 minutes
- Total Time: 1 hour 15 minutes
- Yield: 100 candies
- Category: Dessert
- Method: No-Cook
- Cuisine: American
Description
These Christmas Mints are delightful homemade peppermint candies that are creamy, colorful, and perfect for holiday gifting or party treats. Made with cream cheese, butter, powdered sugar, and peppermint extract, these soft mints come in festive red, green, and white colors and feature a lovely striped pattern on top.
Ingredients
Main Ingredients
- ⅓ cup granulated sugar
- 4 ounces cream cheese, room temperature
- 2 tablespoons unsalted butter, room temperature
- 2 tablespoons light/clear corn syrup (Karo brand recommended)
- 1 teaspoon peppermint extract
- 4 ¼ - 5 cups powdered sugar, divided
- 6 drops green liquid food coloring
- 6 drops red liquid food coloring
Instructions
- Prepare Baking Tray: Line a large rimmed baking tray with parchment paper to prevent sticking and set aside.
- Mix Wet Ingredients: In a large mixing bowl, beat the cream cheese, unsalted butter, light corn syrup, and peppermint extract using a handheld mixer on low speed for 1 minute until smooth.
- Incorporate Powdered Sugar: Gradually add 4 ¼ cups powdered sugar to the bowl, about ½ cup at a time, mixing on low speed. As the dough thickens, switch to mixing by hand with a spatula or wooden spoon to fully incorporate the sugar.
- Prepare Work Surface: Lay a sheet of parchment paper onto a clean counter and sprinkle ¼ cup of powdered sugar on it. Turn out the dough onto the powdered sugar to prevent sticking.
- Divide and Color Dough: Divide the dough into three equal parts. Make shallow wells in two portions and add red food coloring to one and green to the other. Leave the third portion white.
- Knead Colored Dough: Carefully knead the red and green dough balls until color is evenly distributed, adding up to ¼ cup additional powdered sugar if needed to reduce stickiness. Knead the white dough lightly with 1-2 tablespoons of powdered sugar as needed.
- Roll Dough into Ropes: Roll each colored dough ball into an 18-inch long rope about 1 inch thick.
- Slice Dough: Cut each rope into ½-inch slices from one end to the other until all pieces are cut.
- Form Balls: Roll each slice into a small ball using the palm of your hand. Set aside on a clean surface.
- Coat in Granulated Sugar: Toss 2-3 dough balls at a time into the small bowl of granulated sugar to coat, then place them on the prepared baking tray. Repeat until all balls are coated.
- Flatten and Pattern: Use the tip of a fork to gently press each sugar-coated ball into a disc shape. The fork tines will create a pretty striped pattern on top.
- Let Set: Allow the peppermint patties to sit at room temperature on the baking tray for up to 24 hours to dry and set before serving or storing.
Notes
- Yields approximately 100 peppermint candies.
- Store the mints in an airtight container in the refrigerator; they will stay fresh for up to 2 weeks chilled.
- For longer storage, freeze in a freezer-safe container for up to 3 months and thaw in the fridge before serving.
- Add up to ½ teaspoon of liquid food coloring for deeper, richer colors.
- Add powdered sugar gradually to reach the right dough consistency—soft but not sticky or stiff.
- Gel food coloring is recommended for more vibrant colors and less moisture, and it is safe for nut allergy sufferers.
Nutrition
- Serving Size: 1 candy
- Calories: 30 kcal
- Sugar: 3 g
- Sodium: 15 mg
- Fat: 1.5 g
- Saturated Fat: 1 g
- Unsaturated Fat: 0.5 g
- Trans Fat: 0 g
- Carbohydrates: 4 g
- Fiber: 0 g
- Protein: 0.3 g
- Cholesterol: 5 mg


Leave a Reply