There’s something magically satisfying about the classic pattern and flavors in my Mint Chocolate Checkerboard Cookies Recipe. The crisp, buttery dough paired with peppermint and rich chocolate creates a treat that’s as fun to make as it is to eat—trust me, you’ll want to share these (or maybe not!).

Jump to:
- Why You'll Love This Recipe
- Ingredients & Why They Work
- Make It Your Way
- Step-by-Step: How I Make Mint Chocolate Checkerboard Cookies Recipe
- Top Tip
- How to Serve Mint Chocolate Checkerboard Cookies Recipe
- Make Ahead and Storage
- Frequently Asked Questions:
- Final Thoughts
- Mint Chocolate Checkerboard Cookies Recipe
Why You'll Love This Recipe
This Mint Chocolate Checkerboard Cookies Recipe stands out because it’s not only a feast for your taste buds but also for your eyes. When I first made these, I was amazed at how impressive the checkerboard pattern looked—and they tasted even better than they looked!
- Beautiful Visual Impact: The checkerboard pattern is eye-catching and makes an ordinary cookie look gourmet and fun.
- Refreshing Mint Flavor: Peppermint adds a cool freshness that balances the sweetness and richness.
- Rich Chocolate Contrast: Cocoa powder and a touch of espresso deepen the chocolate flavor perfectly.
- Versatile & Fun to Make: You can customize the colors and thickness, making it a fun baking activity or gift.
Ingredients & Why They Work
The ingredients in this Mint Chocolate Checkerboard Cookies Recipe work together to create a dough that’s sturdy yet tender—just right to hold that perfect checkerboard without cracking or spreading too much. Fresh butter and quality extracts make a big difference, so choose wisely when shopping.

- All-purpose flour: Provides the structure; spoon and level it for accurate measuring to get the texture right.
- Baking powder: Gives just enough lift so the cookies aren’t dense.
- Salt: Balances sweetness and enhances all the flavors.
- Unsalted butter: Softened butter is key for creamy, smooth dough and rich flavor.
- Granulated sugar: Sweetens without overpowering and helps with creaming for a light texture.
- Eggs: Add richness and help bind the dough. Don’t forget to save the extra egg white for the egg wash—it adds a lovely sheen and crunch.
- Vanilla extract: Rounds out the flavor and complements mint and chocolate.
- Peppermint extract: The star that gives the mint dough its refreshing zing; a little goes a long way.
- Green food dye: Optional for that classic minty green color—one drop of gel coloring is enough to avoid overpowering the flavor.
- Cocoa powder: Adds deep chocolate flavor and rich color; Dutch-process powder works beautifully here.
- Milk: Just a tablespoon softens the chocolate dough for better handling.
- Espresso powder: Optional but highly recommended for enhancing the chocolate notes without adding coffee taste.
Make It Your Way
I love tailoring this Mint Chocolate Checkerboard Cookies Recipe depending on the occasion. Sometimes I add a hint of orange zest for a bright, unexpected twist, or swap peppermint extract with spearmint for a milder flavor. Feel free to make it your own—you’ll be surprised how versatile these doughs are!
- Variation: One of my favorites is adding a few drops of orange extract to the mint dough for a refreshing holiday vibe.
- Dietary Twist: You can try substituting some flour for almond flour to add a little nuttiness and a tender crumb.
- Visual Fun: Play with your food coloring! Try pastel green for a subtle hint or even a mint-pink combination for a playful look.
Step-by-Step: How I Make Mint Chocolate Checkerboard Cookies Recipe

Step 1: Preparing the Dough Bases
First, whisk together your dry ingredients—flour, baking powder, and salt—and set aside. Then, in my stand mixer fitted with a paddle, I beat softened butter and sugar until it’s fluffy and pale, about 3 minutes. This step is crucial as it creates the perfect texture for the cookies. Adding in the eggs and vanilla, I make sure everything is combined before gradually mixing in the dry ingredients on low speed until it forms a thick, sticky dough. It smells amazing already!
Step 2: Splitting and Flavoring the Dough
Now, divide your dough into two halves—each about two cups. I put one half back in the mixer to add peppermint extract and a drop of green food dye, mixing until consistent. Then I repeat with the other half, adding cocoa powder, milk, and espresso powder for that deep chocolate flavor. If you’ve never used espresso powder before, I highly recommend it—it really makes the chocolate pop! Each dough has such distinct colors and fragrances, it's exciting to see your checkerboard coming to life.
Step 3: Shaping and Chilling the Dough
This part takes a little patience but is so worth it. I lightly flour my work surface and hands (to combat stickiness) and shape each dough half into rectangular blocks about 6 inches long by 2 inches wide and tall. Wrapping them well, then chilling in the fridge for exactly 1 hour is key. The dough needs to be firm enough to handle, but still pliable enough to bend without cracking—if chilled longer, I always let mine rest 20 minutes at room temperature before proceeding.
Step 4: Crafting the Checkerboard Pattern
Once chilled, I slice each dough block lengthwise into three equal strips, then each strip into thirds again, giving nine strips per dough. Don’t worry if your cuts aren't perfect; trimming off rounded edges helps tidy the pattern. On my work surface, I alternate mint and chocolate strips tightly together, layering them to form a checkerboard block. Pressing firmly to eliminate gaps is essential—if the dough is too cold and stiff, it won’t stick well. For the second block, I reverse the pattern to start with chocolate, for variety.
Step 5: Final Chilling and Baking
After shaping, I wrap the checkerboard blocks and chill them for at least 2 hours—up to 4 days ahead, which is a time-saver for busy schedules. When ready, slices about half an inch thick make perfect cookies. I arrange them spaced on baking sheets lined with parchment and, if I’m in the mood for a little sparkle, brush each with egg wash (extra egg white mixed with water) and sprinkle coarse sugar. Baking at 350°F for 12-14 minutes until edges are just golden is ideal—they should feel set but not too crisp. The cooling stage is important too; I leave them on the sheets for a few minutes before transferring to racks to crisp up perfectly.
Top Tip
Through many baking sessions and family feedback, I’ve gathered a few tips that really helped me master this Mint Chocolate Checkerboard Cookies Recipe and make it less stressful and more fun.
- Perfect Dough Consistency: Don’t over-chill the dough. The key is to chill long enough to reduce stickiness but keep it pliable, so the strips stick together well when forming the checkerboard.
- Sharp Knife for Clean Cuts: Use a sharp knife for cutting your strips and cookies. I clean the knife between cuts to keep edges neat and the pattern crisp.
- Trim for the Win: It’s worth trimming rounded edges from strips and blocks. It makes the checkerboard look more professional and symmetrical.
- Egg Wash Magic: Brushing a quick egg wash and adding coarse sugar before baking adds that beautiful sparkle and subtle crunch that makes these cookies extra special.
How to Serve Mint Chocolate Checkerboard Cookies Recipe

Garnishes
I personally keep it classic with no extra garnishes, but if you want to dress them up, try a light dusting of powdered sugar or even a drizzle of dark chocolate after baking. It’s subtle but elegant and pairs beautifully with the mint flavor.
Side Dishes
These cookies shine alongside a warm cup of hot cocoa or a minty tea. For holiday parties, I like serving them with peppermint bark or chocolate-dipped pretzels to keep the mint chocolate theme going strong.
Creative Ways to Present
For a special occasion, I've arranged these cookies stacked in clear glass jars layered with mint leaves or even served them on a checkerboard-patterned platter for a delightful, thematic display. For gift-giving, I wrap stacks in parchment paper tied with festive ribbon—always a hit!
Make Ahead and Storage
Storing Leftovers
I keep leftover cookies in an airtight container at room temperature, and they stay fresh and crisp for up to a week. If the texture softens a bit, just pop a cookie in the oven for a minute to crisp it back up—it really works wonders.
Freezing
I often freeze the shaped dough blocks to bake fresh cookies later; they freeze beautifully up to 3 months. Just thaw overnight in the refrigerator and slice fresh right before baking. This lets me prep ahead for busy holidays.
Reheating
To reheat, I gently warm the cookies in a 300°F oven for 3-5 minutes. This refreshes the crunch and flavor like they just came out of the oven, but be careful not to overbake.
Frequently Asked Questions:
Absolutely! The coloring is optional and does not affect the flavor. Your checkerboard will still be delicious—just less vibrant visually.
Using a sharp knife and trimming rounded edges improves the crisp checkerboard look. Also, making sure the dough isn’t too cold or crumbly helps the strips stick tightly without cracking. Chill just until dough is firm but still pliable.
Yes, baked Mint Chocolate Checkerboard Cookies freeze well for up to 3 months. Store them airtight and thaw overnight in the fridge before serving for the best texture and flavor.
Espresso powder enhances the chocolate flavor without adding a coffee taste, deepening richness and making the chocolate more pronounced.
Final Thoughts
This Mint Chocolate Checkerboard Cookies Recipe has become one of my go-to festive treats because it’s as much a joy to bake as it is to savor. The way the mint and chocolate play off each other, combined with the satisfying checkerboard’s look, makes it a showstopper every time. I hope you enjoy making them as much as I do—and remember, don’t stress about perfection, the fun is in the process and sharing them with people you love!
Print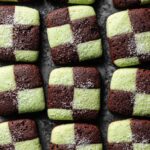
Mint Chocolate Checkerboard Cookies Recipe
- Prep Time: 4 hours 45 minutes
- Cook Time: 13 minutes
- Total Time: 5 hours
- Yield: 24 cookies
- Category: Dessert
- Method: Baking
- Cuisine: American
Description
Mint Chocolate Checkerboard Cookies are a visually stunning and delicious treat featuring alternating layers of mint and chocolate-flavored doughs. These soft, buttery cookies combine the refreshing flavor of peppermint with rich cocoa, arranged in a classic checkerboard pattern that's perfect for holidays or special occasions.
Ingredients
Base Cookie Dough
- 2 and ½ cups (313g) all-purpose flour (spooned & leveled)
- ½ teaspoon baking powder
- ½ teaspoon salt
- 1 cup (16 Tbsp; 226g) unsalted butter, softened to room temperature
- 1 cup (200g) granulated sugar
- 1 large egg + 1 egg yolk, at room temperature*
- 1 and ½ teaspoons pure vanilla extract
- Optional for topping: 1 Tablespoon (15ml) water and ¼ cup (50g) coarse sugar
Mint Dough
- 1 teaspoon peppermint extract
- Optional: 1 drop green food dye
Chocolate Dough
- 2 Tablespoons (10g) unsweetened natural or dutch-process cocoa powder
- 1 Tablespoon (15ml) milk
- Optional: 1 teaspoon espresso powder
Instructions
- Make the dry mix: In a medium bowl, whisk together the flour, baking powder, and salt. Set aside.
- Cream butter and sugar: In a large bowl using a hand or stand mixer with paddle attachment, beat butter and granulated sugar on medium-high speed until creamy, about 3 minutes. Add egg, egg yolk, and vanilla extract; beat on high until combined about 1 minute. Scrape bowl as needed.
- Combine dough: Add dry ingredients to wet ingredients and mix on low speed until combined into a thick sticky dough. Remove from bowl.
- Divide dough: Split dough in half, each about 2 cups.
- Prepare mint dough: Place half dough back in bowl, add peppermint extract and optional green food dye, and mix on low until uniform. Remove from bowl.
- Prepare chocolate dough: Place other half dough in bowl, add cocoa powder, milk, and optional espresso powder; mix on low until combined.
- Shape and chill dough: On floured surface, form each dough half into 6-inch long, 2-inch wide, 2-inch tall rectangles. Wrap tightly and refrigerate for 1 hour to firm but remain pliable.
- Cut strips: Remove dough from fridge, unwrap, and slice each rectangle lengthwise into 3 even strips, then cut each strip into thirds to make 9 strips per dough. Trim rounded edges for neatness.
- Assemble checkerboard blocks: Lay strips alternating mint and chocolate on work surface tightly to form checkerboard pattern. Repeat with second block starting with opposite color. Trim edges if needed for neat blocks.
- Chill checkerboards: Wrap blocks and refrigerate for 2 more hours up to 4 days.
- Preheat oven: Set oven to 350°F (177°C) and line baking sheets with parchment paper or silicone mats.
- Slice and bake cookies: Cut each block into 12 slices about ½-inch thick for thicker cookies or 18 slices for thinner (⅓ inch). Arrange on baking sheets spaced 2-3 inches apart. Optionally brush with egg wash (egg white mixed with water) and sprinkle coarse sugar. Bake for 12-14 minutes until edges lightly browned.
- Cool: Let cookies cool on sheets for 5 minutes then transfer to wire rack to cool completely.
- Store: Cookies keep fresh covered at room temperature for 1 week.
Notes
- Make Ahead: Cookies freeze well baked for up to 3 months; thaw overnight in fridge and bring to room temperature before serving. Dough blocks can be chilled for up to 4 days or frozen up to 3 months.
- Egg Wash: Use egg white mixed with 1 tablespoon water to brush cookies before baking for shine and a crunchy sugar top.
- Trimming Dough: Trimming edges at cutting steps improves the checkerboard appearance. Scraps can be recombined and shaped into extra cookies.
- Use leaf green gel food coloring for best mint hue and minimal dough alteration.
- Espresso powder in chocolate dough enhances cocoa flavor but is optional.
Nutrition
- Serving Size: 1 cookie
- Calories: 150 kcal
- Sugar: 12 g
- Sodium: 70 mg
- Fat: 8 g
- Saturated Fat: 5 g
- Unsaturated Fat: 3 g
- Trans Fat: 0 g
- Carbohydrates: 18 g
- Fiber: 1 g
- Protein: 2 g
- Cholesterol: 30 mg


Leave a Reply