Nothing beats the sweet and salty explosion of flavor in my Kitchen Sink Cookies Recipe. These cookies are seriously the snack equivalent of a surprise party in your mouth—loaded with everything you love, from chocolate chips to crunchy pretzels and potato chips. They’re a fun twist on everyday cookies that never fail to impress at gatherings or after-school treats.

Jump to:
Why You'll Love This Recipe
Honestly, I can't get enough of this kitchen sink cookie combo. It’s the kind of recipe that makes you feel like a genius for throwing in all those random goodies from your pantry. Plus, every bite offers a little surprise, which keeps things exciting and satisfying.
- Loaded with variety: The mix of chips, pretzels, toffee, and sprinkles creates irresistible sweet and salty layers.
- Perfect texture: Crunchy bits and soft cookie dough collide for a delightful sensory experience.
- Easy to customize: You can switch up mix-ins any way you want to fit your pantry or mood.
- Fun to make and share: These cookies are always a hit, sparking conversation and smiles around the table.
Ingredients & Why They Work
The magic behind this Kitchen Sink Cookies Recipe is really in the ingredients. A well-balanced dough with some cornstarch for softness pairs perfectly with salty crunch and sweet pockets of candy and toffee. Plus, the holiday jimmies add that festive pop without melting into a mess.
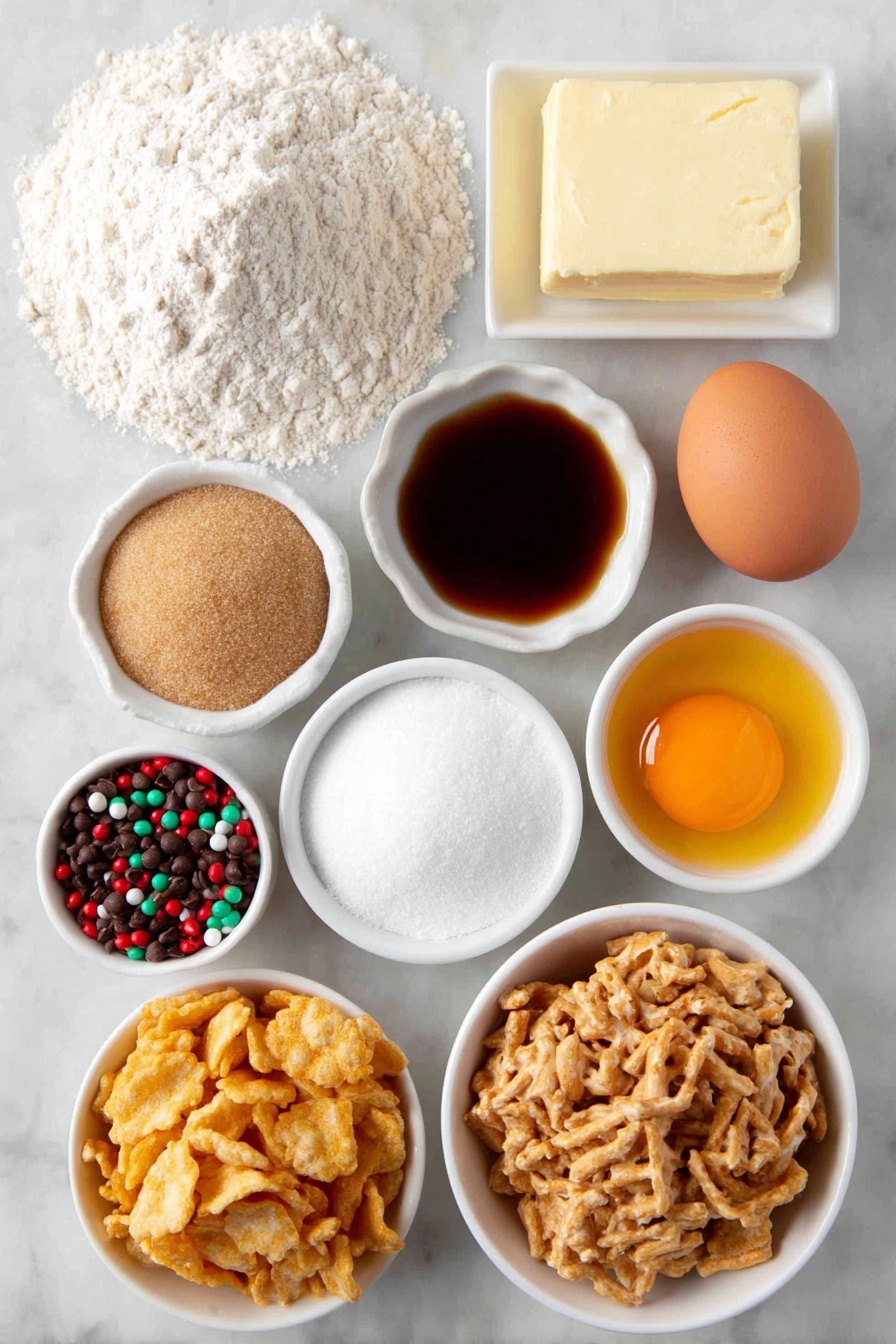
- All-purpose flour: Provides the perfect structure for chewy yet sturdy cookies.
- Baking soda: Gives the cookies lift and that classic cookie crumb.
- Cornstarch: A secret weapon to keep them soft and thick rather than spreading too thin.
- Salt: Balances the sweetness and enhances flavor depth.
- Unsalted butter: Room temperature butter helps with creaminess and texture; too warm and cookies spread too much!
- Light brown sugar: Adds moisture and a hint of caramel flavor that’s so comforting.
- Granulated sugar: Helps with that crisp edge and a touch of extra sweetness.
- Egg and egg yolk: The combo ensures rich flavor and chewy texture.
- Vanilla extract: Elevates all the other flavors with warmth and sweetness.
- Semi-sweet chocolate chips: Classic melt-in-your-mouth goodness.
- Toffee bits: Sweet and buttery crunch that's a wonderful contrast.
- Potato chips: The salty crunch is the cookie’s surprise element.
- Chopped pretzels: Adds that irresistible salty twist and crunch.
- Holiday jimmies: These sprinkles bring festive color without melting away.
Make It Your Way
I love mixing up this Kitchen Sink Cookies Recipe depending on the season or what’s lurking in my pantry. It’s like a blank canvas, encouraging you to have fun and make it your own.
- Variation: One winter, I swapped in crushed peppermint candy for the toffee bits, and it was an instant holiday hit with a refreshing twist.
- Dietary tweak: Want to go gluten-free? I’ve successfully used a gluten-free all-purpose blend with great results.
- Seasonal changes: In summer, fresh chopped dried cherries and white chocolate chips add a splash of bright flavor.
- Kids’ favorites: M&Ms mixed with mini marshmallows turn these into a fun, colorful party cookie.
Step-by-Step: How I Make Kitchen Sink Cookies Recipe

Step 1: Gather and Whisk Your Dry Ingredients
I like to start by whisking together the flour, baking soda, cornstarch, and salt in a medium bowl. Whisking really helps distribute the leavening evenly – plus, it's a quick step that saves time later. Keeping the powdery stuff lump-free makes for cookies that rise just right.
Step 2: Cream Butter and Sugars Until Fluffy
Using a stand or hand mixer with the paddle attachment, I beat the butter with both brown and granulated sugar for about 2-3 minutes until the mixture is light and creamy. This step is a must; it incorporates air into the dough, leading to tender, soft cookies. Don’t rush it—patience pays off here.
Step 3: Add Eggs and Vanilla
Next, I add the whole egg, egg yolk, and vanilla extract, beating them in well. This builds flavor and ensures the dough has the right moisture and richness. Scraping down the bowl sides makes sure everything blends beautifully.
Step 4: Combine Dry Ingredients Gently
With the mixer on low speed, I slowly add the dry ingredient mix to the wet ingredients until just combined. Overmixing here can make cookies tough, so I stop as soon as the clumps disappear.
Step 5: Fold in the Mix-Ins
Now comes the fun part—I stir in chocolate chips, toffee bits, crushed potato chips, chopped pretzels, and festive holiday jimmies with a rubber spatula. This step is all about evenly distributing those tasty surprises without breaking them up too much.
Step 6: Scoop and Shape for Perfect Cookies
I use a large cookie scoop or about a scant ¼ cup of dough and roll each ball into a tall oval shape rather than a round ball—this keeps the cookie thick and chewy. Set them on parchment-lined baking sheets, leaving enough space for spreading.
Step 7: Bake and Finish with a Swirl
Bake at 350°F for 10-12 minutes until edges are just golden and tops set but still soft. Right out of the oven, I gently swirl the rim of a large glass around each cookie to form a neat circle and press some extra mix-ins on top. It’s a simple trick that adds a gorgeous, professional touch.
Step 8: Cool and Enjoy
After about 5 minutes on the baking sheet, transfer the cookies to a wire rack to cool completely. Resist the urge to eat them warm—they’re good, but when cooled, all the flavors really come together and the texture sets perfectly.
Top Tip
After making this Kitchen Sink Cookies Recipe many times, I’ve picked up a few tips that really help you nail the perfect balance of flavor and texture every time.
- Butter Temperature: Make sure your butter is truly room temp—not melty! I usually leave it out for about 30-60 minutes. This controls spreading perfectly.
- Mix-ins Matter: Use holiday jimmies (the long sprinkles) rather than nonpareils so colors don’t bleed into your dough during baking.
- Shaping Trick: Rolling the dough into tall ovals keeps cookies chewy and thick instead of flat and crispy.
- Baking Time: Don’t overbake! Pull them out when edges are golden but centers look just set; they’ll finish baking as they cool.
How to Serve Kitchen Sink Cookies Recipe

Garnishes
I usually add a few extra mix-ins—especially colorful holiday jimmies or a sprinkle of toffee bits—on top of each cookie right after baking. It makes them look festive, plus adds a little crunch at first bite. Sometimes I even dust a tiny pinch of flaky sea salt for that extra salty-sweet pop.
Side Dishes
These cookies are perfect on their own, but I like serving them alongside a tall glass of cold milk (classic combo) or a hot cup of coffee or chai tea for a cozy afternoon treat. At holiday parties, they pair beautifully with a platter of fresh fruit or cheese to balance the sweetness.
Creative Ways to Present
For special occasions, I arrange these Kitchen Sink Cookies Recipe cookies in a festive tin with parchment in between layers, or stack them in a decorative jar with a big ribbon on top. Another fun tip is to serve them warm with a scoop of vanilla ice cream for an irresistible dessert.
Make Ahead and Storage
Storing Leftovers
Once cooled, I keep these cookies in an airtight container at room temperature. They stay fresh and chewy for up to 5 days, though honestly, they rarely last that long! I also add a slice of bread to the container to help maintain moisture—trust me, it’s a game changer.
Freezing
I often freeze these cookies because they’re so easy to make ahead. You can freeze baked cookies in an airtight container for up to 2 months. For dough, I scoop and freeze the balls on a baking sheet, then transfer them into a freezer bag for up to 3 months. When ready, just bake straight from frozen adding a minute or two to the bake time.
Reheating
To enjoy leftover cookies warm, I pop them in the microwave for about 10 seconds or oven at 325°F for 3-4 minutes. This resets the texture and melts the chocolate just right, making them taste freshly baked again.
Frequently Asked Questions:
You can, but I recommend reducing or omitting added salt in the recipe to prevent the cookies from becoming too salty. Unsalted butter gives you better control over the final seasoning.
Cornstarch helps keep the cookies soft and thick by tenderizing the dough. It prevents them from spreading too much during baking, resulting in a chewier texture that’s just perfect.
Absolutely! One of the best things about the Kitchen Sink Cookies Recipe is how versatile it is. Feel free to swap in your favorite chips, nuts, candies, or even dried fruit. Just be mindful of quantities to keep the dough balanced.
Make sure your butter is properly softened—not melted—and handle the dough gently without overmixing. Chilling the dough for 15-30 minutes before baking can also help control spreading if you want thicker cookies.
Final Thoughts
In my kitchen, the Kitchen Sink Cookies Recipe has become a go-to for anytime I want a cookie that feels special, fun, and effortlessly impressive. They remind me that sometimes, the best recipes come from simply combining all the good stuff with a little love. I hope you enjoy baking and sharing them as much as I do—it’s a guaranteed crowd-pleaser that never disappoints.
Print
Kitchen Sink Cookies Recipe
- Prep Time: 15 minutes
- Cook Time: 12 minutes
- Total Time: 27 minutes
- Yield: 16 servings
- Category: Dessert
- Method: Baking
- Cuisine: American
Description
Kitchen Sink Cookies are a delightful and indulgent treat packed with a variety of mix-ins including chocolate chips, toffee bits, potato chips, pretzels, and festive holiday jimmies. These cookies boast a perfect balance of sweet, salty, and crunchy textures, baked to golden perfection with a soft and chewy center. Ideal for holiday celebrations or anytime you crave a fun, flavor-packed cookie.
Ingredients
Dry Ingredients
- 2 ¼ cups 270g all-purpose flour
- 1 teaspoon baking soda
- 1 Tablespoon 8g cornstarch
- ½ teaspoon salt
Wet Ingredients
- ¾ cup 170g unsalted butter, room temperature
- ¾ cup 150g light brown sugar, packed
- ¼ cup 50g granulated sugar
- 1 egg, room temperature
- 1 egg yolk, room temperature
- 1 teaspoon vanilla extract
Mix-ins
- ½ cup semi-sweet chocolate chips (chopped chocolate or white chocolate chips work too)
- ½ cup toffee bits or red & green M&Ms
- ¾ cup crushed potato chips
- ½ cup chopped pretzels
- ¼ cup holiday jimmies (not nonpareils)
Instructions
- Preheat oven: Preheat the oven to 350°F and line baking sheets with parchment paper to prepare for baking.
- Whisk dry ingredients: In a medium bowl, whisk together the all-purpose flour, baking soda, cornstarch, and salt until fully combined.
- Cream butter and sugars: In a large bowl, using a handheld or stand mixer fitted with a paddle attachment, beat the room temperature unsalted butter, light brown sugar, and granulated sugar until the mixture is light and creamy, about 2-3 minutes.
- Add wet ingredients: Add the egg, egg yolk, and vanilla extract to the creamed butter and sugars, then beat for another 1-2 minutes until the mixture is light and fluffy, scraping down the bowl as needed.
- Combine dry and wet ingredients: With the mixer on low speed, slowly add the whisked dry ingredients to the wet mixture and mix until just combined. Do not overmix.
- Incorporate mix-ins: Using a rubber spatula, fold in the semi-sweet chocolate chips, toffee bits (or red & green M&Ms), crushed potato chips, chopped pretzels, and holiday jimmies until evenly distributed throughout the dough.
- Scoop and shape dough: Use a large cookie scoop (or a scant ¼ cup measure) to scoop dough onto baking sheets lined with parchment paper. Roll each dough ball into a tall oval shape to yield thicker cookies.
- Bake cookies: Bake in the preheated oven for 10-12 minutes, until the edges are slightly golden and the tops are just set but soft.
- Finish and cool: Immediately after removing from the oven, gently swirl the rim of a large glass around the outside edge of each warm cookie to create a perfect circle shape and press additional topping pieces on top if desired. Let cookies sit on the baking sheet for 5 minutes, then transfer to a wire rack to cool completely.
Notes
- Room temperature butter is critical; it should be cool to the touch around 69°F, left out for 30-60 minutes to prevent excess spreading during baking.
- Use holiday jimmies sprinkles as they don’t melt or bleed into the dough, maintaining a festive look and texture.
- Other mix-ins like white chocolate chips, red and green M&Ms, chocolate chunks, salted peanuts, or crushed peppermint can be used for variety.
- Dough can be made ahead and refrigerated covered for up to 2 days; the crunchiness of chips may reduce slightly.
- Store baked cookies in an airtight container for up to 5 days or freeze for up to 2 months; thaw uncovered before serving.
- Cookie dough balls can be frozen for up to 3 months; bake frozen dough by adding 1-2 extra minutes to the baking time.
Nutrition
- Serving Size: 1 cookie
- Calories: 220 kcal
- Sugar: 18 g
- Sodium: 150 mg
- Fat: 11 g
- Saturated Fat: 6 g
- Unsaturated Fat: 4 g
- Trans Fat: 0 g
- Carbohydrates: 28 g
- Fiber: 1 g
- Protein: 2 g
- Cholesterol: 40 mg


Leave a Reply