There’s something truly magical about those delicate, airy bites that melt in your mouth—my Festive Peppermint Meringue Cookies Recipe delivers exactly that, with a refreshing peppermint twist that screams holiday spirit. These cookies look stunning, taste like a cloud, and fill your kitchen with the most inviting aroma.

Jump to:
- Why You'll Love This Recipe
- Ingredients & Why They Work
- Make It Your Way
- Step-by-Step: How I Make Festive Peppermint Meringue Cookies Recipe
- Top Tip
- How to Serve Festive Peppermint Meringue Cookies Recipe
- Make Ahead and Storage
- Frequently Asked Questions:
- Final Thoughts
- Festive Peppermint Meringue Cookies Recipe
Why You'll Love This Recipe
Honestly, these peppermint meringues have become a holiday staple in my kitchen. I love how they bring a pop of color, a crisp texture, and that unmistakable minty freshness that complements so many festive treats. Plus, they're surprisingly simple once you get the hang of it!
- Light and Airy Texture: The cookies literally melt in your mouth, perfect for anyone who loves a delicate sweet bite.
- Easy to Customize: You can pipe them in festive shapes and colors to match any holiday vibe.
- Long Lasting Crunch: When stored right, these stay crisp for up to a week, making them great for gifting.
- Minty Fresh Flavor: Peppermint extract adds that cool holiday kick without overpowering the sweetness.

Ingredients & Why They Work
All the ingredients here work harmoniously to create the perfect meringue. Using room-temperature egg whites makes it easier to whip air into them, and caster sugar dissolves smoothly to keep that shiny, glossy finish on your cookies.

- Egg whites: Essential for that fluffy meringue base—make sure they're room temperature for the best volume.
- White vinegar: Helps stabilize the egg whites so your meringue holds its shape beautifully.
- Cornstarch: Adds a tender texture and helps absorb moisture during baking for crisp cookies.
- Caster sugar: Finer than regular sugar, it dissolves quickly, ensuring a smooth meringue without grit.
- Peppermint extract: The star flavor that gives these cookies their festive peppermint kiss.
- Gel food coloring: For adding those classic Christmas red and green swirls that look as good as they taste.
Make It Your Way
I always encourage tweaking this recipe to make it yours. Whether it’s adjusting peppermint levels to suit your taste buds, or playing with color patterns—in my kitchen, experimentation is half the fun!
- Variation: I once added a dash of vanilla alongside peppermint to soften the minty punch, and the result was a lovely, rounded flavor that my family adored.
- Dietary tweak: For friends who avoid artificial colors, I've used natural beet juice or spinach powder to create red and green hues—still festive, just cleaner.
- Sweetness level: If you prefer a less-sweet cookie, try reducing caster sugar by a tablespoon or two—just be careful not to lose that glossy, stiff peak finish.
Step-by-Step: How I Make Festive Peppermint Meringue Cookies Recipe
Step 1: Whip the Egg Whites to Fluffy Perfection
Start by beating your room-temperature egg whites on high speed until they’re foamy—about 30 seconds. This first foamy stage is your indicator to add the white vinegar and cornstarch, which will stabilize and soften the meringue’s texture. Keep whipping until you see soft peaks form, roughly another minute.
Step 2: Slowly Sweeten and Add the Peppermint
This step requires patience! Gradually pour in the caster sugar in a thin, steady stream while continuing to beat. This slow addition ensures the sugar fully dissolves, preventing gritty meringue. Once all the sugar is in, add your peppermint extract and keep beating for about 4 minutes until stiff, glossy peaks form. Your meringue should be thick enough to hold its shape when you lift the beaters.
Step 3: Color and Pipe Your Festive Meringue
Using a clean pastry bag with a star tip, draw thin lines inside with red gel food coloring—this creates those pretty swirls when you pipe. Fill the bag halfway with the meringue mixture and pipe one-inch stars onto parchment-lined baking sheets. Repeat this with the other half of the meringue, adding green gel food coloring for a complementary color batch. This step lets you get festive and creative!
Step 4: Low and Slow Baking for Crisp Perfection
Bake your piped cookies in a 200°F (about 93°C) oven for around 80 minutes. Don’t rush this—then turn the oven off but leave the cookies inside for 4 hours or overnight. This slow drying is the key to their crisp texture without browning or burning. Patience here really pays off!
Step 5: Storing Your Festive Peppermint Meringue Cookies
Once cooled, store your meringues in an airtight container to keep them crisp. They last well for up to a week but honestly, they’re at their best the day you bake them—light, crunchy, and festive fresh.
Top Tip
Over the years, I’ve learned a few secrets in making perfect meringue cookies every time—these simple tips will save you lots of frustration and guarantee stellar results.
- Egg White Separation: Be extra cautious when separating the whites from yolks—any fat from yolks will prevent stiff peaks.
- Sugar Timing: Don’t add sugar too soon; wait until the whites are foamy, so the meringue can properly fluff up.
- Oven Temperature: Check your oven with a thermometer since too-hot ovens can brown the meringues instead of drying them.
- Piping Color Trick: Draw the lines inside the piping bag with gel food coloring before filling—that swirl makes your cookies look shop-bought!
How to Serve Festive Peppermint Meringue Cookies Recipe

Garnishes
I like to sprinkle a tiny pinch of crushed candy canes on some cookies before baking for added crunch and vibrant specks. It adds texture and amps up that peppermint vibe. A light dusting of powdered sugar can also make them look beautifully frosted if you’re aiming for an elegant presentation.
Side Dishes
These cookies pair wonderfully with hot chocolate, peppermint mocha, or a warm cup of tea. At holiday parties, I set them alongside a cheese board or spiced nuts so guests can balance the sweet with savory bites.
Creative Ways to Present
I’ve had great fun arranging these meringues in clear glass jars with festive ribbons as gifts. For parties, I like to stack them on tiered dessert stands mixed with colorful candies and sprigs of rosemary or holly for that gorgeous holiday table look.
Make Ahead and Storage
Storing Leftovers
Store your leftover meringues in an airtight container at room temperature—try to keep humidity out, as moisture is the enemy of crispiness. I usually keep them on the counter for up to a week and refresh the container’s seal each day.
Freezing
Though not absolutely necessary, I’ve frozen these meringues wrapped well in plastic wrap and stored in airtight bags, which preserves their texture and flavor nicely for up to a month. Just thaw at room temp before serving.
Reheating
If your meringues lose crispness, pop them briefly in a low oven (about 200°F) for 5-10 minutes to help re-crisp without melting. Keep a close eye so they don’t brown or burn.
Frequently Asked Questions:
Caster sugar is finer than regular granulated sugar, which helps it dissolve more smoothly into the meringue. If you don't have caster sugar, you can pulse regular white sugar in a food processor for a few seconds to achieve a similar fine texture, but do not substitute with powdered sugar as it changes the texture dramatically.
Stiff peaks mean when you lift the beaters out of the meringue, the peaks stand up straight without drooping. The mixture should look shiny and hold its shape firmly. This is crucial for your cookies to pipe nicely and bake with the right structure.
Yes! Lightly folding in or sprinkling crushed candy canes on top before baking adds that fun crunch and extra peppermint flavor. Just be careful not to add too much, as it can affect the texture of your cookies.
Leaving the cookies to dry in the turned-off oven for several hours helps them dry out gently without browning or burning. This low, prolonged drying is what gives meringue cookies their characteristic crisp and airy texture.
Final Thoughts
Making these Festive Peppermint Meringue Cookies Recipe has become one of my favorite holiday traditions. They’re light, fun to make (with a bit of focus on technique), and bring that perfect peppermint cheer to the room. I’m betting once you try them, you’ll find they’re the star of your cookie platter too—give them a go, and enjoy every sweet, crisp bite!
Print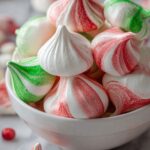
Festive Peppermint Meringue Cookies Recipe
- Prep Time: 15 minutes
- Cook Time: 1 hour 20 minutes
- Total Time: 5 hours 35 minutes
- Yield: 60 cookies
- Category: Dessert
- Method: Baking
- Cuisine: American
- Diet: Gluten Free
Description
These Christmas Meringue Cookies are light, airy, and infused with a refreshing peppermint flavor. Perfectly crisp on the outside and melt-in-your-mouth soft inside, they are decorated with festive red and green coloring, making them an ideal treat to brighten your holiday celebrations. Low in fat and gluten free, these cookies offer a sweet crunch without heaviness, baked low and slow to achieve the perfect texture.
Ingredients
Meringue Base
- 4 egg whites room temperature
- 1 tablespoon white vinegar
- 1 tablespoon cornstarch
- 1 cup caster sugar
- ¾ teaspoon peppermint extract
Decoration
- Red gel food coloring
- Green gel food coloring
Instructions
- Prepare Egg Whites: Beat the egg whites on high speed until foamy, approximately 30 seconds, ensuring a light and airy starting texture.
- Add Stabilizers: Incorporate the white vinegar and cornstarch into the foamy egg whites and beat for about one minute until soft peaks begin to form, which helps stabilize the meringue.
- Mix in Sugar and Flavor: Slowly add the caster sugar in a steady stream while continuing to beat. Then add the peppermint extract. Continue beating for about 4 minutes until stiff peaks form, creating a glossy and firm meringue.
- Prepare Piping Bags: Using a pastry bag fitted with a star tip, draw lines inside the bag with red gel food coloring. Fill this bag halfway with the meringue mixture. Repeat the process with a second bag and green gel food coloring for the remaining meringue.
- Pipe Cookies: Pipe one-inch star-shaped cookies onto parchment paper-lined baking sheets in red and green colors, creating festive shapes.
- Bake: Place the baking sheets in a preheated oven at 200 degrees Fahrenheit and bake for 80 minutes to slowly dry out the cookies rather than brown them.
- Cool and Dry: Turn off the oven and leave the cookies inside for an additional 4 hours or overnight to finish drying and firming up perfectly.
- Store: Once completely cooled, store the meringue cookies in an airtight container to maintain their crisp texture for up to one week.
Notes
- Do not add sugar too early; wait until the egg whites are foamy to maintain fluffiness.
- Be careful when separating egg yolks and whites, as any yolk can prevent stiff peaks from forming.
- Check your oven temperature to avoid overheating, which could prevent proper drying of the cookies.
- Meringue cookies are best enjoyed within a few hours of baking for optimal texture.
- If caster sugar is unavailable, pulse granulated sugar in a food processor to a finer consistency; do not substitute powdered sugar.
Nutrition
- Serving Size: 1 cookie
- Calories: 20 kcal
- Sugar: 3 g
- Sodium: 5 mg
- Fat: 0 g
- Saturated Fat: 0 g
- Unsaturated Fat: 0 g
- Trans Fat: 0 g
- Carbohydrates: 4 g
- Fiber: 0 g
- Protein: 0.5 g
- Cholesterol: 0 mg


Leave a Reply