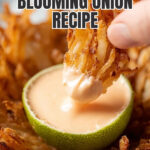
If you’ve ever been tempted by that iconic appetizer at your favorite restaurant, I’m here to show you how to make your own at home. This Crispy Blooming Onion Recipe transforms a sweet onion into a show-stopping, golden-fried flower that’s perfectly crunchy and loaded with flavor.

Jump to:
Why You'll Love This Recipe
I absolutely adore making this blooming onion because it turns a simple sweet onion into an irresistible appetizer that everyone loves to dig into. It’s crispy on the outside, tender on the inside, and perfect for sharing (or keeping all to yourself!).
- Show-Stopping Presentation: The onion is cut and opened up like a flower, making for a beautiful centerpiece that impresses every time.
- Crunchy and Flavorful: The seasoned breading packs a punch with paprika, cumin, and a subtle kick from cayenne pepper.
- Perfect for Sharing: This appetizer serves 4 and makes a fun dish to enjoy with friends or family.
- Customizable Dipping: Pair it with your favorite sauce for an extra layer of deliciousness.
Ingredients & Why They Work
Choosing the right ingredients will make or break your blooming onion. I always reach for a large sweet onion like a Vidalia — it has just the right size and natural sweetness to balance the spices and crispy coating.
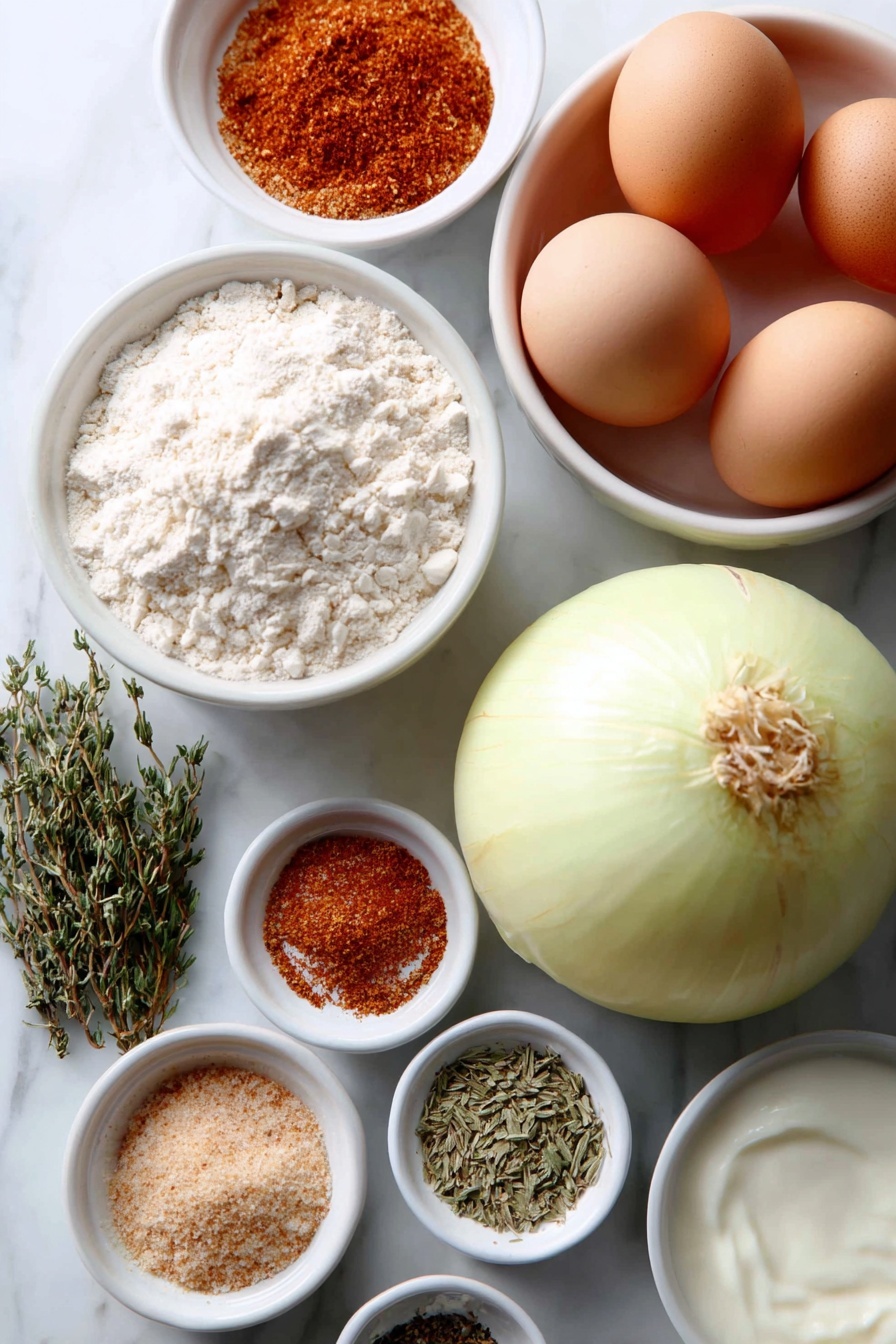
- High-heat oil: Essential for deep-frying at the right temperature without burning or smoking.
- Large sweet onion: The star of the show; its size and mild sweetness work perfectly for blooming and frying.
- All-purpose flour: Forms the base of the crispy breading when combined with spices.
- Paprika: Adds a mild, smoky flavor and vibrant color to the coating.
- Kosher salt: Used in stages to season the flour and finish the onion with balanced saltiness.
- Dried oregano: Brings a subtle herbal note that complements the spices.
- Cayenne pepper: Gives just a touch of heat for depth without overpowering.
- Ground cumin: Adds earthiness and warmth to the spice mix.
- Garlic powder: Infuses the coating with savory richness.
- Freshly ground black pepper: Provides a gentle peppery bite.
- Large eggs: Combined with milk for the egg wash, they help the breading stick and create a crispy texture.
- Buttermilk or milk: Adds moisture and a slight tang that tenderizes the onion while binding the breading.
- Dipping sauce (optional): A spicy ranch or aioli pairs beautifully but is totally up to your taste.
Make It Your Way
The beauty of this Crispy Blooming Onion Recipe is how easy it is to put your own spin on a classic favorite. Whether you like it spicy, mild, or packed with herby goodness, customizing the breading and dipping sauce can totally elevate the experience.
- Spicy Kick: I love adding an extra ½ teaspoon of cayenne pepper or a pinch of smoked paprika to the flour mix for a smoky heat that wakes up every bite.
- Herbaceous Twist: Fresh chopped parsley or thyme mixed into the flour or egg wash adds a fresh, garden-like flavor that pairs wonderfully with the sweetness of the onion.
- Dairy-Free Version: Swap out buttermilk for a plant-based milk like almond or oat milk, and use a dairy-free egg replacer to keep things vegan-friendly without sacrificing crispiness.
- Seasonal Spin: In cooler months, a dusting of ground cinnamon or nutmeg in the breading can create unexpected warmth and depth that’s perfect alongside a creamy honey mustard dip.
- Dipping Sauces: Don’t overlook the power of your sauce! Spicy ranch, chipotle aioli, or even a tangy barbecue sauce can each bring a whole new dimension to this appetizer.
Step-by-Step: How I Make Crispy Blooming Onion Recipe
Step 1: Heating the Oil Just Right
Pour 4 quarts of your chosen high-heat oil—canola, corn, or peanut—into a large stockpot. Heat it over medium-high until it reaches exactly 375ºF. This is key: too cool, and the breading soaks up oil; too hot, and the onion burns before cooking through. Make sure you have plenty of room in your pot, as the bubbling will grow when you add the onion.
Step 2: Mixing That Perfect Flour Blend
In a large bowl, whisk together 1 cup all-purpose flour, 1 tablespoon paprika, 2 ½ teaspoons kosher salt, ¾ teaspoon cayenne pepper, 1 teaspoon dried oregano, ¾ teaspoon ground cumin, ¾ teaspoon garlic powder, and ½ teaspoon freshly ground black pepper. Set aside about ¾ cup of this seasoned flour for later use—the rest will be your initial dredge to coat the onion.
Step 3: Whisking the Egg Wash for Perfect Adhesion
Whisk together 2 large eggs, ½ cup of buttermilk (or whole or 2% milk if you prefer), and the remaining ¼ teaspoon kosher salt in a medium bowl until smooth. This egg wash helps the flour stick to every petal for maximum crunch and flavor.
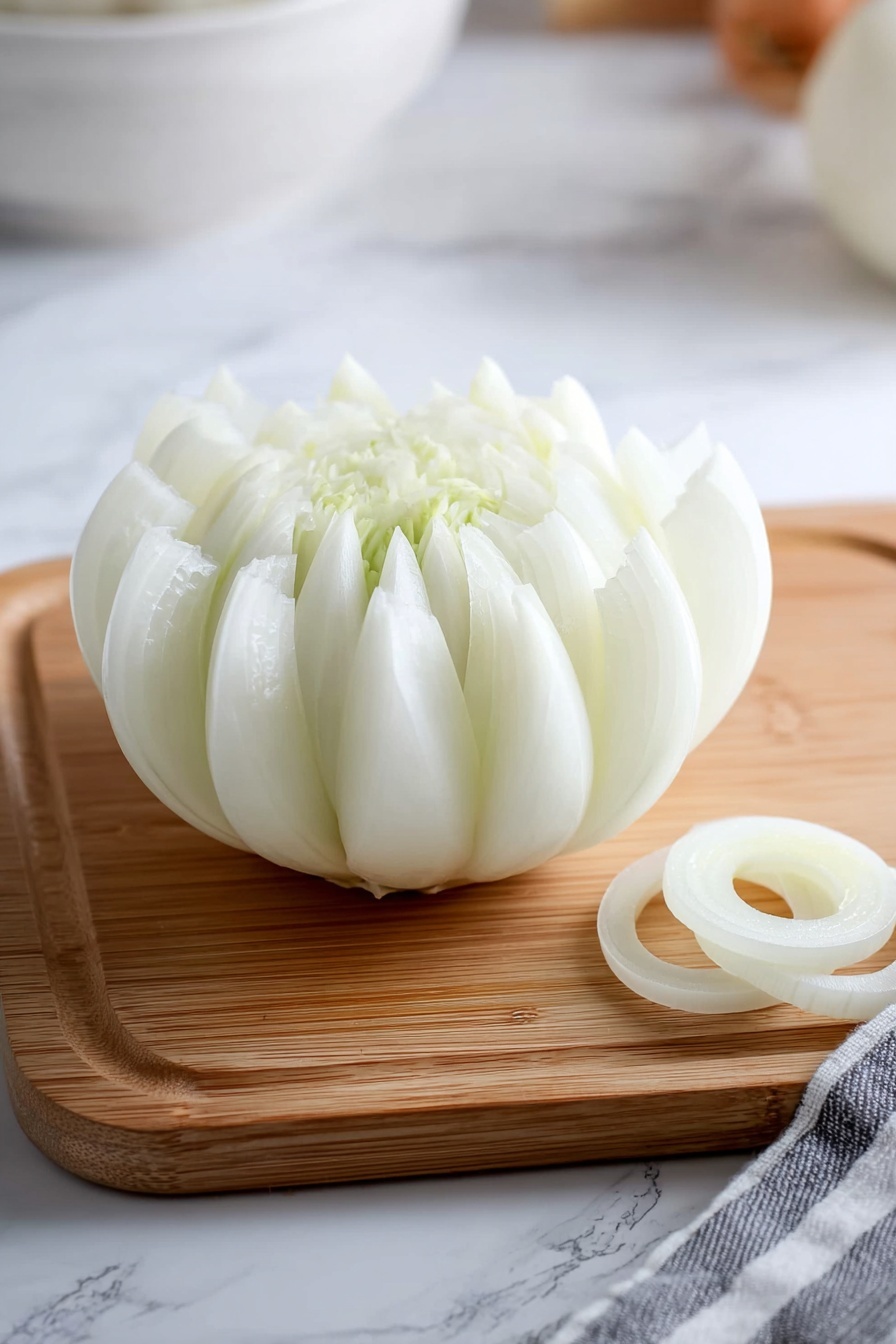
Step 4: Cutting the Onion Blossom
Carefully trim about ½ to ¾ inch off the stem end of your large sweet onion and peel off the outer skin. Place the onion root side up on your board. With a sharp knife, make your initial four cuts evenly spaced around the onion, starting about ½ inch below the root moving downward. Turn the onion a quarter turn and repeat until you have 4 cuts. Then, slice 4 more times between those cuts for 8 sections, and finally 8 more between those for a total of 16 petals—all while keeping the root intact. This root is your anchor that holds the onion together like a beautiful flower.
Step 5: Opening and Preparing the Petals
Flip the onion over and gently separate the petals to resemble a blooming flower. If any petals are stuck together, use your knife tip to carefully loosen the center sections so the breading and frying cook evenly and no raw onion is hiding inside.
Step 6: Flour First, Sprinkle Next
Place the onion cut side up into the bowl with the larger portion of your flour mixture. Sprinkle the reserved flour over the petals, spreading them open to coat every nook and cranny. Gently shake or brush off excess flour—you want enough to create a good crust but not clumps of dry flour.
Step 7: Egg Dip to Lock It In
Now carefully transfer the onion cut side down into the egg wash. Use a scooping motion to lift and spread the petals, ensuring the liquid clings to every surface. Let excess drip back into the bowl so your coating isn’t heavy and soggy.
Step 8: Flour Again for Double Crunch
Return the onion cut side up into the flour mixture a second time. This step locks in that crispy, flavorful crust we all love. Spread the petals and sprinkle the reserved flour section by section, making sure every petal is fully coated on all sides.
Step 9: Time to Fry!
Line a baking sheet with a wire rack topped with paper towels to catch the oil. Carefully lower your breaded onion cut side up into the hot oil—watch out for the bubbles! Maintain the temperature between 360ºF and 365ºF for even cooking. Fry for about 4 minutes until the bottom turns a deep golden brown, then flip and fry another 3 to 4 minutes until the whole onion is beautifully golden and tender when pierced with a knife.
Step 10: Drain, Season, and Serve
Remove the onion with a spider or slotted spoon, letting excess oil drip back into the pot. Place cut side up on the paper towels and sprinkle with the remaining ¼ teaspoon kosher salt. Let it cool about 5 minutes so the crust firms up slightly, then serve warm alongside your favorite dipping sauce for a crowd-pleasing appetizer or snack.
Top Tip
Mastering the Crispy Blooming Onion Recipe is all about patience and precision. These tips come from making this recipe several times and wanting to share what really makes a difference for that perfect golden crunch every time.
- Perfect Oil Temperature: Keep the oil steady between 360 to 365ºF. I learned that a consistent temperature prevents greasy or undercooked petals, giving you that crispy, golden-brown finish.
- Gentle Cutting Technique: Use a sharp knife and avoid sawing motions. I found that slicing cleanly and carefully keeps the onion petals intact and opens beautifully like a flower.
- Double Dredging Process: Don’t rush the two-step coating — flour, egg wash, then flour again. This layering is what seals in flavor and ensures a crunchy coating that sticks well during frying.
- Drain with Care: After frying, place the onion cut side up on a wire rack over paper towels. I’ve avoided sogginess by letting excess oil drip away, which keeps the petals crisp to the last bite.
How to Serve Crispy Blooming Onion Recipe
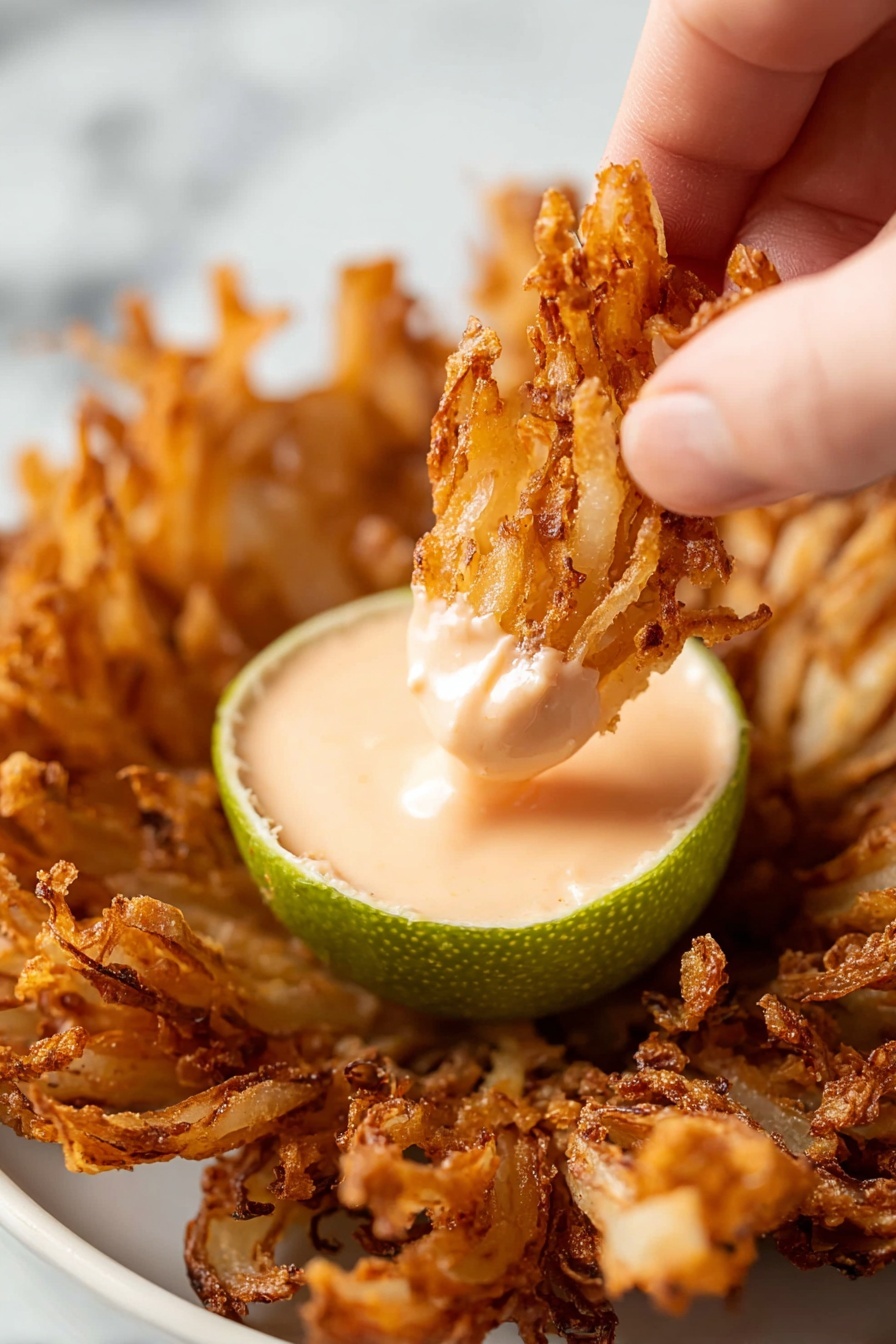
Garnishes
For an extra pop of color and flavor, sprinkle freshly chopped parsley or chives over the blooming onion right before serving. Adding a light dusting of smoked paprika can also enhance the smoky aroma. A few wedges of lemon or lime on the side add a fresh citrus zing that pairs wonderfully with the spiced breading.
Side Dishes
This crispy appetizer pairs beautifully with creamy coleslaw or a crisp green salad to balance the richness. For a heartier spread, serve alongside crispy fries or sweet potato wedges. And don’t forget a chilled glass of your favorite beer or a tangy lemonade to round out the snack or starter experience.
Make Ahead and Storage
Storing Leftovers
If you have leftovers, store the crispy blooming onion in an airtight container in the refrigerator for up to 2 days. To keep the petals from getting soggy, place a paper towel inside the container to absorb moisture.
Freezing
While best when fresh, you can freeze the onion after it’s fully cooled and fried. Wrap it tightly in plastic wrap and place it in a freezer-safe bag or container. Freeze for up to 1 month. When ready to enjoy, thaw in the refrigerator before reheating.
Reheating
To bring back that crispness, reheat the blooming onion in a preheated oven at 375ºF for 8 to 10 minutes. Avoid microwaving as it tends to make the breading soggy. Using a wire rack on a baking sheet helps hot air circulate evenly for a crunchy texture.
Frequently Asked Questions:
While a large sweet onion like Vidalia is ideal for its size and mild flavor, you can use other large onions. Just make sure they are firm and not too spicy to balance the seasoning and breading flavor.
Maintaining the oil temperature between 360 to 365ºF ensures the onion cooks quickly and evenly without absorbing too much oil, which keeps the petals crispy rather than greasy or soggy.
Baking is possible but the texture won’t be quite the same. Deep-frying is what gives the onion its signature crisp, golden crust. If baking, try using a convection oven and coat with a little oil spray to mimic crispiness.
Spicy ranch, chipotle mayo, garlic aioli, or even a cool blue cheese dressing complement the flavorful breading beautifully. Feel free to get creative and try your favorite sauce!
Final Thoughts
Making the Crispy Blooming Onion Recipe at home is a rewarding way to impress guests or treat yourself to an indulgent snack. Once you master the technique, it’s easy to customize with your favorite spices and sauces. So grab that big sweet onion, fire up your oil, and enjoy the crunchy, flavorful fun of this classic appetizer!
Print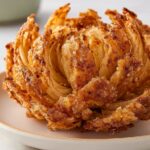
Crispy Blooming Onion Recipe
- Prep Time: 20 minutes
- Cook Time: 8 minutes
- Total Time: 28 minutes
- Yield: 4 servings
- Category: Appetizer
- Method: Frying
- Cuisine: American
Description
This classic Blooming Onion recipe features a large sweet onion cut into a flower shape, breaded in a flavorful seasoned flour mixture, then deep-fried until golden and crispy. Served with optional dipping sauce, it makes a perfect appetizer or snack for sharing.
Ingredients
Oil for Frying
- 4 quarts high-heat oil (canola, corn, or peanut)
Onion and Breading
- 1 large sweet onion (13 to 14 ounces), such as Vidalia
- 1 cup all-purpose flour
- 1 tablespoon paprika
- 3 teaspoons kosher salt, divided
- 1 teaspoon dried oregano
- ¾ teaspoon cayenne pepper
- ¾ teaspoon ground cumin
- ¾ teaspoon garlic powder
- ½ teaspoon freshly ground black pepper
Egg Wash
- 2 large eggs
- ½ cup buttermilk or whole or 2% milk
Optional
- Dipping sauce of choice
Instructions
- Heat Oil: Heat 4 quarts of high-heat oil in a large stockpot over medium-high heat until it reaches 375ºF, ensuring enough space to prevent overflow when adding the onion.
- Prepare Flour Mixture: In a large bowl, whisk together 1 cup flour, 1 tablespoon paprika, 2 ½ teaspoons kosher salt, ¾ teaspoon cayenne pepper, 1 teaspoon dried oregano, ¾ teaspoon ground cumin, ¾ teaspoon garlic powder, and ½ teaspoon black pepper. Remove about ¾ cup of this mixture and set aside for later use.
- Make Egg Wash: In a medium bowl, whisk together 2 large eggs, ½ cup buttermilk or milk, and the remaining ¼ teaspoon kosher salt until smooth.
- Cut the Onion: Trim ½ to ¾ inch from the stem end of the onion. Peel the outer skin and place the onion root-side up on the cutting board. Using a sharp knife, make 4 evenly spaced cuts from ½ inch below the root down toward the board, turning the onion a quarter turn after each cut. Make 4 more cuts between the first cuts, creating 8 sections, then 8 additional cuts between those, creating 16 sections total while keeping the root intact.
- Separate Petals: Flip the onion over and carefully separate the petals to open like a flower. Use the knife tip to release any stuck petals in the center to avoid raw onion inside.
- First Flour Dredge: Place the onion cut side up into the larger portion of the flour mixture. Sprinkle the reserved flour over the petals, spreading them to coat well. Brush off excess flour gently.
- Dip in Egg Mixture: Transfer the floured onion cut side down into the egg wash. Scoop between petals to coat completely. Let excess liquid drip back into the bowl.
- Second Flour Dredge: Return the dipped onion cut side up into the flour mixture again. Spread petals and sprinkle the reserved flour mixture section by section to ensure full coating on all sides.
- Prepare for Frying: Line a baking sheet with a wire rack and top with paper towels to drain the fried onion.
- Fry the Onion: Carefully lower the breaded onion into the hot oil cut side up. Maintain oil temperature between 360 to 365ºF. Fry 4 minutes until deep golden brown on the bottom, then flip and fry another 3 to 4 minutes until golden and knife-tender.
- Drain and Season: Remove the onion with a spider or slotted spoon, drain excess oil back into the pot. Place cut side up on paper towels and sprinkle with the remaining ¼ teaspoon kosher salt.
- Serve: Let cool for about 5 minutes and serve warm with your favorite dipping sauce if desired.
Notes
- Use a large sweet onion like Vidalia for the best flavor and size.
- Ensure your oil is at the correct temperature to avoid greasy or undercooked onion.
- Handle the onion gently when cutting to avoid breaking the petals.
- If you do not have buttermilk, whole or 2% milk works fine.
- The dipping sauce can be a spicy ranch or aioli, adding extra flavor to the blooming onion.
- Use a spider or slotted spoon to safely lower and remove the onion from hot oil.
- Do not overcrowd the pot; fry one onion at a time for even cooking.
Nutrition
- Serving Size: 1 serving
- Calories: 510 kcal
- Sugar: 7 g
- Sodium: 730 mg
- Fat: 36 g
- Saturated Fat: 7 g
- Unsaturated Fat: 27 g
- Trans Fat: 0 g
- Carbohydrates: 39 g
- Fiber: 5 g
- Protein: 8 g
- Cholesterol: 110 mg


Leave a Reply