There’s something undeniably indulgent about cracking through a crisp caramelized sugar top to reach the luscious, velvety custard beneath. This Creamy Vanilla Crème Brûlée Recipe perfectly balances rich creaminess with the warm essence of real vanilla beans—making it the ideal French dessert to impress (or simply treat yourself) at home.

Jump to:
Why You'll Love This Recipe
I’ll be honest: I love this recipe because it feels fancy but is surprisingly straightforward to make. The creamy texture combined with that satisfying crackle as you tap the brûlée top is pure joy every single time.
- Rich and Velvety Texture: The custard is baked gently in a water bath, which gives it that ultra-smooth finish without any graininess.
- Real Vanilla Bean Flavor: Using half a vanilla bean plus vanilla extract means you get layers of deep, aromatic vanilla that bottled extract alone can’t replicate.
- Perfect Caramelized Crunch: The brûlée topping crisps up beautifully under the kitchen torch, making each bite a delightful contrast of textures.
- Simple Ingredients: With basic pantry staples like cream, eggs, and sugar, this recipe is easy to pull off but feels indulgent.
Ingredients & Why They Work
When you gather your ingredients for this crème brûlée, quality really matters—especially for the cream and vanilla bean. Choose the freshest eggs you can find and real vanilla bean for that incomparable, nuanced flavor.
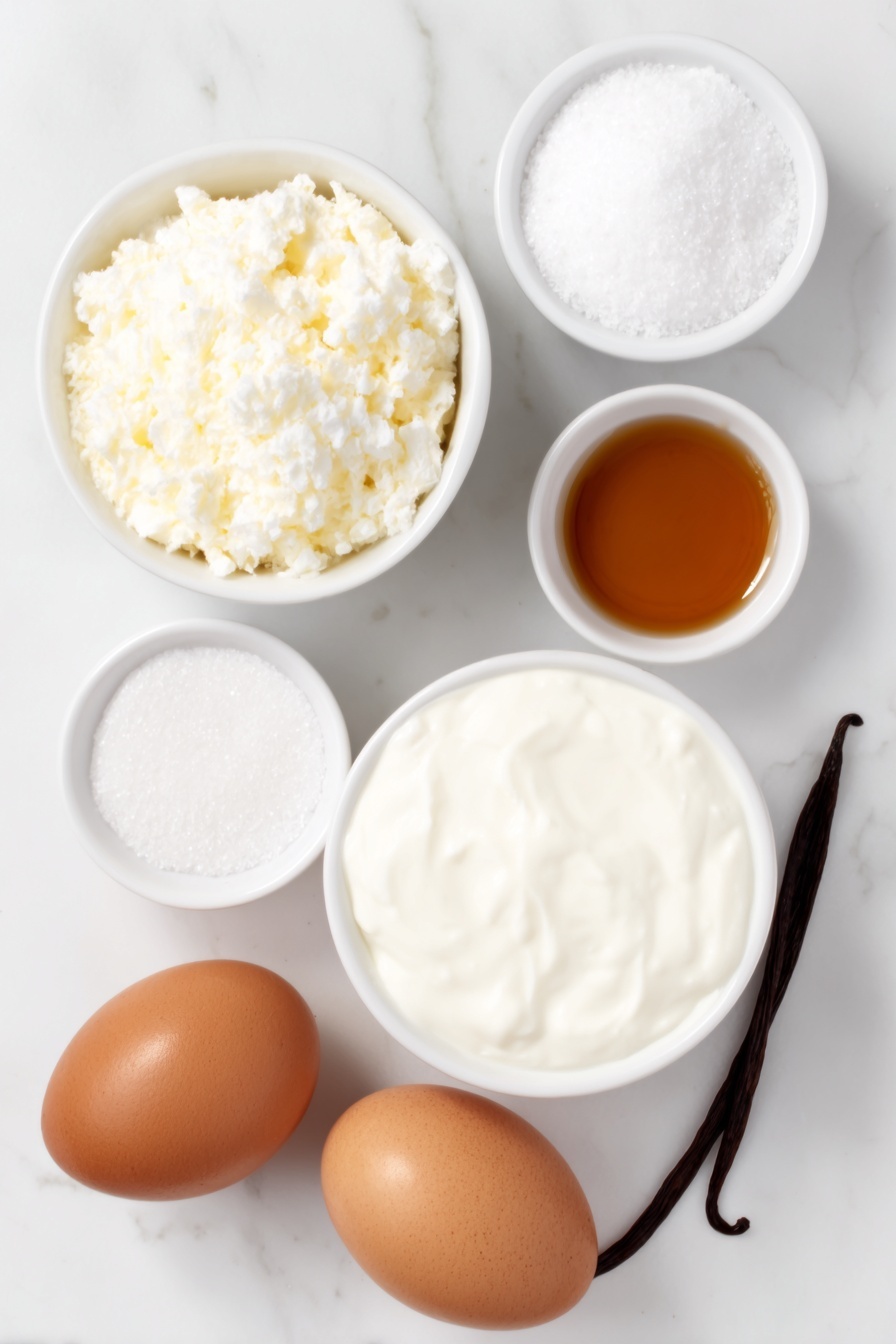
- Heavy Cream: The base of the custard, heavy cream lends a rich mouthfeel and silky smoothness that lighter creams just can’t replicate.
- Granulated Sugar: Divided in the recipe to sweeten the custard and create that iconic brûlée crust.
- Kosher Salt: Just a pinch to balance the sweetness and enhance the flavors.
- Vanilla Bean: Scraped to get those tiny black seeds that add authentic vanilla flavor and speckles to the custard.
- Eggs (1 yolk + 1 whole): Essential for curdling the custard just right to a creamy, set texture without scrambling.
- Vanilla Extract: A little boost to complement the bean, rounding out the fragrant vanilla profile.
Make It Your Way
The beauty of this Creamy Vanilla Crème Brûlée Recipe is how easily you can make it your own. Whether you like subtle twists on flavor or need to accommodate dietary preferences, there’s a variation for every palate.
- Classic Vanilla: Sticking to the original recipe, the use of real vanilla bean gives the custard a deeply aromatic richness that’s hard to beat. I love it just as much as my guests do—each spoonful is pure silky indulgence.
- Almond Delight: Replace the vanilla bean with ½ teaspoon almond extract for a nutty, fragrant twist. I’ve tried this at holiday dinners, and it’s always a crowd-pleaser that adds a cozy vibe to the dessert.
- Mocha Magic: Stir in 1 teaspoon of espresso powder or swap in coffee extract instead of vanilla for that perfect afternoon pick-me-up with your coffee or espresso.
- Mint Freshness: For a refreshing contrast, I’ve used peppermint extract sparingly (around ¼ teaspoon)—it brightens the rich custard without overpowering its classic creaminess.
- Keto-friendly Version: Swap out granulated sugar for a granular sugar substitute suitable for baking and use a low-carb sweetener in the custard to make it suitable for keto diets. Just be mindful the brûlée topping caramelization might slightly differ.
- Vegan-Adapted: While this recipe is vegetarian, a vegan adaptation requires alternative creams like coconut cream and a thickening agent such as agar or cornstarch, but it won’t have quite the same silky texture of the traditional custard.
Step-by-Step: How I Make Creamy Vanilla Crème Brûlée Recipe
Step 1: Preheat Your Oven and Prepare Vanilla Cream
Start by preheating your oven to 325°F—this moderate temperature is key to gently baking the custard without curdling. In a small saucepan, combine 2 cups heavy cream, half the sugar (about 2 ½ tablespoons), ¼ teaspoon kosher salt, and the split vanilla bean with scraped seeds. Warm the mixture just to a simmer—you'll see tiny bubbles forming at the edges—but don’t let it boil. The aroma of vanilla warming in the cream is already making my kitchen feel cozy and inviting!
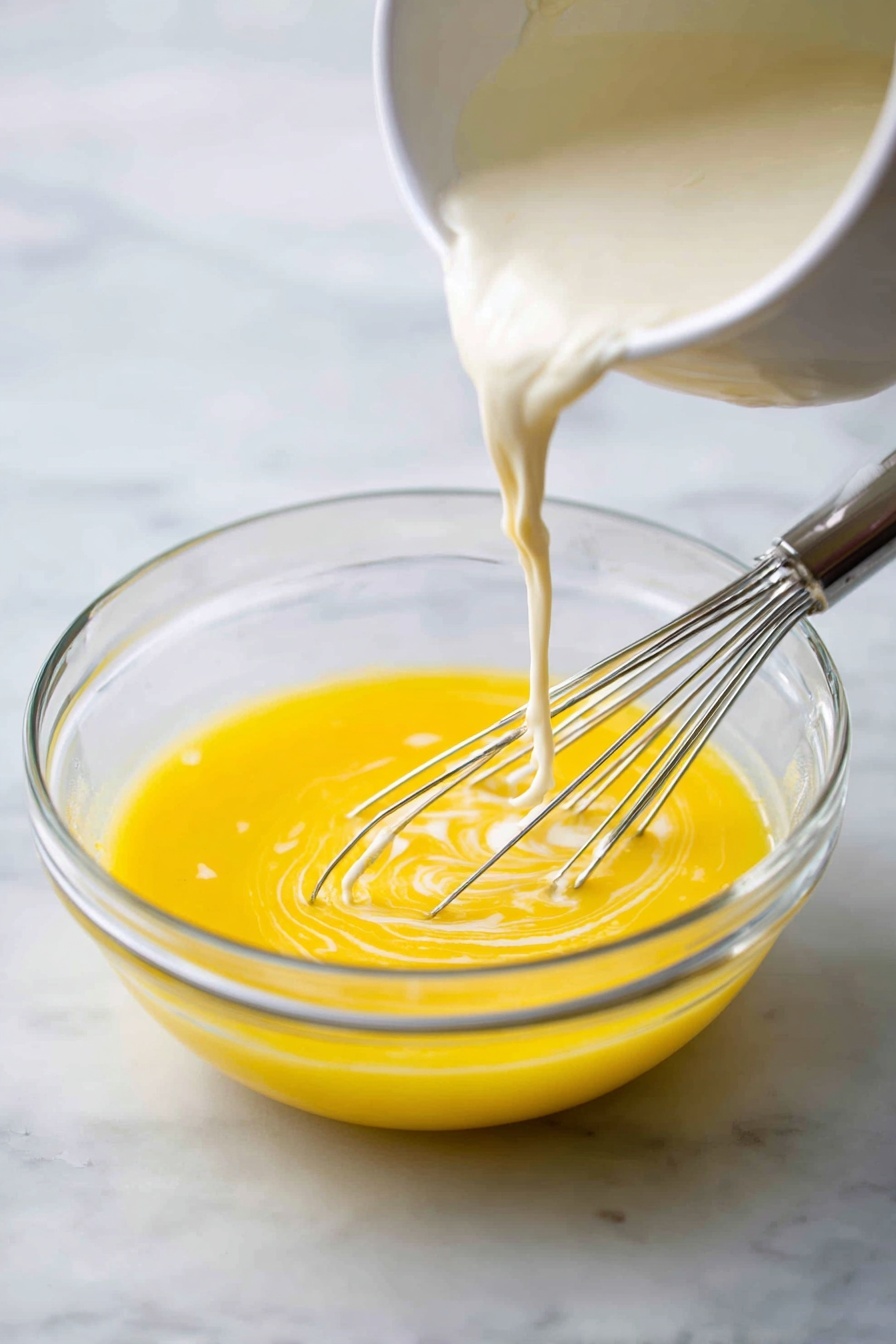
Step 2: Whisk Eggs and Sugar for a Light Base
While the cream heats, whisk together 1 large egg, 1 egg yolk, and the remaining sugar vigorously until the mixture lightens slightly in color and texture—a technique called blanchir. This creates a smooth, light base that will meld beautifully with the warm cream.
Step 3: Temper Your Eggs and Combine
Now, the trick to avoiding scrambled eggs: tempering. Slowly pour the hot cream into the egg mixture—in small increments—whisking constantly. This gradual warm-up gently brings the eggs up to temperature without cooking them. For stability, I like placing a kitchen towel under my mixing bowl so it doesn’t slip around during this step. When all the cream is incorporated, skim off any foam for a beautifully smooth custard.
Step 4: Strain, Divide, and Set Up Your Water Bath
Strain the custard to remove vanilla bean bits and residual foam. Then divide evenly among six 3-ounce ramekins—using a scale or measuring cup helps achieve uniform portions, so they bake evenly. Arrange the ramekins in a deep baking dish, cover with foil leaving a small corner open to peek inside, and carefully pour hot water halfway up the ramekin sides. This gentle water bath keeps the custard cooking evenly and smoothly.
Step 5: Bake Until Silky and Set
Bake for 25 minutes on the middle oven rack. The custards should be mostly set but still have a slight jiggle in the center—like a gentle wobble. If you like, place a small spoon on top; it should hold its weight without sinking. This part always feels a bit magical to me—the custard transforming into creamy heaven.
Step 6: Cool and Chill for Perfect Texture
Carefully remove ramekins from the water bath and let cool to room temperature. Then cover with plastic wrap and refrigerate for at least 2 hours or, if you can wait, overnight is best. The longer chilling lets the custard fully set and intensifies its luscious texture.
Step 7: Sprinkle Sugar and Torch for That Iconic Crackle
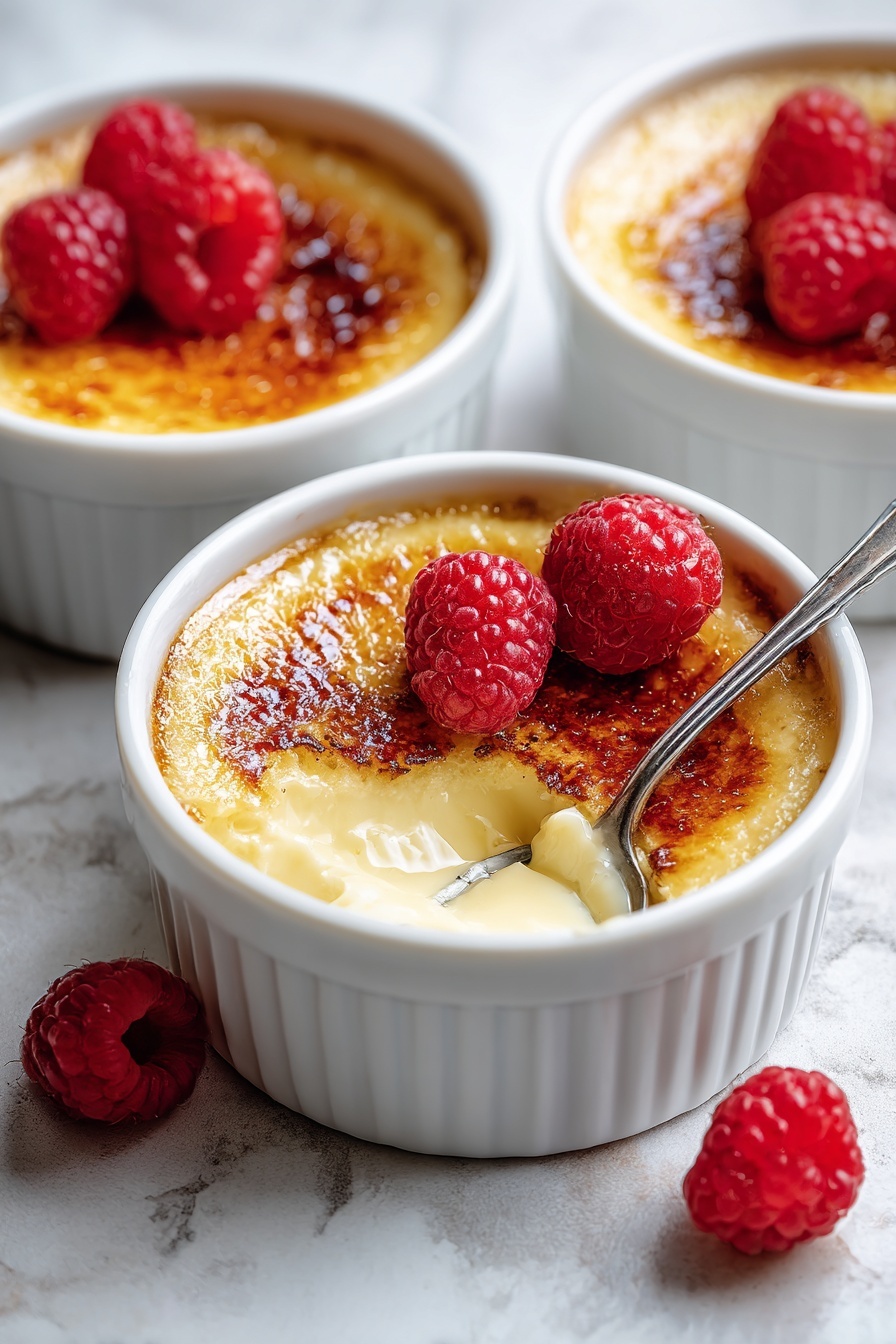
Just before serving, sprinkle about half a tablespoon of granulated sugar evenly over each custard’s surface. Using a kitchen torch, melt the sugar starting with a low flame a few inches away, gradually moving closer and increasing heat until the sugar melts into a deep amber, caramelized crust. The satisfying crackle as you tap the top is pure joy every time.
Step 8: Let the Crust Set and Serve Immediately
Allow the caramelized sugar to cool and harden for about 3 minutes. Then serve immediately to enjoy the delightful contrast of the cool, creamy custard and crisp, caramelized topping. This is where the magic happens and why this Creamy Vanilla Crème Brûlée Recipe shines as a timeless crowd-pleaser.
Top Tip
Mastering the perfect Creamy Vanilla Crème Brûlée Recipe is all about attention to detail. These tips helped me transform my dessert from good to unforgettable, and I’m sure they will for you too!
- Control the Temperature: Always preheat your oven to exactly 325°F and bake the custards in a water bath to ensure gentle, even cooking. This prevents curdling and gives you that silky texture we all crave.
- Slowly Temper the Eggs: When mixing hot cream into the eggs, add a little at a time while whisking constantly. It’s a trick I learned the hard way—rushing this step can cause scrambled eggs instead of custard.
- Perfect the Sugar Crust: Using a kitchen torch to brûlée the sugar topping just before serving is key. Start with a low flame a few inches away, then move closer to get a deep amber color without burning—it creates that satisfying crackle we love.
- Chill Properly: Don’t skip the chill time! Letting the custards rest in the fridge for at least 2 hours, but ideally overnight, firms them up perfectly and makes the brûlée topping hold beautifully.
How to Serve Creamy Vanilla Crème Brûlée Recipe
Garnishes
To elevate this classic dessert, consider adding a few fresh berries like raspberries or blackberries atop the caramelized sugar crust. A sprig of fresh mint adds a burst of color and subtle aroma. If you’re feeling decadent, a light dusting of cocoa powder or finely chopped toasted almonds brings delightful texture without overpowering the delicate vanilla custard.
Side Dishes
The richness of this creamy vanilla crème brûlée pairs beautifully with a light, refreshing side like a mixed green salad featuring citrus vinaigrette or a crisp glass of dessert wine such as Sauternes or late harvest Riesling. For a cozy finish, try serving it with shortbread cookies or a simple biscotti to complement the caramel crunch.
Make Ahead and Storage
Storing Leftovers
After cooling the custards to room temperature, cover each ramekin tightly with plastic wrap and store them in the refrigerator. These creamy beauties will keep well for up to 1 week. Just remember—wait to brûlée the sugar topping until right before serving to maintain the perfect crackle.
Freezing
Freezing crème brûlée isn’t recommended because it can compromise the silky texture of the custard. The ice crystals formed during freezing tend to break down the delicate custard structure, resulting in a grainy mouthfeel once thawed. For best results, enjoy fresh or within the 1-week refrigerated window.
Reheating
Since crème brûlée is best served cold with a freshly brûléed top, reheating isn’t necessary or recommended. If you prefer it slightly warmed, gently bring the custard to room temperature before torching the sugar, but avoid heating too much or the texture can suffer.
Frequently Asked Questions:
Absolutely! You can substitute the scraped vanilla bean with 1 teaspoon of vanilla extract. While the bean provides a more intense and complex flavor, the extract still delivers lovely vanilla notes and works well in this recipe.
No worries! You can make a dry caramel in a pot by carefully melting 1 cup of sugar over medium-high heat until it reaches a medium amber color. Then pour it gently over the cold custards to create a caramel crust. It won’t be as thin or even as a torch brûlée, but it’s a delicious alternative.
The custard is perfectly baked when it’s mostly set but still jiggles slightly in the center—similar to jello. You can also place a small spoon gently on top; it should hold its weight without the custard being liquid.
Definitely! In fact, chilling the custards for at least 2 hours or overnight improves the texture and makes caramelizing the sugar easier. Just cover and refrigerate after baking and cooling to room temperature, and brûlée just before serving.
Final Thoughts
There’s something wonderfully satisfying about cracking through that glossy, caramelized sugar crust to the velvety custard beneath. This Creamy Vanilla Crème Brûlée Recipe is a timeless French classic that never fails to impress, whether at an intimate dinner or a festive celebration. Take your time, follow the steps carefully, and you’ll have a stunning dessert that tastes as luxurious as it looks. Enjoy every luscious bite!
Print
Creamy Vanilla Crème Brûlée Recipe
- Prep Time: 15 minutes
- Cooling Time: 2 hours
- Cook Time: 25 minutes
- Total Time: 2 hours 40 minutes
- Yield: 6 servings
- Category: Dessert
- Method: Baking
- Cuisine: French
- Diet: Vegetarian
Description
This classic crème brûlée recipe delivers a rich, velvety custard topped with a perfectly caramelized sugar crust. Made with heavy cream, real vanilla bean, and a touch of sugar, this elegant French dessert is baked in a water bath to ensure a smooth texture. Ideal for a sophisticated finish to any meal, it’s best served chilled and brûléed just before serving for that satisfying crackle.
Ingredients
Custard Base
- 2 cups heavy cream
- ⅓ cup granulated sugar, divided
- ¼ teaspoon kosher salt
- ½ vanilla bean, scraped
- 1 egg yolk
- 1 large egg
- 1 teaspoon vanilla extract
Brûlée Topping
- ¼ cup granulated sugar
Instructions
- Preheat Oven: Preheat your oven to 325°F to prepare for baking the custards.
- Prepare Cream Mixture: In a small saucepan, combine 2 cups heavy cream, half of the granulated sugar (about 2 ½ tablespoons), kosher salt, and the split and scraped ½ vanilla bean. Heat the mixture just to a simmer, then remove from heat.
- Whisk Eggs and Sugar: In a separate bowl, vigorously whisk together 1 egg yolk, 1 large egg, and the remaining sugar until the mixture lightens slightly. This process is called blanchir.
- Temper Eggs: Slowly add the hot cream to the egg mixture in small increments while whisking constantly to prevent the eggs from curdling. Continue until all cream is incorporated.
- Strain and Skim: Skim off any foam from the custard mixture to ensure smooth texture. Strain if necessary to remove vanilla bean solids.
- Fill Ramekins: Divide the custard evenly among six 3-ounce ramekins. Use a scale or measuring cup for accuracy.
- Prepare Water Bath: Place ramekins in a large deep baking dish. Cover the dish with foil, leaving a corner open to monitor. Carefully pour hot water into the baking dish until it comes halfway up the sides of the ramekins.
- Bake Custards: Bake in the preheated oven on the middle rack for 25 minutes until the custards are mostly set but still jiggle slightly in the center.
- Cool and Chill: Remove ramekins carefully from the water bath. Let cool to room temperature, then cover with plastic wrap and refrigerate for at least 2 hours or ideally overnight for best texture.
- Prepare for Brûlée: When ready to serve, sprinkle about half a tablespoon of granulated sugar evenly over the top of each custard.
- Caramelize Sugar: Using a kitchen torch, melt the sugar by starting a few inches away with a low flame and gradually increase heat until sugar turns a deep amber color forming a crisp caramelized crust.
- Set and Serve: Let the caramelized sugar set for 3 minutes before serving immediately, enjoying the contrast of creamy custard and crunchy top.
Notes
- If you don't have a kitchen torch, you can make dry caramel in a pot by heating about 1 cup sugar over medium-high heat until melted and amber. Pour carefully over cold custards, though the crust will be thicker and less even.
- For flavor variations, swap vanilla bean with almond, coffee, or peppermint extract, adding cautiously depending on strength.
- Store crème brûlée covered in plastic wrap in the refrigerator for up to 1 week.
- For the best crackle effect, brûlée the sugar topping just before serving.
- Use a kitchen towel under the egg bowl when tempering to stabilize it during whisking.
Nutrition
- Serving Size: 1 ramekin (approx. 3 oz)
- Calories: 350 kcal
- Sugar: 22 g
- Sodium: 60 mg
- Fat: 28 g
- Saturated Fat: 17 g
- Unsaturated Fat: 9 g
- Trans Fat: 0 g
- Carbohydrates: 20 g
- Fiber: 0 g
- Protein: 5 g
- Cholesterol: 190 mg


Leave a Reply