There’s something irresistibly festive about a rich, creamy fudge that looks as delightful as it tastes, and this Christmas Swirl White Chocolate Fudge Recipe does just that. With swirls of classic red and green running through velvety white chocolate, it’s a perfect holiday treat to share or savor by the fireside.

Jump to:
- Why You'll Love This Recipe
- Ingredients & Why They Work
- Make It Your Way
- Step-by-Step: How I Make Christmas Swirl White Chocolate Fudge Recipe
- Top Tip
- How to Serve Christmas Swirl White Chocolate Fudge Recipe
- Make Ahead and Storage
- Frequently Asked Questions:
- Final Thoughts
- Christmas Swirl White Chocolate Fudge Recipe
Why You'll Love This Recipe
I’ve made this Christmas Swirl White Chocolate Fudge Recipe countless times now, and it never fails to wow guests with its festive look and melt-in-your-mouth texture. It’s an easy crowd-pleaser that brings the holiday spirit to every bite.
- Stunning visual appeal: The red and green swirls create a beautiful, holiday-themed presentation that’s almost too pretty to eat.
- Simple ingredients: Made from just a few pantry staples, this fudge comes together quickly without needing complicated steps.
- Decadently creamy texture: Thanks to the mix of white chocolate chips and sweetened condensed milk, the fudge is perfectly smooth and rich.
- Great for gifting: This recipe slices into perfect bite-sized squares that make charming edible gifts or party treats.

Ingredients & Why They Work
Each ingredient in this Christmas Swirl White Chocolate Fudge Recipe plays an essential role in achieving that classic fudge consistency and festive look. I always suggest using quality white chocolate chips because they melt smoothly and taste rich without the bitterness found in some lower-grade options.

- White chocolate chips: Use good-quality chips like Ghirardelli for the best melt and creaminess.
- Sweetened condensed milk: Adds sweetness, creaminess, and helps the fudge set perfectly without being grainy.
- Unsalted butter: Gives body and smooth texture; cutting it into cold cubes helps it melt evenly when stirred.
- Red gel food coloring: Choose gel coloring for vivid hues without changing the fudge texture.
- Green gel food coloring: Same as red – gel coloring keeps those vibrant festive swirls intact.
Make It Your Way
One of the things I adore about this Christmas Swirl White Chocolate Fudge Recipe is how easy it is to customize. Sometimes, I swap the red and green swirls with your favorite holiday candy bits or crushed peppermint to add a little textural contrast. You can absolutely make it your own.
- Variation: I’ve tried adding a pinch of sea salt on top of the fudge before chilling—it adds a lovely counterbalance to the sweetness.
- Dietary tweak: For a dairy-free version, you can experiment with vegan white chocolate and coconut condensed milk, but results vary, so try a small batch first.
- Color swaps: Use different gel colors for other seasons or occasions if red and green aren’t your thing.
Step-by-Step: How I Make Christmas Swirl White Chocolate Fudge Recipe
Step 1: Prep your pan like a pro
Start by lining an 8×8-inch baking pan with parchment paper, making sure the paper hangs over the edges. This is a game-changer because it lets you lift the fudge out easily once it’s set, keeping those swirls perfect for slicing.
Step 2: Melt your magic
In a medium saucepan over medium-low heat, combine your white chocolate chips, sweetened condensed milk, and cold, cubed butter. Stir constantly — I usually keep the heat low enough to prevent scorching but high enough to melt smoothly, about 4 to 6 minutes. You’re aiming for a glossy, completely melted mixture with no lumps. This step is key to smooth fudge without graininess.
Step 3: Divide and color
Transfer about a third of your melted white chocolate mixture into a small bowl and stir in red gel food coloring, starting with ¼ teaspoon. Add more if you want a deeper shade. Repeat with a second third for your green bowl. Make sure there are no white streaks—vivid, uniform color is what you aim for. Working quickly is important here since the fudge will start to firm up as it cools.
Step 4: Dollop, swirl, and smooth
On the parchment-lined pan, randomly dollop white, red, and green fudge mixtures. Don’t worry about perfect placement—this is where the fun begins. Grab a wooden skewer or butter knife and gently swirl the different colors together to create that trademark holiday marbled look. For a smooth, polished finish, press a small piece of parchment lightly over the top, careful not to disturb the design.
Step 5: Chill and cut
Pop the pan into the fridge for 2-3 hours until the fudge is firmly set. When ready, lift the fudge out using the parchment overhang and slice it into 1-inch squares. I like warming my knife under hot water and drying it between cuts to get clean, smooth edges.
Top Tip
Through making this recipe several times, I’ve learned a few tricks that save the day and keep your fudge looking and tasting perfect every time.
- Timing is everything: Add the gel color and swirl quickly before the fudge starts to thicken—warm small bowls gently if needed to loosen it up.
- Constant stirring: Keep stirring while melting to avoid burning or graininess from uneven heating.
- Parchment overhang: This simple step makes removing fudge from the pan effortless and keeps your squares sharp and clean.
- Warm knife slice: Running your knife under warm water for each cut gives impressively tidy, smooth fudge squares.
How to Serve Christmas Swirl White Chocolate Fudge Recipe

Garnishes
I often sprinkle a few crushed peppermint candies or some edible glitter on top before chilling for that extra festive sparkle. It adds a charming pop of crunch without overpowering the fudge’s creamy texture.
Side Dishes
This fudge pairs wonderfully with a cup of hot cocoa or strong coffee, making it a perfect treat after holiday meals or alongside an afternoon tea spread.
Creative Ways to Present
For gift-giving, I wrap small stacks of fudge squares with colorful parchment paper and tie them with twine or ribbon. For parties, I arrange the fudge on tiered trays interspersed with candy canes for a festive display everyone loves.
Make Ahead and Storage
Storing Leftovers
I store leftover fudge in an airtight container in the fridge, and it keeps beautifully for up to a week without losing its creamy texture or flavor.
Freezing
If I make extra, I freeze the fudge in a single layer inside an airtight container or wrapped tightly in plastic wrap, then in foil. It freezes well for up to two months. When you’re ready to enjoy again, just thaw it overnight in the fridge.
Reheating
I usually don’t reheat fudge because it’s best served cold, but if you want it softer, let it stand at room temperature for about 15 minutes. Avoid microwaving or gentle warming that can alter the texture.
Frequently Asked Questions:
Milk chocolate behaves quite differently when melted and combined with sweetened condensed milk, so it won’t give the same smooth, creamy, and firm fudge texture. If you want a different chocolate flavor, try a recipe specifically designed for milk or dark chocolate fudge.
Grainy fudge usually results from overheating the chocolate or stirring insufficiently during melting. Make sure to melt the chips gently over medium-low heat and stir constantly to avoid chocolate crystals forming. Also, don’t skip the butter, which helps keep the texture smooth.
This recipe isn’t vegan as-is because it uses dairy white chocolate and sweetened condensed milk. You could try substituting vegan white chocolate chips and a plant-based condensed milk alternative, but the results might differ in texture and flavor. Testing a small batch first is best.
Stored in an airtight container in the refrigerator, this Christmas Swirl White Chocolate Fudge Recipe will stay fresh for up to one week. If frozen, it lasts up to two months. Always keep it well wrapped to protect it from moisture and odors.
Final Thoughts
This Christmas Swirl White Chocolate Fudge Recipe is truly one of my treasured holiday treats—it’s as joyful to make as it is to eat. Whether you’re sharing it with friends or sneaking a few squares for yourself after a long day, it adds that cozy, festive magic I look forward to every winter. Give it a try; I’m pretty sure it’ll become a holiday tradition in your kitchen, just like it did in mine.
Print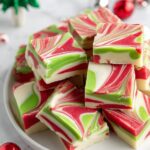
Christmas Swirl White Chocolate Fudge Recipe
- Prep Time: 15 minutes
- Cook Time: 6 minutes
- Total Time: 2 hours 15 minutes
- Yield: 64 pieces
- Category: Dessert
- Method: Stovetop
- Cuisine: American
Description
This festive Christmas fudge recipe features smooth white chocolate blended with sweetened condensed milk and butter, swirled with vibrant red and green gel food coloring for a holiday-themed treat. Perfect for gifting or serving at holiday parties, this rich and creamy fudge is easy to make and sets beautifully in the fridge.
Ingredients
Main Ingredients
- 22 oz white chocolate chips (2 11-oz. bags)
- 14 ounce can sweetened condensed milk
- 4 tablespoons unsalted butter, cold and cut into small cubes
Food Coloring
- ¼-½ teaspoon red gel food coloring
- ¼-½ teaspoon green gel food coloring
Instructions
- Prepare the Pan: Line an 8×8 inch straight-sided baking pan with parchment paper, ensuring there is enough overhang to lift the fudge out easily after setting.
- Melt Ingredients: In a medium saucepan over medium-low heat, combine the white chocolate chips, sweetened condensed milk, and cold butter cubes. Stir constantly for 6 minutes until the chips have fully melted and the mixture is smooth. Remove from heat.
- Color the Fudge - Red: Transfer one-third of the melted white chocolate mixture to a small bowl. Add ¼ to ½ teaspoon red gel food coloring, stirring until the color is uniform with no white streaks.
- Color the Fudge - Green: Place another one-third of the melted mixture into a separate bowl. Add ¼ to ½ teaspoon green gel food coloring and stir until fully incorporated and uniform in color.
- Assemble Fudge: Spoon dollops of white, red, and green fudge mixtures randomly into the prepared pan until all mixtures are used.
- Create Swirls: Using a wooden skewer or butter knife, gently swirl the three colors to create a decorative pattern on the fudge's surface.
- Smooth the Top: Place a small piece of parchment paper on top of the fudge and gently press down to create an even surface without disturbing the swirl pattern.
- Chill: Refrigerate the fudge for 3 hours or until fully set.
- Slice and Serve: Once set, lift the fudge from the pan using the parchment overhang. Transfer to a cutting board and slice into 64 one-inch squares. Serve and enjoy.
Notes
- Store fudge in an airtight container in the refrigerator for up to 1 week.
- Freeze leftover fudge for up to 2 months; thaw completely in the refrigerator before serving.
- Line the pan with parchment or waxed paper and lightly grease it to prevent sticking.
- Work quickly when mixing in gel food coloring as the fudge mixture firms up fast.
- If fudge thickens too much while coloring, gently warm the bowls for 15-20 seconds to loosen the mixture.
- Reheat gently without overheating to avoid burning or seizing the chocolate.
- To achieve smooth fudge, stir constantly while melting and avoid overcooking to prevent graininess.
- Cut fudge into small pieces due to its rich, dense texture; warming the knife before slicing helps achieve clean cuts.
Nutrition
- Serving Size: 1 piece (1x1 inch)
- Calories: 100 kcal
- Sugar: 15 g
- Sodium: 20 mg
- Fat: 5 g
- Saturated Fat: 3 g
- Unsaturated Fat: 1.5 g
- Trans Fat: 0 g
- Carbohydrates: 14 g
- Fiber: 0 g
- Protein: 1 g
- Cholesterol: 10 mg


Leave a Reply