There’s just something magical about that first bite of holiday sweetness—and this Christmas Candy Bark Recipe totally captures the festive spirit with its chewy marshmallows, creamy white chocolate, and colorful candies. It’s easy to whip up, looks charming, and makes the perfect treat for sharing or gifting this season.

Jump to:
Why You'll Love This Recipe
I honestly love how this Christmas Candy Bark Recipe brings together simple ingredients to create something pretty and irresistible. It’s one of those desserts that doesn’t feel fussy but delivers a festive crunch and sweetness everyone will adore.
- Super Easy: It comes together quickly with just a few ingredients and minimal kitchen tools, perfect for busy holiday prep.
- Customizable Fun: You can swap out candies to match your flavor favorites or color theme, making it your own signature bark.
- Great for Gifting: Makes a beautifully festive homemade gift that’s charmingly personal.
- Kid-Friendly: This recipe is a fun and safe way to get the kiddos involved in holiday baking.

Ingredients & Why They Work
Each ingredient in this Christmas Candy Bark Recipe plays its own role — from smooth, creamy white chocolate to chewy marshmallows and bright candy for texture and color. Here’s a quick rundown to help you shop with confidence.

- Butter: Adds richness and helps create a glossy, smooth melting base.
- White chocolate chips: The star of this bark — creamy and sweet, perfect for candy bark.
- Mini marshmallows: They melt slightly to give soft, gooey pockets that add fun texture.
- Red and green gumdrops or chewy candy, chopped: These add vibrant holiday colors and an extra burst of sweetness and chew.
Make It Your Way
I love experimenting with this Christmas Candy Bark Recipe, and I encourage you to get playful with it too! Whether you swap in peppermint pieces or add nuts, there’s room to make it truly yours.
- Variation: One year, I replaced the gumdrops with crushed candy canes — it gave such a refreshing crunch and festive peppermint flavor that everyone raved about.
- Dietary Mods: For a dairy-free twist, try using dairy-free white chocolate chips and vegan marshmallows.
- Seasonal spin: Swap the candies for pastel colors at Easter or mix in dried fruit bits for some added texture.
Step-by-Step: How I Make Christmas Candy Bark Recipe
Step 1: Prep Your Pan and Gather Ingredients
I like to line an 8x8 baking dish with parchment paper first, then lightly grease it—this makes lifting out the bark afterward super easy. Also, have your butter, white chocolate chips, and mini marshmallows ready nearby, so you’re set for melting.
Step 2: Melt the Magic
Pop the butter, white chocolate, and marshmallows into a large microwave-safe bowl and microwave for 1 minute. Stir with a greased spatula (this helps prevent sticking!), then continue microwaving in 30-second bursts, stirring each time, until the mixture is velvety smooth with no lumps.
Step 3: Stir in the Colorful Candies
Let the melted mixture cool just a tad—about a minute or so—then gently fold in your chopped red and green candies. This prevents the candy from melting too much and keeps those festive pops of color intact.
Step 4: Set and Chill
Pour the mixture into your prepared pan and use the spatula to press it out evenly. Cover with plastic wrap and pop it in the fridge for at least 4 hours, but overnight is even better. Patience here makes slicing much easier.
Step 5: Slice and Enjoy
Once fully set, lift the bark out by grabbing the parchment edges. Remove the paper and slice into bite-size pieces. Then, get ready for smiles and maybe some sneaky tastes before sharing!
Top Tip
This recipe is forgiving, but a few tricks really make it shine—I’ve learned some handy pointers that’ll help you nail it the first time.
- Use a Greased Spatula: Coat your spatula with butter or cooking spray before stirring or pressing the bark—this stops the sticky chocolate from clinging and smooths spreading.
- Don’t Overheat the Chocolate: Microwaving in short bursts and stirring keeps the white chocolate from burning or seizing, preserving that silky texture.
- Cool Before Adding Candy: Let the melted mixture cool slightly before folding in the candies so they maintain their shape and color.
- Chill Long Enough: Patience pays here! Give it a full 4 hours or more in the fridge for clean slices and an easier time handling.
How to Serve Christmas Candy Bark Recipe

Garnishes
For me, the candy pieces themselves act like a garnish—those little red and green pops instantly brighten any plate or gift box. Sometimes, I sprinkle a pinch of crushed candy canes on top before chilling for an extra festive touch and a little minty kick.
Side Dishes
This candy bark pairs beautifully with a hot cup of cocoa or mulled wine. For dessert tables, I love offering it alongside gingerbread cookies or cranberry-orange scones—it adds a sweet contrast that guests appreciate.
Creative Ways to Present
I enjoy wrapping small bundles in festive cellophane tied with ribbon for gifting. For parties, arranging bark pieces on a tiered stand with holiday décor around creates instant joy and invites nibbling throughout the event. And if you’re feeling fancy, drizzle some dark chocolate on top for a beautiful marbled look.
Make Ahead and Storage
Storing Leftovers
I store leftover Christmas Candy Bark in an airtight container at room temperature or in the fridge if it’s particularly warm. That way, it stays fresh and retains its chewy texture for about a week.
Freezing
If you want to make it well ahead, freezing works great! Wrap the bark tightly in plastic wrap and foil, then freeze. When you’re ready to enjoy, thaw it in the fridge overnight to maintain that perfect texture and flavor.
Reheating
Normally, I don’t reheat candy bark since it’s best served cool and firm, but if you want to soften it slightly before serving, a quick 5-10 second zap in the microwave can help. Just watch closely so it doesn’t melt completely!
Frequently Asked Questions:
Absolutely! While white chocolate is traditional here, you can substitute milk or dark chocolate chips to create a different flavor profile. Just remember that the melting time might vary slightly.
I recommend using a sharp knife and working on a sturdy cutting board. Chopping candies into small, manageable pieces helps distribute the color and sweetness evenly. Try to avoid powdery candies that might melt too much.
Yes! This Christmas Candy Bark Recipe is naturally gluten-free as long as you check your candies and marshmallows for any gluten-containing ingredients or cross-contamination warnings.
Stored in an airtight container at room temperature, it usually stays fresh for about a week. Refrigeration can extend its life, especially in warmer climates.
Final Thoughts
This Christmas Candy Bark Recipe has become a little holiday tradition for me—it’s just so simple and satisfying! I bet you’ll enjoy making it as much as eating it, and your friends and family will be so impressed with your festive treat. Give it a try, and you might find yourself reaching for this recipe every year.
Print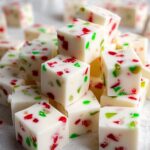
Christmas Candy Bark Recipe
- Prep Time: 20 minutes
- Cook Time: 0 minutes
- Total Time: 4 hours 20 minutes
- Yield: 24 servings
- Category: Dessert
- Method: No-Cook
- Cuisine: American
Description
Delightfully festive Christmas Candy made with melted white chocolate, marshmallows, and colorful red and green gumdrops, perfect for holiday snacking or gifting.
Ingredients
Main Ingredients
- 2 tablespoons butter
- 1 (12 oz) bag white chocolate chips
- 1 (10 oz) bag mini marshmallows
- 1 cup red and green gumdrops or chewy candy, chopped
Instructions
- Prepare Baking Dish: Line an 8x8 inch baking dish with parchment paper and lightly grease it to prevent sticking. Set aside the prepared dish for later use.
- Melt Ingredients: Place butter, white chocolate chips, and mini marshmallows into a large microwave-safe bowl. Microwave for 1 minute, then stir with a greased spatula. Continue microwaving in 30-second increments, stirring between each, until the mixture is fully melted and smooth.
- Cool Mixture: Allow the melted mixture to cool for about 1 minute to avoid melting the added candies too much in the next step.
- Fold in Candies: Gently fold the chopped red and green gumdrops or chewy candies into the melted mixture ensuring even distribution without melting the candies.
- Transfer and Flatten: Pour the mixture into the prepared baking dish and use a spatula to press it down into an even and flat layer for uniform pieces later.
- Chill: Cover the dish with plastic wrap and refrigerate for a minimum of 4 hours or overnight to allow the candy to set firmly.
- Slice and Store: Once set, lift the candy out of the dish using the parchment paper. Remove the paper and slice the candy into small, bite-sized pieces. Store pieces in an airtight container for optimal freshness.
Notes
- Use parchment paper for easy removal and clean-up.
- Microwave times might vary, so monitor closely to avoid burning the chocolate.
- Substitute gumdrops with any festive chewy candy for variety.
- Store candy in a cool, dry place to prevent melting.
- For a vegan option, use vegan white chocolate chips and marshmallows.
Nutrition
- Serving Size: 1 piece
- Calories: 150 kcal
- Sugar: 18 g
- Sodium: 30 mg
- Fat: 7 g
- Saturated Fat: 5 g
- Unsaturated Fat: 2 g
- Trans Fat: 0 g
- Carbohydrates: 22 g
- Fiber: 0 g
- Protein: 1 g
- Cholesterol: 10 mg


Leave a Reply