There’s something undeniably charming about those swirls of chocolate and vanilla dancing together in this Chocolate Pinwheel Cookies Recipe. The look alone is enough to bring a smile, but the taste? Oh, it's a perfect balance of buttery sweetness and rich cocoa that makes these cookies truly special.

Jump to:
Why You'll Love This Recipe
I remember the first time I made this Chocolate Pinwheel Cookies Recipe — it was a kitchen full of nervous excitement. The rolling and layering might look intimidating, but once you get into the rhythm, it’s downright fun. And the end result? Stamped with love and looking bakery-worthy every time.
- Eye-Catching Design: These cookies turn simple dough into a mesmerizing spiral, perfect for impressing friends and family.
- Balanced Flavors: The gentle vanilla dough paired with cocoa makes every bite satisfyingly tasty without being overwhelming.
- Make-Ahead Friendly: You can prep the dough ahead of time and bake fresh cookies when you want them, which is a lifesaver for busy days.
- Customizable Fun: Whether you dip them in chocolate or roll them in sprinkles, you get to add your signature touch with ease.

Ingredients & Why They Work
This recipe uses simple pantry staples that combine perfectly to create a dough that’s tender, slightly sweet, and holds its shape beautifully for the iconic pinwheel effect. Knowing why each ingredient matters helps you see how these cookies come together so well.

- All-purpose flour: The backbone of your cookie dough providing structure, so your cookies hold that distinct pinwheel shape.
- Baking powder: Adds a gentle lift to keep the cookies tender and not too dense.
- Salt: Balances sweetness and enhances the butter and chocolate flavors.
- Unsalted butter: I always bring this to room temperature for easier creaming, which is crucial for light, fluffy dough.
- Granulated sugar: Sweetens and helps the dough spread just right.
- Egg and egg yolk: Important for moisture, richness, and binding the dough.
- Pure vanilla extract: One of the stars that brings warmth and depth to the vanilla dough.
- Cocoa powder: Gives the chocolate dough that unmistakable rich, earthy flavor and the deep color contrast.
- Milk: Just a touch to soften the cocoa dough and balance the texture.
- Espresso powder (optional): A little secret ingredient that amps up the chocolate flavor without making it taste like coffee.
- Chocolate for dipping (optional): Melts smooth and luxurious, perfect for finishing your cookies with flair.
Make It Your Way
One of the reasons I keep coming back to this Chocolate Pinwheel Cookies Recipe is how easy it is to tweak. Whether I want to add an unexpected twist or keep things classic, there’s room for creativity that makes it feel like “mine” each time.
- Chocolate Variations: I’ve swapped the cocoa powder for matcha powder once, and the green swirls delighted everyone at a tea party! Feel free to experiment with flavors you love.
- Dietary Swaps: For a dairy-free version, use coconut oil in place of butter and a non-dairy milk for the chocolate dough. The texture is slightly different but still delicious.
- Color Play: Tint the vanilla dough with your favorite gel food color to match holidays or special themes – that’s always a crowd-pleaser.
- Add on the Fun: Rolling the dough logs in sprinkles before slicing gives these cookies a playful, colorful edge — perfect for kids’ celebrations!
Step-by-Step: How I Make Chocolate Pinwheel Cookies Recipe
Step 1: Whisk together your dry ingredients
Start by whisking the all-purpose flour, baking powder, and salt in a medium bowl. Setting this aside keeps everything organized and prevents clumps later when you mix it with your wet ingredients. Trust me, this step saves a lot of headaches.
Step 2: Cream butter and sugar until fluffy
Using a mixer, beat the softened butter and granulated sugar on medium-high speed for about 3 minutes. You want a light, fluffy texture — this is where the magic starts to take shape. Don’t forget to scrape down the bowl sides to mix everything evenly.
Step 3: Add eggs and vanilla
Beat in the egg, egg yolk, and pure vanilla extract on high speed until combined, around 1 minute. This enriches the dough and adds that buttery vanilla flavor we all love. Scraping the bowl again ensures there are no streaks of unmixed egg lurking around.
Step 4: Incorporate your dry ingredients
Mix the flour mixture into the wet ingredients on low speed until just combined. The dough will look thick and sticky here — that’s exactly what you want. At this stage, take the dough out; no need to rinse the bowl since you’ll use it soon for the chocolate dough.
Step 5: Divide and transform half into chocolate dough
Divide the dough roughly in half — don’t stress about perfect portions. Place one half back in the mixing bowl, then add cocoa powder, milk, and espresso powder (if you’re using it). Beat on low speed until the chocolate dough is uniform and alluringly dark.
Step 6: Shape into rectangles and chill
On a floured surface, use lightly floured hands to shape each dough half into a 4x5-inch rectangle about 1-inch thick. For the chocolate dough, I prefer using cocoa powder instead of flour to avoid white patches on the dark dough. Wrap each block tightly and chill for 60–90 minutes — you’re aiming for pliable but not overly sticky dough.
Step 7: Roll out the doughs on parchment
Roll the vanilla dough out on a floured piece of parchment paper to an 8x14-inch rectangle, flipping occasionally to avoid sticking. Chill it while you roll the chocolate dough out similarly on another parchment. When both are ready, carefully layer the chocolate dough on top of the vanilla one, smoothing out air bubbles and fixing any tears gently with your hands.
Step 8: Roll up tightly into a log
Starting from a long edge, use the parchment paper under the vanilla dough to help you roll both doughs together tightly. This takes patience, but rolling firmly ensures distinct pinwheels. If bits of vanilla dough show or cracks develop, just patch them as you go — imperfection here is totally fine. Slice the log in half to create two smaller logs.
Step 9: Chill the logs again
Wrap your dough logs and refrigerate for 2 hours up to 4 days. This step firms them up for cleaner slices and makes baking way easier. If you need to chill longer, just remember to let the logs soften a bit at room temperature before slicing.
Step 10: Slice and bake your cookies
Preheat your oven to 350°F (177°C). Slice each log into 14 pieces roughly ½-inch thick. Arrange them on parchment-lined baking sheets spaced at least 2 inches apart because they'll spread somewhat. If the dough feels soft before baking, chilling the cookie slices on the tray for 10 minutes helps prevent excessive spreading. Bake for 14–15 minutes until edges are just lightly browned.
Step 11: Cool and optionally dip in chocolate
Let your cookies cool on the baking sheet for 5 minutes before transferring to a wire rack. For an extra-special touch, melt chocolate and dip half of each cookie into it. I love sprinkling on a few festive sprinkles right after dipping — that’s a simple way to make everyday cookies party-ready!
Top Tip
I’ve learned a few things making this Chocolate Pinwheel Cookies Recipe multiple times. These tips help take the stress out and boost your cookie game.
- Chill just right: Don’t over-chill your dough the first time. You want it cool enough to handle but still flexible for rolling and shaping.
- Use parchment paper for rolling: Rolling on parchment makes transferring the dough much easier and keeps your counter clean.
- Patch as you go: It’s normal for the dough to crack or break a little when rolling; just pinch any gaps back together gently—they won’t show after baking.
- Pre-chill cookie slices if needed: If your sliced cookies get warm, pop them in the fridge for a bit before baking to help them keep their shape.
How to Serve Chocolate Pinwheel Cookies Recipe

Garnishes
I usually keep the garnishes simple — just dipping the cookies in melted dark chocolate and a quick sprinkle of colorful sugar crystals or festive sprinkles. It adds sparkle and a little texture without hiding those beautiful pinwheels.
Side Dishes
These cookies pair so well with a cold glass of milk or a warm cup of coffee. For holiday gatherings, I like serving them alongside spiced hot chocolate or even a nutty chai latte — it’s a cozy match that everyone loves.
Creative Ways to Present
For parties, I’ve arranged these cookies in spiraling towers on tiered trays, echoing the pinwheel pattern. Wrapping individual cookies in cute clear bags tied with twine makes adorable favors. You can even stack them with layers of parchment paper inside a decorative tin for gifting.
Make Ahead and Storage
Storing Leftovers
I keep leftover cookies in an airtight container at room temperature; they taste best within a week. If dipped in chocolate, I move them to the fridge after a few days to keep the chocolate from softening too much.
Freezing
The unbaked dough logs freeze wonderfully for up to 3 months. When I freeze them, I double wrap in plastic and foil for best protection. Thaw overnight in the fridge, then slice and bake fresh cookies that taste just like homemade.
Reheating
Leftover baked cookies warm up nicely if you want a fresh-from-the-oven feel. I usually pop 2–3 cookies in a preheated 300°F oven for 5 minutes; it revives that slightly crisp edge and soft center beautifully without drying them out.
Frequently Asked Questions:
Absolutely! You can skip the cocoa powder to keep both doughs vanilla, but I recommend tinting one half with gel food coloring so the pinwheel pattern stands out nicely.
I always roll doughs on parchment paper dusted with flour or cocoa powder for the chocolate half. Occasionally flipping the dough during rolling also helps prevent sticking and ensures an even thickness.
Yes! Baked Chocolate Pinwheel Cookies freeze well for up to 3 months. Just thaw them overnight in the fridge and bring to room temperature before enjoying for the best texture and flavor.
Espresso powder is an optional ingredient that enhances the chocolate flavor without adding a coffee taste. It’s a great little hack I use to make the chocolate more intense and rich.
Final Thoughts
I hope you enjoy making this Chocolate Pinwheel Cookies Recipe as much as I do. It’s a bit of a project, but that’s part of the charm—and the joy when you pull out those perfect spirals from the oven! So next time you want a cookie that’s both fun to make and irresistible to eat, this one’s a winner. Happy baking, friend!
Print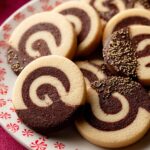
Chocolate Pinwheel Cookies Recipe
- Prep Time: 4 hours 15 minutes
- Cook Time: 15 minutes
- Total Time: 4 hours 30 minutes
- Yield: 28 cookies
- Category: Dessert
- Method: Baking
- Cuisine: American
- Diet: Vegetarian
Description
Learn how to make classic, delicious pinwheel cookies featuring vanilla and chocolate swirls. These buttery, tender cookies are made by rolling together two doughs, chilling, slicing, and baking to perfection. Optional dipping in chocolate adds a festive touch, perfect for holidays and special occasions.
Ingredients
Base Cookie Dough
- 2 and ⅔ cups (333g) all-purpose flour (spooned & leveled)
- ¾ teaspoon baking powder
- ½ teaspoon salt
- 1 cup (16 Tbsp; 226g) unsalted butter, softened to room temperature
- 1 cup (200g) granulated sugar
- 1 large egg
- 1 egg yolk, at room temperature
- 1 and ½ teaspoons pure vanilla extract
Chocolate Dough
- 2 Tablespoons (10g) unsweetened natural or dutch-process cocoa powder
- 1 Tablespoon (15ml) milk
- ½ teaspoon espresso powder (optional)
Optional for Dipping
- 6 ounces (170g) white, semi-sweet, or dark chocolate, finely chopped
- Sprinkles (optional)
Instructions
- Make the dough: Whisk the flour, baking powder, and salt together in a medium bowl. Set aside.
- Cream butter and sugar: In a large bowl using a hand mixer or stand mixer fitted with a paddle attachment, beat the butter and granulated sugar on medium-high speed until creamed, about 3 minutes. Scrape the bowl as needed.
- Add eggs and vanilla: Add the egg, egg yolk, and vanilla extract. Beat on high speed until combined, about 1 minute, scraping the bowl again as needed.
- Incorporate dry ingredients: Add the flour mixture to the wet ingredients and mix on low speed until combined. The dough will be thick and sticky. Remove from the bowl.
- Divide dough: Divide the dough in half, around 800–900g total. Use the smaller half for the chocolate dough if portions aren’t equal.
- Make chocolate dough: Place half dough in mixing bowl. Add cocoa powder, milk, and espresso powder if using. Beat on low speed to combine fully.
- Shape and chill: Form each dough into a 1-inch-thick, 4×5 inch rectangle block on a lightly floured surface (use cocoa powder for chocolate dough). Wrap each in plastic or parchment and refrigerate for 60–90 minutes until less sticky but still pliable.
- Roll out doughs: Roll the vanilla dough on lightly floured parchment to an 8×14-inch rectangle, about ⅛–¼ inch thick. Refrigerate the vanilla dough while rolling the chocolate dough out to an 8×14-inch rectangle on separate parchment (dust with flour or cocoa powder).
- Assemble layers: Remove vanilla dough from fridge and carefully layer chocolate dough on top, aligning edges and patting to remove air pockets. Patch any tears.
- Roll into a log: Starting from the long side, roll the layered doughs tightly using parchment for assistance. Patch any cracks. Slice the log in half into two 7-inch logs.
- Chill logs: Wrap logs well and refrigerate for 2 hours up to 4 days.
- Preheat and prepare baking sheets: Preheat oven to 350°F (177°C). Line two baking sheets with parchment paper or silicone mats.
- Slice and bake: Slice each log into 14 half-inch-thick cookies. Arrange 2 inches apart on baking sheets. If dough is soft, chill cookies on sheet for 10 minutes. Bake for 15 minutes until lightly browned on edges.
- Cool cookies: Let cookies cool on baking sheet 5 minutes, then transfer to wire rack to cool completely.
- Optional chocolate dipping: Melt finely chopped chocolate in double boiler or microwave stirring every 20 seconds. Dip half of each cooled cookie in chocolate and add sprinkles if desired. Let chocolate set at room temperature or in fridge.
Notes
- Baked cookies freeze well up to 3 months; thaw in refrigerator overnight before serving.
- Dough logs can be chilled up to 4 days or frozen for 3 months; thaw before slicing and baking.
- Use gel food coloring to tint vanilla dough if skipping chocolate dough or for colorful pinwheels.
- To add flavor variations, mix different extracts into one or both dough halves before chilling.
- Roll dough logs in sprinkles or coarse sugar after chilling for a decorative coating; moisten dough lightly if sprinkles don’t stick.
- Use baking chocolate bars rather than chocolate chips for melting and dipping for smooth consistency.
- Keep cookies covered at room temperature for up to 1 week; refrigerate chocolate-dipped cookies for freshness.
Nutrition
- Serving Size: 1 cookie
- Calories: 160 kcal
- Sugar: 10 g
- Sodium: 90 mg
- Fat: 9 g
- Saturated Fat: 5 g
- Unsaturated Fat: 3 g
- Trans Fat: 0 g
- Carbohydrates: 18 g
- Fiber: 1 g
- Protein: 2 g
- Cholesterol: 40 mg


Leave a Reply