There’s something utterly irresistible about a sweet treat that combines the rich depth of chocolate with a cool burst of mint. That’s exactly why I’m excited to share my Chocolate Andes Mint Cookies Recipe with you—it’s a perfect balance of fudgy cookie dough and those iconic Andes mints we all adore. Trust me, these cookies will make your kitchen smell like heaven and disappear faster than you can say “yum.”

Jump to:
Why You'll Love This Recipe
This Chocolate Andes Mint Cookies Recipe isn’t just another cookie—it’s my go-to for when I want an indulgent treat with a sophisticated twist. I love how the mint melds perfectly with the deep chocolate flavor, creating a cookie that’s tender, chewy, and packed with bursts of sweet, minty goodness. Plus, it’s surprisingly easy to nail every time!
- Minty-Chocolate Harmony: The chopped Andes mints melt into the batter, giving pockets of peppermint surprise in every bite.
- Soft, Chewy Texture: The chilling step transforms the dough, resulting in thicker, perfectly chewy cookies that hold their shape.
- Simple Ingredients, Big Flavor: You probably already have everything you need in your pantry, plus the signature Andes mints make it extra special.
- Customizable and Fun: Pressing a whole Andes mint on top as they come out of the oven feels like a little culinary magic trick that’s as enjoyable as eating the cookie.
Ingredients & Why They Work
The magic in this Chocolate Andes Mint Cookies Recipe comes from a simple, thoughtful combination of ingredients that build flavor and texture beautifully. Each has a role—from the cocoa lending richness to the Andes mints bringing that cooling peppermint kick.
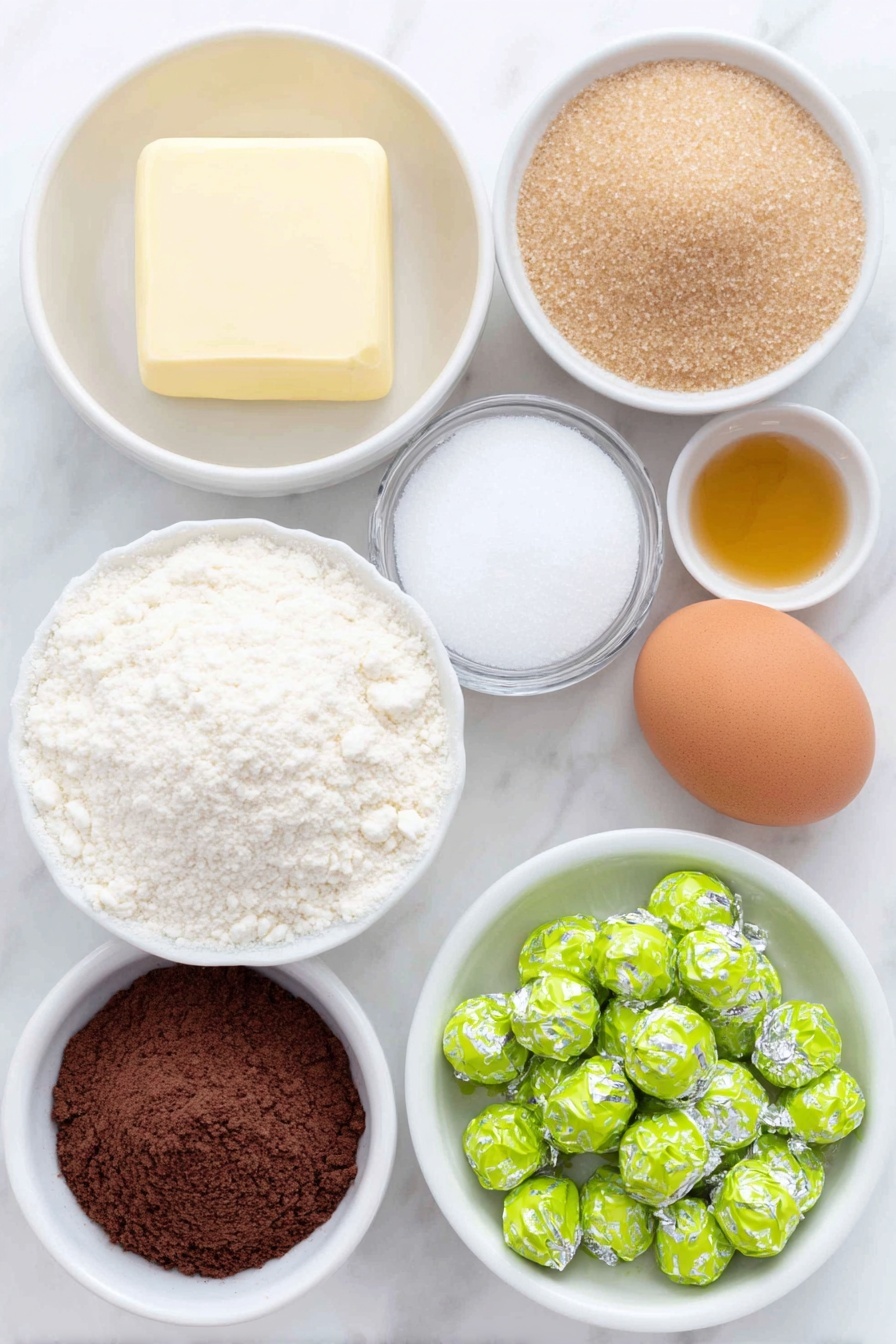
- Butter: Using softened butter helps create that dreamy, light, and fluffy cookie dough base that melts in your mouth.
- Granulated Sugar: Adds crunch and a bit of sweetness to balance the chocolate and mint.
- Light Brown Sugar: This brings moisture and chewiness with its molasses content—key for that perfect cookie texture.
- Egg: We use one egg to bind everything together while keeping the dough tender.
- Vanilla Extract: I always add vanilla to boost flavor depth; it pairs surprisingly well with chocolate and mint.
- All-Purpose Flour: The backbone of your cookie, providing structure without weighing it down.
- Cocoa Powder: Unsweetened cocoa gives a rich chocolate kiss without extra sweetness.
- Baking Soda: Helps the cookies rise just right, making them tender but not cakey.
- Salt: A little salt awakens all the sweet flavors and balances the richness perfectly.
- Chopped Andes Mints: The star of the show, these melt into the dough creating delightful bursts of mint flavor.
- Whole Andes Mints: Pressed on top after baking, they melt into a creamy, minty swirl—a signature finishing touch.
Make It Your Way
One of the best parts about this Chocolate Andes Mint Cookies Recipe is how easy it is to make it your own. Over time, I’ve played around with different ways to tweak it based on who I’m baking for—but no matter the variation, that chocolate-mint dream always shines through.
- Double Mint Punch: For extra mint lovers, I sometimes add a splash of peppermint extract into the dough. Just a tiny bit goes a long way and amps up the freshness beautifully.
- Nutty Crunch: I’ve tossed in chopped pecans or walnuts before for some texture contrast, and it adds a lovely nutty balance.
- Dairy-Free Version: You can swap out the butter for coconut oil or a dairy-free butter alternative—cookies still come out fantastic!
- Chocolate Chip Twist: Adding a handful of semisweet or mint chocolate chips alongside the Andes chunks turns these into a double-chocolate mint feast.
Step-by-Step: How I Make Chocolate Andes Mint Cookies Recipe
Step 1: Cream Butter and Sugars Until Fluffy
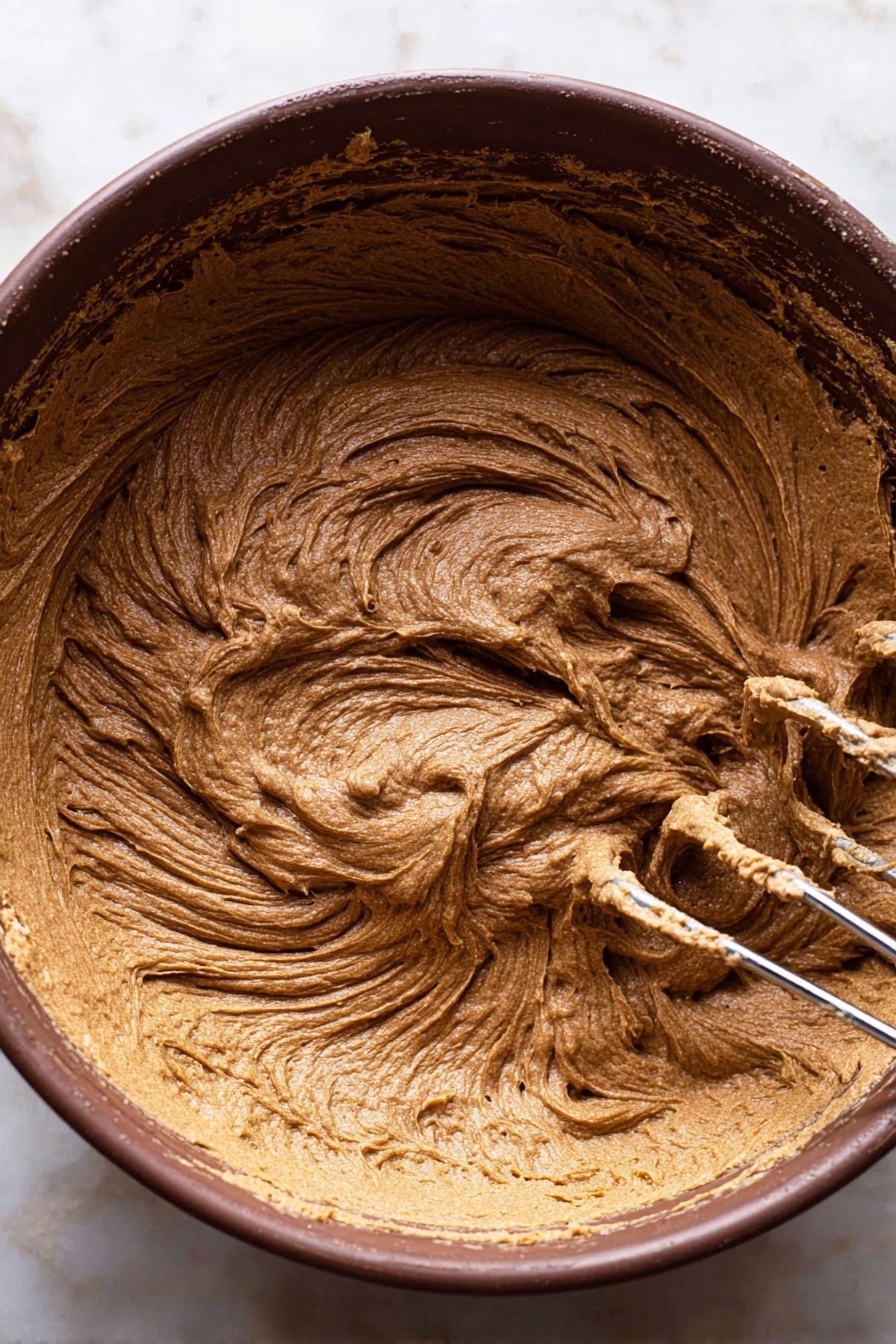
Start by beating the softened butter with both the granulated sugar and brown sugar. I use a stand mixer fitted with a paddle attachment on medium-high speed for about 3 minutes. You’ll notice the mixture turn lighter in color and fluff up—this step is key for that incredible texture. Don’t rush it; the fluffier, the better for your cookies.
Step 2: Mix in Egg and Vanilla
Once your sugar and butter are fluffy, crack in the room-temperature egg, add vanilla extract, and beat everything together thoroughly. Scrape down the bowl sides to make sure everything is evenly combined—you want a cohesive, fragrant dough base before adding the dry ingredients.
Step 3: Whisk Dry Ingredients Separately
In another bowl, whisk together the all-purpose flour, unsweetened cocoa powder, baking soda, and salt. This ensures your dry elements are evenly distributed, preventing lumps or uneven chocolate flavor pockets.
Step 4: Combine Dry Ingredients Gently
Turn your mixer down to low and slowly add the dry ingredients to the wet mixture. Adding in slowly helps keep the flour from puffing into the air and gives you better control over the dough’s consistency. Mix just until combined—you don’t want to overwork the dough or it’ll get tough.
Step 5: Fold in Chopped Andes Mints and Chill
Now for the fun part—fold in your chopped Andes mints with a rubber spatula. The dough will get chunky and infused with peppermint. Cover the bowl tightly with plastic wrap and chill it in the fridge for at least 3 hours or up to 3 days. Trust me, don’t skip this step; chilling thickens the dough so your cookies bake up thicker and chewier.
Step 6: Scoop and Bake
Preheat your oven to 350°F and line baking sheets with parchment paper. If your dough has been chilling for more than a day, let it sit at room temp for about 30 minutes to soften a bit. Use a large cookie scoop to portion your dough, placing them 2 to 3 inches apart on the sheets. Bake for 10-12 minutes until the edges set but tops stay soft.
Step 7: Press Whole Andes Mint and Swirl
Right when the cookies come out of the oven, press one whole Andes mint in the center of each. Let it sit for a minute or two to melt, then swirl the melted mint around with a toothpick. If your cookies spread a bit unevenly, use the rim of a wide-mouthed cup to gently nudge them back into a perfect circle. This little finishing move turns these into absolute showstoppers!
Top Tip
I’ve made these cookies countless times, and a few small tweaks make all the difference between "just good" and "absolutely crave-worthy." Here are my personal nuggets of wisdom for perfect results every time.
- Chill That Dough: Do not skip chilling—it's the secret to thicker, chewier cookies instead of thin, flat ones.
- Use Room Temperature Ingredients: Butter and egg at room temp mix better, ensuring the batter whips to that fluffy, light texture you want.
- Swirling Mint While Warm: Wait just a minute after pressing the whole Andes mint to swirl; if you do it too soon or too late, the swirl won’t spread evenly.
- Shape Fix Trick: If your cookies spread oddly, a quick swirl with a cup rim reshapes them perfectly before they cool completely.
How to Serve Chocolate Andes Mint Cookies Recipe

Garnishes
I usually keep the garnish simple—those gently melted whole Andes mints on top really make the cookies festive and inviting. If I’m serving them at a party, I like to dust a light sprinkle of powdered sugar on the plate for a snowy effect and add a few fresh mint leaves nearby for a pop of green and extra freshness.
Side Dishes
Pair these cookies with a big glass of cold milk or a steamy cup of coffee or hot chocolate for the ultimate cozy treat. I’ve also found they go wonderfully with a scoop of vanilla ice cream for an easy dessert upgrade that everyone raves about.
Creative Ways to Present
For holiday gatherings, I like to arrange the cookies on a festive platter lined with emerald green tissue paper to bring out the mint vibe. Another favorite is to stack them in a pretty jar tied with a satin ribbon—makes a lovely gift or centerpiece. If you want to wow guests, serve warm cookies on a plate with a drizzle of chocolate sauce or a side of whipped cream.
Make Ahead and Storage
Storing Leftovers
I keep leftover cookies in an airtight container at room temperature, layered with parchment paper to avoid sticking. They stay soft and fresh for about 4-5 days—if they lose a bit of their fresh-baked softness, pop them in the microwave for 10 seconds and they’re heavenly again.
Freezing
This recipe freezes beautifully either as dough or baked cookies. For dough, scoop and freeze on a parchment-lined tray, then transfer to a freezer bag for up to 3 months. When ready, thaw overnight in the fridge, then bake normally. Baked cookies freeze well wrapped tightly and reheated gently for a quick minty dessert.
Reheating
To refresh your cookies, I warm them briefly in a 300°F oven for 5 minutes or microwave them for about 10 seconds. This softens the texture and helps revive the melted mint goodness on top without making the cookies too crunchy or hard.


Leave a Reply