There’s something truly special about a homemade Cherry Pie with Lattice Crust Recipe. The tartness of the cherries, the warm spices, and that flaky, golden lattice crust come together in a melt-in-your-mouth dessert that feels just like summer at home. Let me show you how to make this classic beauty step-by-step!

Jump to:
Why You'll Love This Recipe
I honestly can’t get enough of this pie. Making the lattice crust is such a satisfying process, and the tart cherries combined with a touch of almond extract give it a flavor profile that feels both nostalgic and refreshing.
- Perfectly tart-sweet filling: The sour cherries balance beautifully with warm cinnamon and ginger for a nuanced flavor.
- Flaky homemade crust: Making your own pie dough and weaving a lattice top is easier than it looks and super rewarding.
- Year-round availability: Using frozen tart cherries means you can enjoy this pie any time—not just in cherry season.
- Great presentation: The lattice crust not only looks stunning but allows steam to escape, keeping your crust crisp and tasty.
Ingredients & Why They Work
Choosing quality ingredients really elevates this cherry pie. Tart cherries give you that signature tang, and I always recommend chilling your homemade pie dough—it rolls out so much smoother and bakes to a satisfying flakiness.
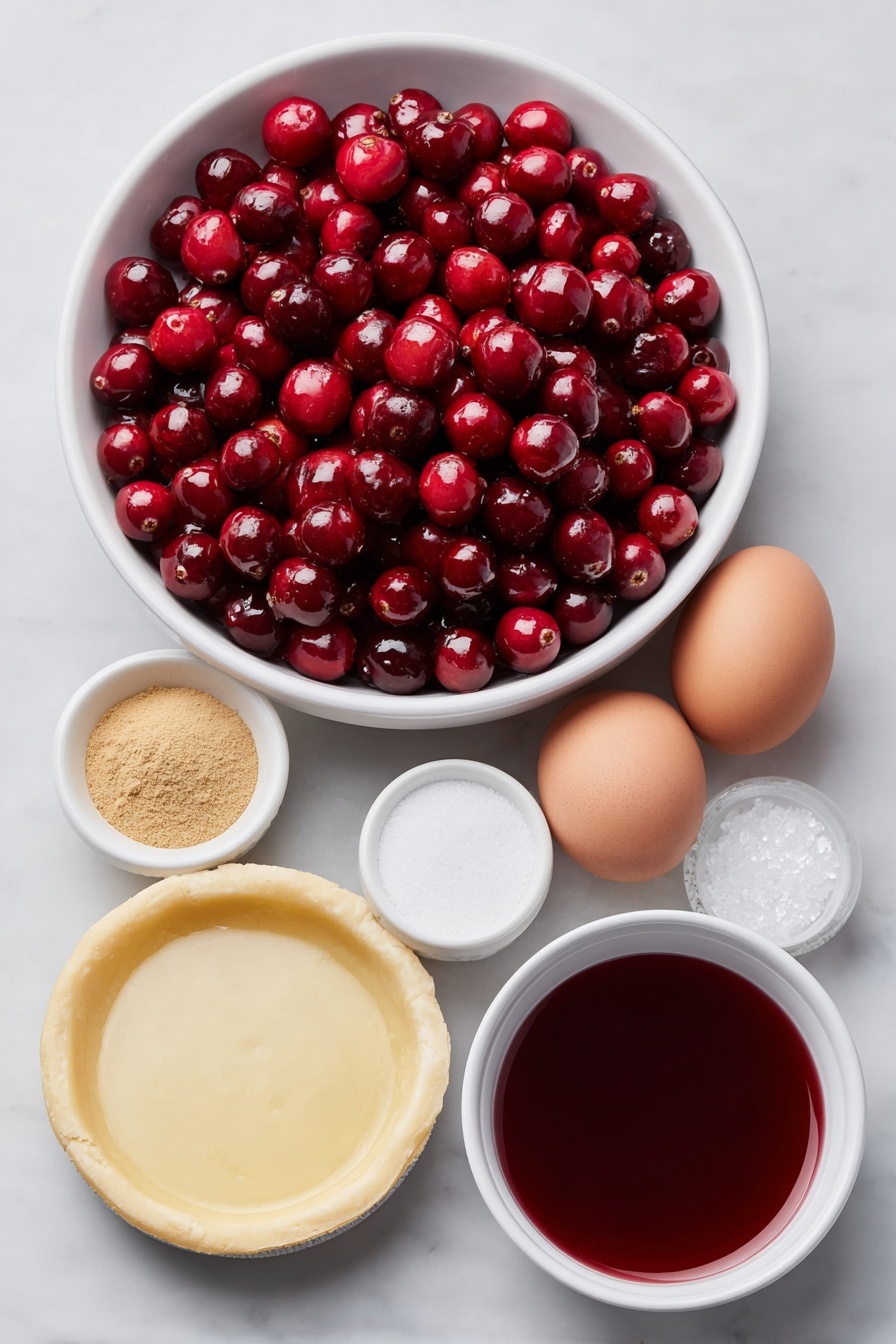
- Frozen pitted tart cherries: Tart cherries provide the bright, tangy flavor crucial for this pie’s character, and frozen ones work beautifully year-round.
- Cornstarch: Acts as a thickener so the cherry filling holds together perfectly without being runny.
- Water: Used to create the cornstarch slurry and thin the egg wash.
- Cane sugar: Adds just the right amount of sweetness to balance the tart cherries.
- Cinnamon: Warm spice that deepens the flavor of the cherry filling.
- Ground ginger: Provides a subtle zing that complements the tartness and cinnamon.
- Almond extract: A tiny boost here that amplifies the cherry’s natural flavor beautifully.
- Salt: Just a pinch to elevate all the flavors.
- Pie crust dough: Homemade and well-chilled, giving you that flaky, buttery texture.
- Large egg: Whisked with water for the egg wash, it makes the lattice top shine with a beautiful golden color.
- Coarse sugar (optional): Sprinkling this on top before baking adds a delightful crunch and sparkle.
- Vanilla ice cream: The perfect cool, creamy partner when serving your slice.
Make It Your Way
The Cherry Pie with Lattice Crust Recipe is wonderfully versatile — you can easily tweak the filling or crust to suit your taste or dietary needs. Don’t be afraid to make it your own and add a personal twist!
- Variation: For a nutty depth, I love adding a tablespoon of finely chopped toasted almonds to the cherry filling — it pairs beautifully with the almond extract and adds a lovely crunch.
- Dietary swap: For a gluten-free take, you can use your favorite gluten-free pie crust recipe in place of the classic dough. Just be sure it's well chilled so the lattice weaving holds together.
- Seasonal twist: Feel free to swap in fresh sour cherries when in season for a brighter, fresher flavor. Just be sure to reserve and measure out 1 cup of their juices for thickening.
- Sweetener alternative: You can substitute maple syrup or honey for the cane sugar, adjusting quantities slightly and watching for sweetness level since these vary compared to sugar.
- Decor inspiration: Try shaping some of the lattice strips into hearts or braids for a special occasion — it adds charm without extra fuss.
Step-by-Step: How I Make Cherry Pie with Lattice Crust Recipe
Step 1: Prep Your Cherries and Juices
Start by placing your thawed tart cherries in a strainer set over a bowl. This lets all those beautiful juices drip down. You want to measure out exactly 1 cup of that tart cherry juice, which you’ll use to create the perfect filling. If you don’t get a full cup, gently microwave the cherries for 15 seconds and press again to coax out a bit more juice — just like I do! Save any extra juice for a refreshing drink or syrup later.
Step 2: Make a Silky Cornstarch Slurry
Next, whisk together ¼ cup cornstarch and ¼ cup water in a small bowl until completely smooth. This slurry will thicken your cherry juices into that luscious, glossy filling we all crave. Set it aside while you prepare the rest.
Step 3: Cook the Cherry Filling to Perfection
Bring your reserved 1 cup of cherry juice to a rolling boil in a small saucepan. Stir in sugar and watch as it dissolves completely. Then, slowly add the cornstarch slurry, stirring continuously — this part is key to avoid lumps. When the mixture thickens and turns clear and glossy, take it off the heat. Stir in cinnamon, ground ginger, almond extract, and just a pinch of salt. Let this heavenly filling cool completely — I find this step makes slicing the pie so much neater later!
Step 4: Roll Out Your Bottom Crust and Chill
Roll out your chilled pie dough to fit a 9 or 9.5-inch pie plate, leaving a generous ½-inch overhang all around. This extra dough is perfect for folding over the lattice edges later. Cover the crust loosely with plastic wrap and pop it into the fridge for 30 minutes — chilling helps keep the dough firm and flake beautifully in the oven. Meanwhile, position your oven rack in the bottom third and place a baking sheet on it. Preheat your oven to 425°F with that sheet inside. This trick creates a hot surface to help bake the crust evenly.
Step 5: Roll Out the Top Crust and Prep Egg Wash
Roll out the remaining chilled dough for your lattice crust, then transfer it to a baking sheet. Cover loosely with plastic wrap and keep it chilled alongside the bottom crust while it rests. In a small bowl, whisk together your large egg and 1 tablespoon of water to create an egg wash that adds that gorgeous golden sheen to your crust.
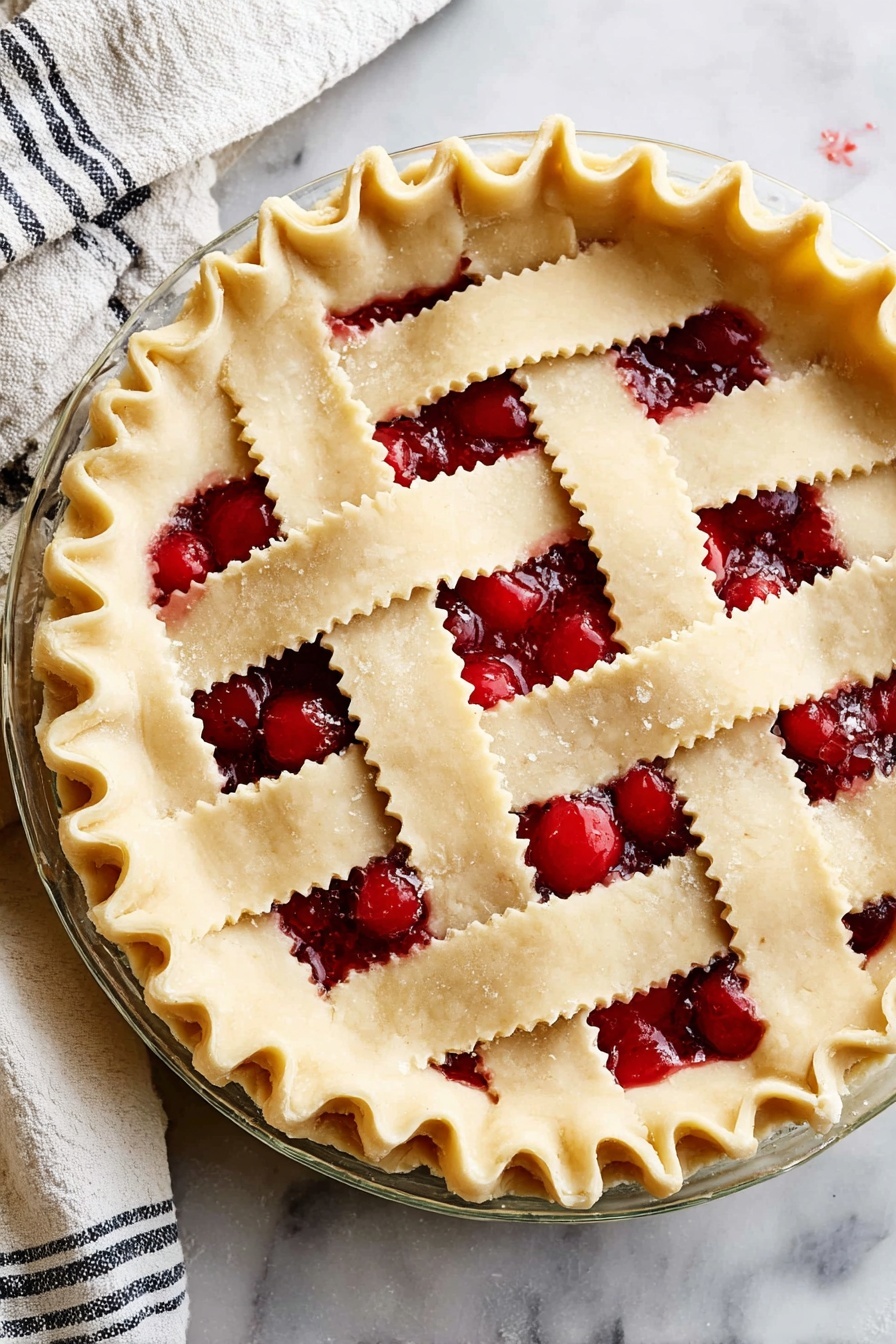
Step 6: Assemble the Pie with a Beautiful Lattice
Remove the bottom crust from the fridge and pour in the cooled cherry filling, spreading it evenly. Transfer the top crust to a cutting board and slice it into 1-inch strips using a sharp knife or pizza cutter. Lay 4 to 5 strips evenly crosswise over the filling. Then weave another 4 to 5 strips perpendicular, carefully pulling back strips as you go to create that classic lattice pattern. Trim the edges of the lattice, then fold the bottom crust’s edges over so it aligns neatly with the pie plate. Crimp the edges with your fingers or fork to seal in that filling goodness.
Step 7: Egg Wash, Sugar, and Bake
Brush the entire lattice crust generously with your egg wash. If you like a little sparkle and crunch, sprinkle coarse sugar on top — it’s completely optional but so pretty! Place your pie carefully on the hot baking sheet in the oven. Bake at 425°F for 20 minutes, then reduce the heat to 375°F and bake for another 40 to 50 minutes until the crust is golden brown and the filling bubbles deliciously. Keep an eye on the edges; if they brown too quickly, tent foil around them to prevent burning.
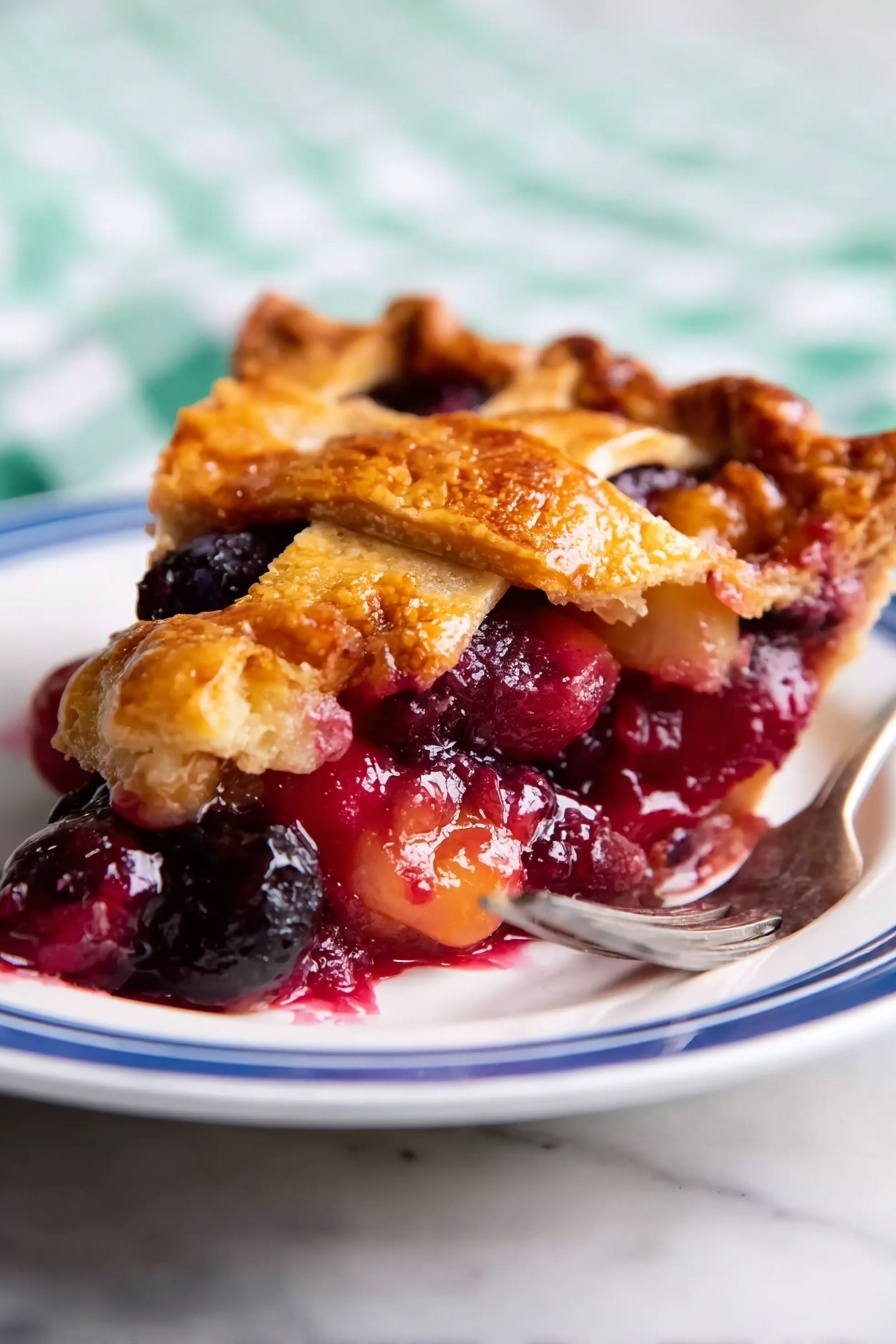
Step 8: Cool and Serve with Love
This step requires patience — let your pie cool completely, about 4 hours, so the filling sets just right and slices with ease. Serve each slice warm or room temperature, topped with a scoop of luscious vanilla ice cream. Trust me, this final moment is pure bliss.
Top Tip
Getting the perfect Cherry Pie with Lattice Crust Recipe is all about attention to detail and a few handy tricks I've learned over time. These tips will help your pie look stunning and taste delicious every time.
- Chilling the Dough: Always chill your pie dough at least 2 hours before rolling it out. This makes it much easier to handle and helps your crust bake up nice and flaky rather than shrinking or becoming tough.
- Juice Recovery: If you find you don’t have enough cherry juice after thawing, microwave your cherries for 15 seconds and press them to release more juice. It saves you from diluting the filling and keeps the flavor concentrated.
- Even Lattice Weaving: Take your time weaving the lattice strips on top. Gently pull strips back as you go to create a neat, even pattern — it really elevates the pie's presentation.
- Edge Protection: Tent the edges with foil during baking if they brown too fast. This helps prevent burning while giving the filling enough time to bubble and thicken perfectly.
How to Serve Cherry Pie with Lattice Crust Recipe
Garnishes
This cherry pie is stunning on its own, but a scoop of creamy vanilla ice cream or a dollop of freshly whipped cream takes it to the next level. For a little extra flair, sprinkle some toasted sliced almonds on top of the whipped cream or dust the pie lightly with powdered sugar just before serving.
Side Dishes
Cherry pie pairs beautifully with a warm cup of coffee or black tea for an afternoon treat. For a festive dessert spread, offer fresh berries or a simple green salad with citrus vinaigrette to balance the sweetness. If serving for a special occasion, a few cheese slices and nuts on the side create a lovely contrast to the fruity pie.
Make Ahead and Storage
Storing Leftovers
After your Cherry Pie with Lattice Crust Recipe has completely cooled — which takes about 4 hours — cover it loosely with plastic wrap or foil. Store it in the refrigerator where it will keep well for up to 3 days. This cooling time is crucial to let the filling set, so avoid slicing the pie too soon.
Freezing
You can freeze the fully baked pie for up to 2 months. To do this, wrap it tightly with plastic wrap and then with aluminum foil to prevent freezer burn. Thaw it overnight in the refrigerator before reheating.
Reheating
To warm slices of pie, place them on a baking sheet and heat in a preheated 350°F oven for about 15 to 20 minutes. This refreshes the crust’s flakiness and softens the filling. Avoid microwaving as it can make the crust soggy.
Frequently Asked Questions:
Yes! You can prepare the cherry filling a day or even two in advance. Just keep it covered in the refrigerator. When assembling the pie, make sure the filling is completely cooled before adding it to the crust.
Using a preheated baking sheet in the oven helps the bottom crust start cooking immediately, creating a crispier base. Also, chilling the bottom crust before adding filling prevents it from becoming soggy too quickly.
Absolutely! Fresh tart cherries work wonderfully in this recipe when in season. Just pit and measure out the cherries and juices as directed. Frozen cherries offer the convenience of year-round baking without sacrificing flavor.
Letting the pie cool for about 4 hours allows the filling to set properly, preventing it from spilling out when sliced. It also helps the flavors meld together beautifully.
Final Thoughts
Making this Cherry Pie with Lattice Crust Recipe is such a rewarding experience — from the buttery, flaky crust to the vibrant, tart cherry filling accented with warm spices. Whether it’s a summer gathering or a cozy night in, this pie brings warmth and joy to the table. Take your time with the lattice top and enjoy every step of the process. Most importantly, savor each delicious slice with a scoop of vanilla ice cream and the company of loved ones. Happy baking!
Print
Cherry Pie with Lattice Crust Recipe
- Prep Time: 2 hours
- Cooling Time: 4 hours
- Cook Time: 1 hour
- Total Time: 3 hours
- Yield: 8 servings
- Category: Dessert
- Method: Baking
- Cuisine: American
- Diet: Vegetarian
Description
This classic sour cherry pie features a luscious filling made from tart cherries thickened with cornstarch and accented with warm spices and almond extract. The flaky homemade pie crust forms a beautiful lattice top that bakes to golden perfection. Perfect for summer or anytime using frozen cherries, this pie is wonderful served with vanilla ice cream.
Ingredients
Filling
- 2 pounds frozen pitted tart cherries, thawed, juices reserved
- 1 cup reserved cherry juice
- ¼ cup cornstarch
- ¼ cup plus 1 tablespoon water
- ¾ cup cane sugar
- ½ teaspoon cinnamon
- ½ teaspoon ground ginger
- ¼ teaspoon almond extract
- Pinch salt
Pie Dough
- 1 recipe Pie Crust, chilled at least 2 hours (for a 9- or 9.5-inch pie)
For Assembly
- 1 large egg
- 1 tablespoon water (for egg wash)
- Coarse sugar, optional
- Vanilla ice cream, for serving
Instructions
- Prepare cherries and juices: Place thawed cherries in a strainer over a bowl to catch excess juices. Measure out 1 cup of the cherry juice for the filling, saving any leftover juice for another use.
- Make cornstarch slurry: Combine cornstarch and ¼ cup water in a small bowl until smooth; set aside.
- Cook cherry filling: Bring reserved 1 cup cherry juice to a boil in a small saucepan. Stir in sugar and return to a boil until dissolved. Add cornstarch slurry and stir continuously until the mixture thickens and turns clear and glossy. Remove from heat and stir in cinnamon, ginger, almond extract, and salt. Let cool completely.
- Roll out bottom crust: Roll out chilled pie dough to fit a 9 or 9.5-inch pie plate, leaving a ½-inch overhang. Cover loosely with plastic wrap and chill for 30 minutes. Meanwhile, position oven rack in bottom third and place a baking sheet on it; preheat oven to 425°F with the sheet inside.
- Roll out top crust: Roll out remaining pie dough, transfer to a baking sheet, cover loosely with plastic wrap, and chill alongside bottom crust.
- Prepare egg wash: Whisk together egg and remaining 1 tablespoon water in a small bowl; set aside.
- Assemble pie: Remove bottom crust from fridge and pour in cooled cherry filling. Transfer top crust to a cutting board and cut into 1-inch strips. Lay 4 to 5 strips crosswise over the pie. Weave 4 to 5 more strips perpendicular over the crosswise strips to create a lattice, pulling strips as needed. Trim edges and fold bottom crust edges over lattice, aligning with pie plate. Crimp edges to seal.
- Apply egg wash and sugar: Brush lattice with egg wash and sprinkle with coarse sugar if desired.
- Bake pie: Place pie on hot baking sheet in oven. Bake at 425°F for 20 minutes. Reduce heat to 375°F and bake for an additional 40 to 50 minutes, until crust is golden and filling bubbles. Tent edges with foil if they brown too quickly.
- Cool and serve: Allow pie to cool completely, about 4 hours, before slicing. Serve with vanilla ice cream if desired.
Notes
- If you don’t have 1 cup of cherry juice after thawing, microwave the cherries for 15 seconds and then press to release more juice. Repeat as needed. Save any extra juice for another use.
- Making pie dough ahead of time and chilling improves handling and crust texture.
- A lattice crust lets steam escape and creates a beautiful presentation.
- Use frozen tart cherries when fresh sour cherries are unavailable to enjoy this pie year-round.
- Coarse sugar on top adds a nice crunch and sparkle but is optional.
- Cooling the pie completely before serving ensures the filling sets properly.
Nutrition
- Serving Size: 1 slice
- Calories: 340 kcal
- Sugar: 27 g
- Sodium: 130 mg
- Fat: 14 g
- Saturated Fat: 4 g
- Unsaturated Fat: 8 g
- Trans Fat: 0 g
- Carbohydrates: 48 g
- Fiber: 3 g
- Protein: 3 g
- Cholesterol: 35 mg


Leave a Reply