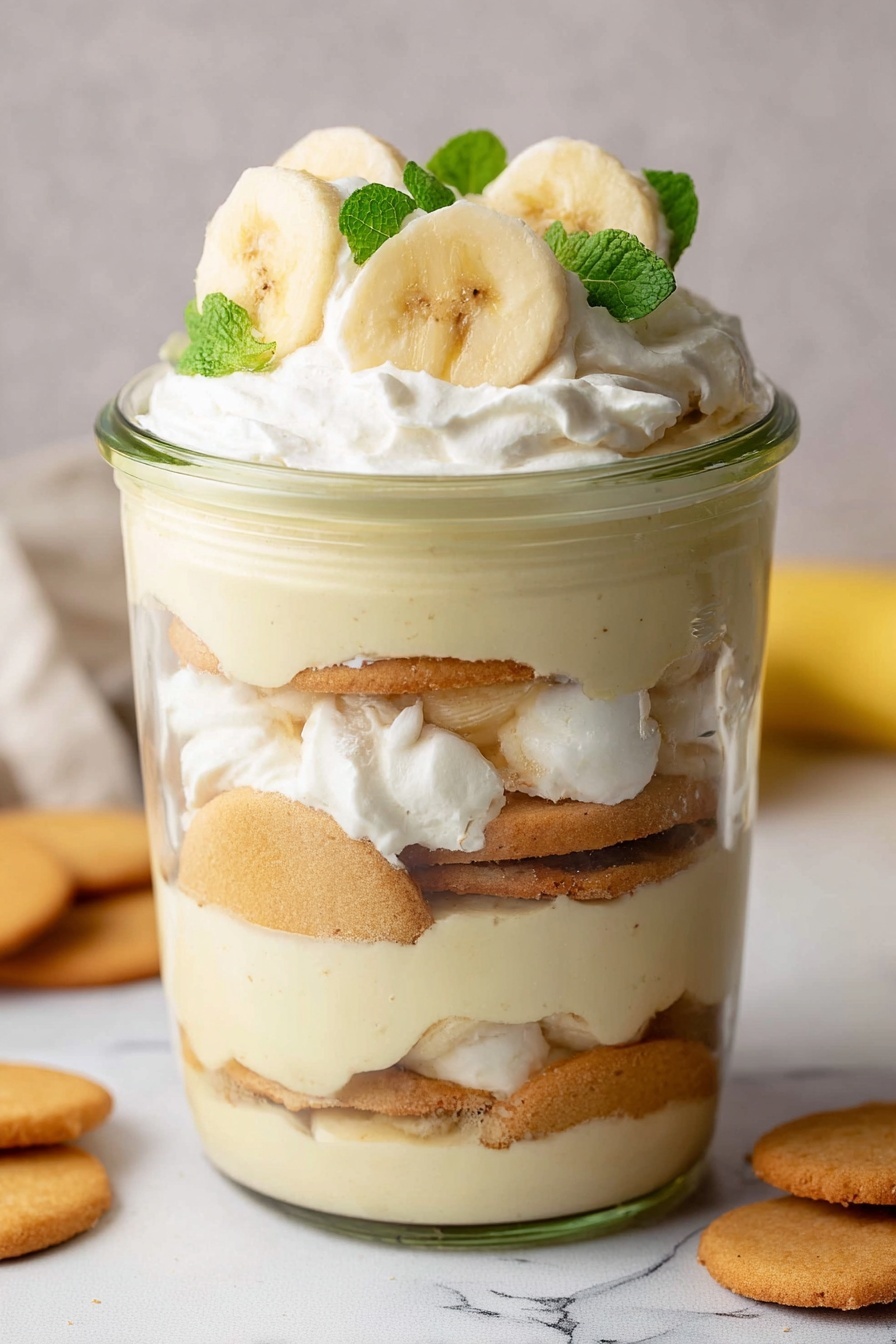
There’s something magical about creamy, dreamy banana pudding that just feels like a warm hug in dessert form. This Homemade Banana Pudding with Creamy Topping Recipe hits all the right notes—rich pudding, tender bananas, crisp wafers, and a luscious topping that ties it all together perfectly.

Jump to:
- Why You'll Love This Recipe
- Ingredients & Why They Work
- Make It Your Way
- Step-by-Step: How I Make Homemade Banana Pudding with Creamy Topping Recipe
- Top Tip
- How to Serve Homemade Banana Pudding with Creamy Topping Recipe
- Make Ahead and Storage
- Frequently Asked Questions:
- Final Thoughts
- Homemade Banana Pudding with Creamy Topping Recipe
Why You'll Love This Recipe
I have to admit, this homemade banana pudding quickly became a staple in my kitchen. It’s one of those recipes that feels special yet is surprisingly easy to make, turning simple ingredients into something memorable. Plus, that creamy topping? It’s like the cherry on top of an already perfect dessert.
- Rich, authentic flavor: Using real vanilla bean paste and banana extract takes the pudding to a whole new level of deliciousness.
- Perfect creamy topping: The blend of cream cheese, Cool Whip, and sweetened condensed milk creates a silky layer that’s balanced but indulgent.
- Great make-ahead dessert: You can prepare everything in advance and let the flavors meld, making it perfect for gatherings or a comforting treat.
- Customizable and approachable: Whether you want to add bourbon or skip it, use different banana varieties, or swap toppings, it’s easy to tailor to your taste.
Ingredients & Why They Work
Every ingredient in this recipe plays a key role—from the creamy dairy that makes the pudding luscious, to the crumbly Nilla wafers that add texture. A quick heads up on some of the staples you’ll want to have or pick up for that perfect balance.
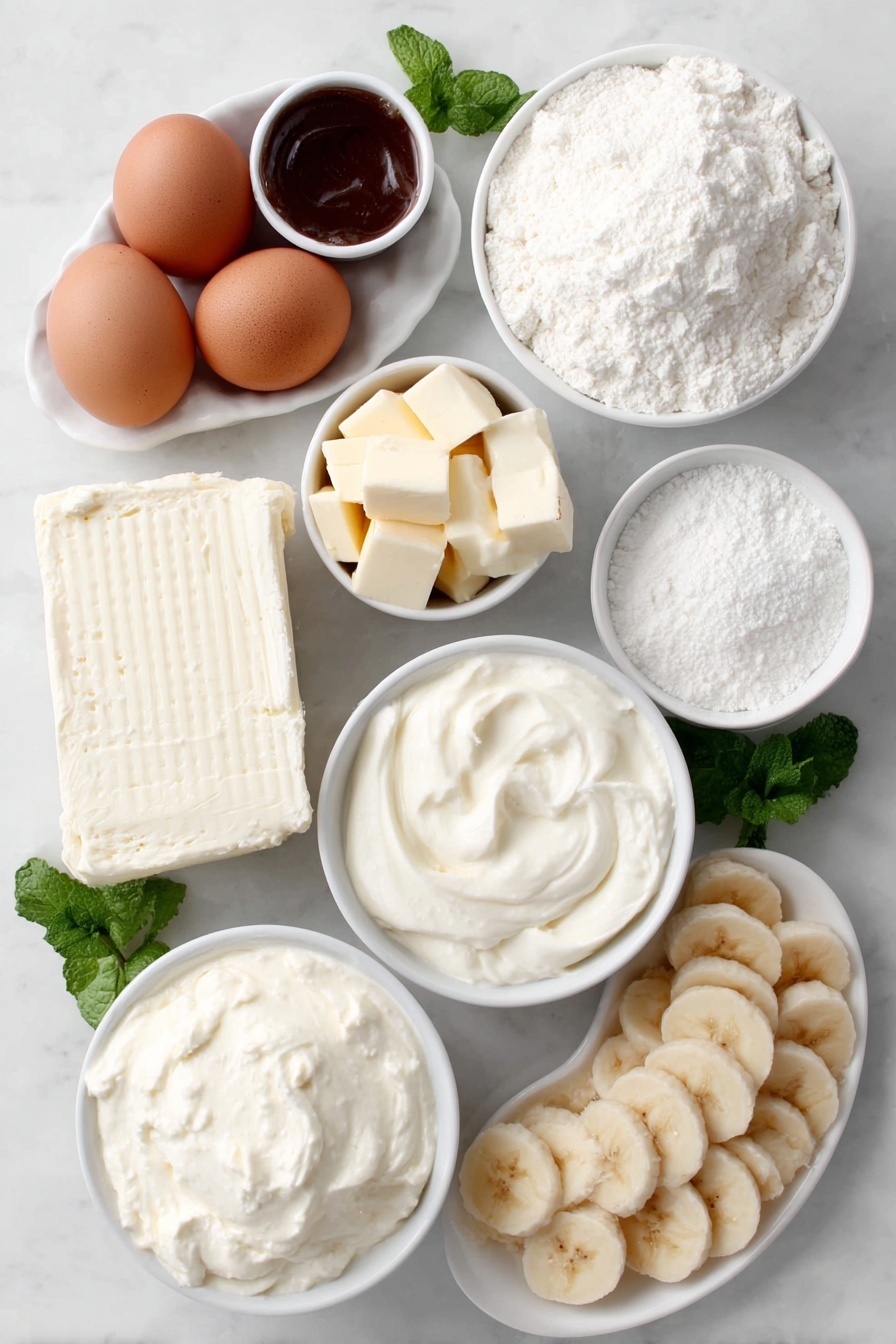
- Whole milk: This adds richness without being too heavy; it’s the base that works well with cream.
- Heavy whipping cream: For that velvety texture and a hint of extra creaminess.
- Bourbon (optional): I love this little splash—it adds subtle warmth and depth, but feel free to skip for kid-friendly versions.
- Egg yolks: They thicken the pudding naturally and give it a gorgeous, silky finish.
- Vanilla bean paste: You’ll love how the real vanilla flecks and flavor enhance every bite.
- Cornstarch: The magic thickening agent that creates pudding without lumps.
- Sugar (caster or granulated): Sweetens just right without overpowering the banana flavor.
- Salted butter: Adds richness and rounds out the flavors perfectly.
- Banana/banana cream extract: This boosts the banana flavor fun and fancy, especially if your bananas aren’t super ripe.
- Cream cheese (full-fat brick): For the creamy topping, this creates a tangy balance with sweetness.
- Cool Whip: Provides that airy, dreamy texture that’s easy to incorporate.
- Sweetened condensed milk: Adds sweetness and helps the topping hold together beautifully.
- Nilla wafers: The classic crisp layer that softens to perfection in the pudding.
- Bananas: Freshly sliced, they bring natural sweetness and a fresh pop of texture.
- Fresh mint leaves (optional): Such a nice touch for garnish—adds color and a hint of freshness.
Make It Your Way
One of my favorite things about this Homemade Banana Pudding with Creamy Topping Recipe is how easily you can tweak it to suit your preferences or what’s on hand. I love tossing in bourbon sometimes for a grown-up twist, but leaving it out also creates a smooth, family-friendly treat.
- Variation: Once, I swapped Cool Whip for homemade whipped cream to reduce processed ingredients, and the pudding was luxuriously fresh and less sweet—a personal favorite variation.
- Dietary tip: You can use lactose-free milk and cream cheese alternatives for a dairy-friendly version, and just keep in mind the consistency might shift slightly.
- Seasonal adjustment: In summer, I like to toss in some fresh berries with the bananas for a fruity surprise.
Step-by-Step: How I Make Homemade Banana Pudding with Creamy Topping Recipe
Step 1: Heat the Milk and Cream Gently
Start by combining the milk, heavy cream, and bourbon (if you’re using it) in a saucepan over medium-high heat. Bring it just to a simmer—meaning you’ll see little bubbles at the edges but no full boil. This slow warming invites the flavors to meld without scorching. It usually takes about 5 to 7 minutes, so keep your eyes on it!
Step 2: Whisk Your Egg Yolk Mix
While your milk mixture is heating, whisk together the egg yolks, vanilla bean paste, cornstarch, and sugar in a separate bowl. This combination looks like a paste—it’s essential to get it smooth so your pudding will be silky, not lumpy.
Step 3: Temper the Egg Yolks
This is a critical step that took me a few tries to master! Slowly add a tablespoon of the hot milk mixture to your egg yolks while stirring constantly—this warms up the eggs gently. Repeat 2-3 more times to prevent scrambled eggs and ensure the pudding sets perfectly later.
Step 4: Combine and Cook the Pudding
Now pour your tempered egg mixture back into the saucepan with the remaining milk mixture. Over medium heat, whisk constantly until the pudding thickens—usually 4 to 5 minutes. Patience here pays off; don’t rush or stop whisking unless you want scrambled pudding! Once thickened, remove from heat and stir in the butter cubes and banana extract for that rich, irresistible flavor.
Step 5: Chill the Pudding
Transfer the pudding into an airtight container and press plastic wrap directly onto the surface to prevent a skin from forming. Refrigerate for at least 4 hours or overnight—this chilling step helps it firm up and deepens the flavors beautifully.
Step 6: Prepare the Creamy Topping
Using a hand mixer or whisk, blend together the softened cream cheese, Cool Whip, sweetened condensed milk, and vanilla bean paste. Mix until smooth and fluffy—this topping will melt right into the pudding on your tongue!
Step 7: Assemble Your Banana Pudding
Now the fun part! Whether you’re layering in a big trifle dish or making individual parfait servings, start with a layer of pudding, then Nilla wafers, followed by the creamy topping and banana slices. Repeat until you reach the top, finishing with that creamy topping and a few Nilla wafers or crumbs for texture.
Pop it into the fridge for at least an hour before serving, allowing everything to settle and meld.
Top Tip
Making this Homemade Banana Pudding with Creamy Topping Recipe taught me a lot about balance, especially when working with delicate pudding and eggs. Here are a few things that helped me nail it every time—so you don’t have to guess and stress!
- Tempering is Key: Don’t rush adding hot milk to the eggs. Adding a little at a time while whisking saves you from scrambled eggs and keeps the pudding silky.
- Use Real Vanilla Bean Paste: It elevates the flavor so much more than imitation vanilla—a little splurge worth making.
- Plastic Wrap Touch: Pressing cling film directly on pudding before chilling prevents that stubborn skin that ruins the texture.
- Chill Overnight: I always find the pudding tastes best after a good night’s rest in the fridge—the flavors marry and pudding sets to perfection.
How to Serve Homemade Banana Pudding with Creamy Topping Recipe
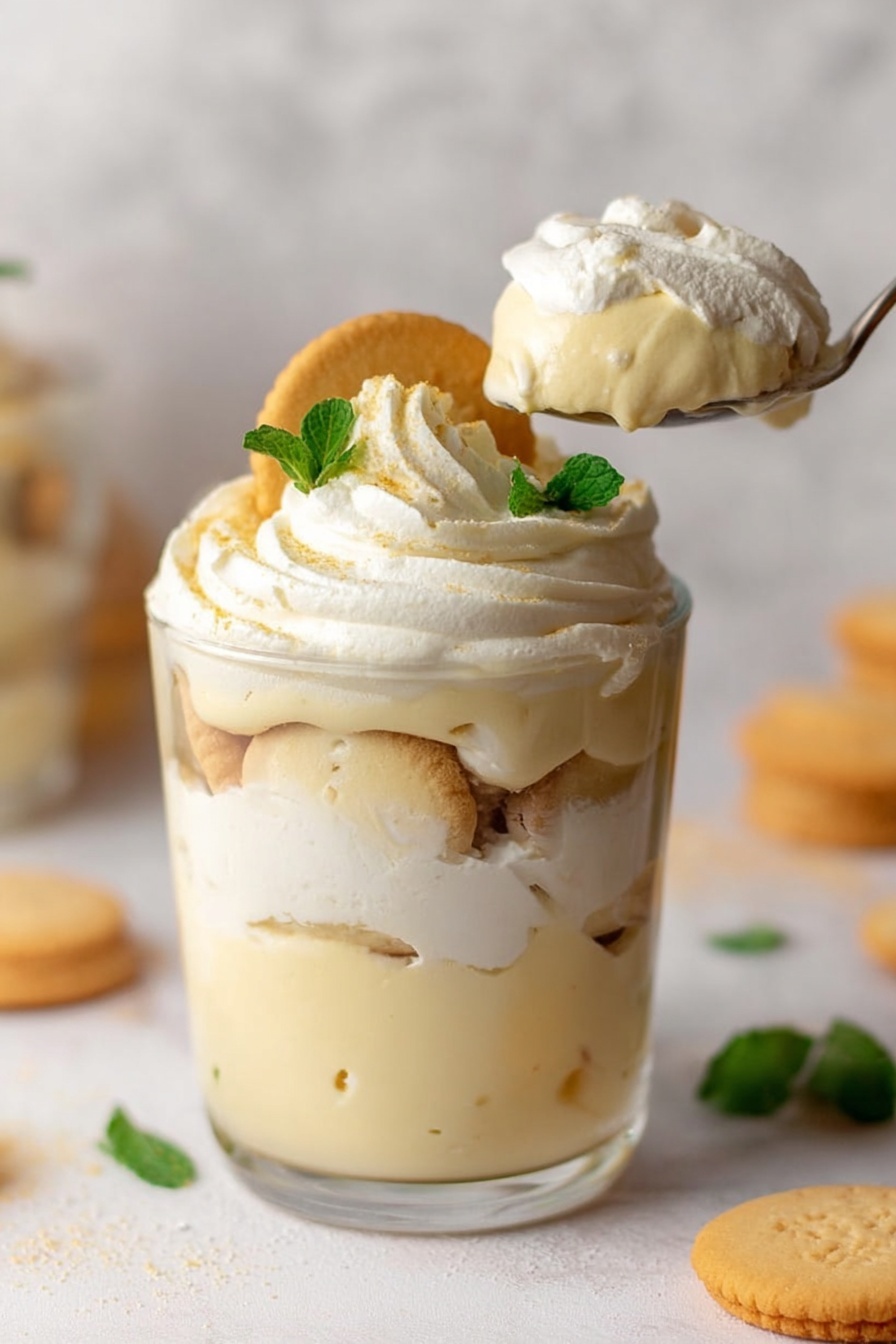
Garnishes
I love topping mine with a few fresh mint leaves—they add a pop of color and a slight hint of herbal freshness that lifts the richness. Crushed Nilla wafer crumbs sprinkled on top give that satisfying crunch balance to the creamy layers. Sometimes, I even toss on a few toasted coconut flakes for a tropical twist!
Side Dishes
Though this pudding is a dessert star on its own, I sometimes serve it alongside light bites like homemade angel food cake slices or buttery tea sandwiches for a lovely afternoon spread. If you want to keep things simple, a cup of strong coffee or a glass of chilled dessert wine pairs beautifully.
Creative Ways to Present
I’ve had fun creating mini banana pudding parfaits in little glass jars for parties—everyone loves their personal-sized treat. Layering the pudding attractively so you see banana slices and wafers through the glass is a showstopper! For special occasions, topping with edible flowers makes it feel truly festive.
Make Ahead and Storage
Storing Leftovers
Once assembled, store your banana pudding covered tightly in the fridge. It keeps great for up to 3 days, though I promise it rarely lasts that long in my house! The flavors deepen and textures meld even more after a night in the fridge.
Freezing
I haven’t had the best luck freezing assembled banana pudding because the texture of bananas and wafers changes when thawed. However, you can freeze the pudding base (before assembly) in an airtight container for up to one month—just thaw it overnight in the fridge before adding your toppings and assembling.
Reheating
Because this is a chilled dessert, I don’t recommend reheating. Instead, just scoop it straight from the fridge. If your pudding feels very stiff, let it sit at room temperature for 10 minutes before serving for a creamier mouthfeel.
Frequently Asked Questions:
Yes! You can make a version without eggs by using cornstarch and milk with vanilla as a thickener, but the texture will be slightly different—less silky and rich than the original custard base.
If you don’t have Nilla wafers, simple vanilla or butter cookies work great as a substitute. Shortbread cookies add a buttery note, and even graham crackers can offer an interesting texture and slight sweetness.
The best bananas for this pudding are ripe but still firm—think yellow with a few brown spots. Overly ripe bananas can be too mushy and overpower the flavor, while under-ripe ones might not be sweet enough.
Absolutely! In fact, chilling the pudding and assembled dessert overnight really helps the flavors deepen and textures to set just right. Just keep it tightly covered in the fridge until ready to serve.
Final Thoughts
This Homemade Banana Pudding with Creamy Topping Recipe really feels like a celebration of classic comfort food, but with a touch of my own kitchen flair. I hope you enjoy making it as much as I do—it’s one of those desserts that brings smiles all around and always invites seconds. So next time you want something indulgently sweet yet fresh and nostalgic, give this recipe a try and share it with those you love.
Print
Homemade Banana Pudding with Creamy Topping Recipe
- Prep Time: 25 minutes
- Cook Time: 10 minutes
- Total Time: 35 minutes
- Yield: 6 servings
- Category: Dessert
- Method: Stovetop
- Cuisine: Southern American
Description
This homemade banana pudding recipe features a rich and creamy pudding made from whole milk, heavy cream, and egg yolks, flavored with vanilla bean paste and banana extract. Topped with a luscious cream cheese and Cool Whip mixture, layered with Nilla wafers and fresh bananas, this classic Southern dessert is perfect for any occasion and can be assembled in a trifle dish or individual glasses.
Ingredients
Banana Pudding
- 2 cups whole milk
- 1 cup heavy whipping cream
- 1 tablespoon bourbon (optional)
- 5 large egg yolks
- 1 tablespoon vanilla bean paste
- ¼ cup cornstarch
- ½ cup caster sugar (or granulated sugar)
- ¼ cup salted butter, cut into cubes
- 1 tablespoon banana or banana cream extract
Creamy Topping
- 8 ounces full-fat brick cream cheese, room temperature
- 8 ounces Cool Whip, room temperature
- ½ cup sweetened condensed milk
- 1 tablespoon vanilla bean paste
Assembly
- 1 (11-ounce) box Nilla wafers
- 4 medium bananas, sliced into ½-inch thick slices
- Fresh mint leaves, for garnish (optional)
Instructions
- Heat the Cream: In a saucepan over medium-high heat, combine the milk, heavy cream, and bourbon if using. Heat the mixture until it is barely hot and simmering gently but not boiling, about 7 minutes.
- Whisk Egg Mixture: In a medium bowl, whisk together the egg yolks, vanilla bean paste, cornstarch, and sugar until fully combined and pasty in consistency.
- Temper Egg Yolks: Gradually add a tablespoon of the hot cream mixture into the egg yolks while stirring constantly to temper the eggs. Repeat 2 to 3 more times to prevent curdling.
- Combine Mixtures: Remove the pan from heat but keep it on the stove. Pour the tempered egg yolk mixture slowly into the hot cream, whisking constantly to avoid cooking the eggs, for about 2 minutes.
- Thicken the Pudding: Reduce heat to medium and return the pan to the stove. Continue whisking for 4 to 5 minutes until the pudding thickens to a custard-like consistency. Turn off the heat.
- Finish Pudding: Stir in the cubed butter and banana extract until fully melted and incorporated by the residual heat.
- Chill Pudding: Transfer pudding to an airtight container and cover the surface directly with plastic wrap to avoid skin formation. Refrigerate for at least 4 hours or overnight for best texture.
- Prepare Creamy Topping: In a large bowl, using a handheld mixer or whisk, combine softened cream cheese, Cool Whip, sweetened condensed milk, and vanilla bean paste until smooth and well blended.
- Assemble the Banana Pudding: In your chosen dish or individual glasses, layer pudding, Nilla wafers, creamy topping, and banana slices in that order. Repeat layers until filled, finishing with creamy topping and wafer crumbs on top.
- Chill Before Serving: Refrigerate the assembled pudding for at least 1 hour to set. Garnish with fresh mint leaves if desired, then serve and enjoy.
Notes
- Make sure to temper the egg yolks carefully to prevent scrambling.
- Use ripe but firm bananas to avoid mushiness in the pudding.
- The bourbon is optional but adds a depth of flavor.
- Plastic wrap directly on the pudding surface helps prevent a gel skin from forming.
- For a dairy-free version, substitute milk and cream with plant-based alternatives and use dairy-free cream cheese and whipped topping.
- Chilling the pudding overnight improves flavor and texture.
- The pudding can be assembled in large or individual dishes depending on preference.
Nutrition
- Serving Size: 1 serving
- Calories: 420 kcal
- Sugar: 35 g
- Sodium: 150 mg
- Fat: 22 g
- Saturated Fat: 12 g
- Unsaturated Fat: 8 g
- Trans Fat: 0 g
- Carbohydrates: 45 g
- Fiber: 2 g
- Protein: 6 g
- Cholesterol: 150 mg

Leave a Reply