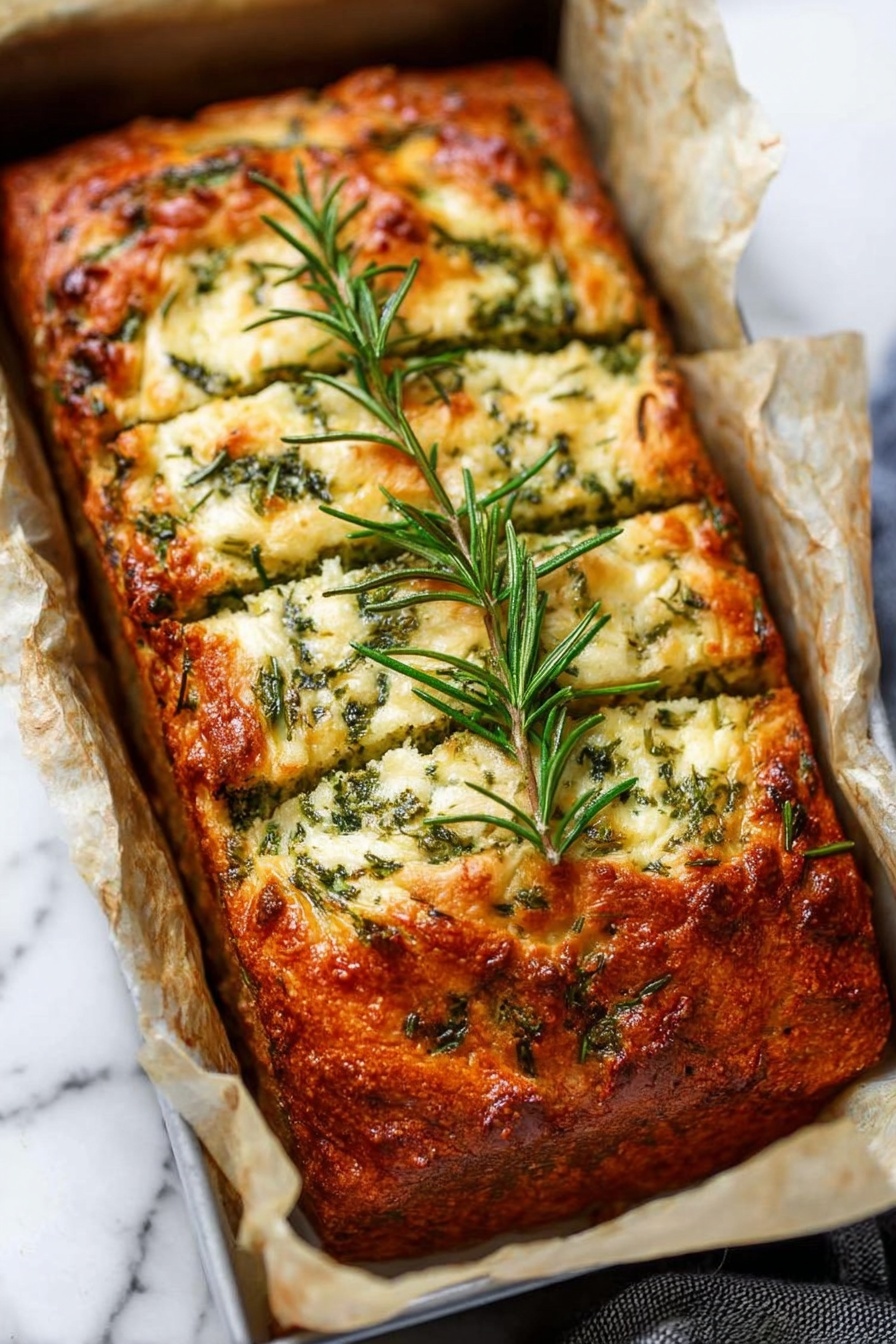
There’s something truly comforting about the aroma of fresh bread mingled with garlic, herbs, and melting cheese—this Cheese and Herb Garlic Quick Bread Recipe brings all that home in less than an hour. It’s an easy, flavorful loaf that’s perfect for any meal or just snacking on its own.

Jump to:
- Why You'll Love This Recipe
- Ingredients & Why They Work
- Make It Your Way
- Step-by-Step: How I Make Cheese and Herb Garlic Quick Bread Recipe
- Top Tip
- How to Serve Cheese and Herb Garlic Quick Bread Recipe
- Make Ahead and Storage
- Frequently Asked Questions:
- Final Thoughts
- Cheese and Herb Garlic Quick Bread Recipe
Why You'll Love This Recipe
I became obsessed with this Cheese and Herb Garlic Quick Bread Recipe the first time I baked it. The way the cheese melts into gooey ribbons and the herb-garlic swirl perfumes your kitchen? Absolute magic. Plus, it’s fast enough to whip up even on weeknights.
- Speedy comfort: Quick bread means no waiting on yeast or rises—perfect for when you want fresh bread, like, yesterday.
- Flavor-packed: Garlic and herbs aren’t just sprinkled; they’re swirled right through for every bite to burst with taste.
- Cheesy goodness: I love slicing the cheese thicker so you get gooey ribbons through the loaf—makes it feel extra special.
- Super adaptable: You can easily swap herbs or cheeses, making it your own creation every time you bake it.
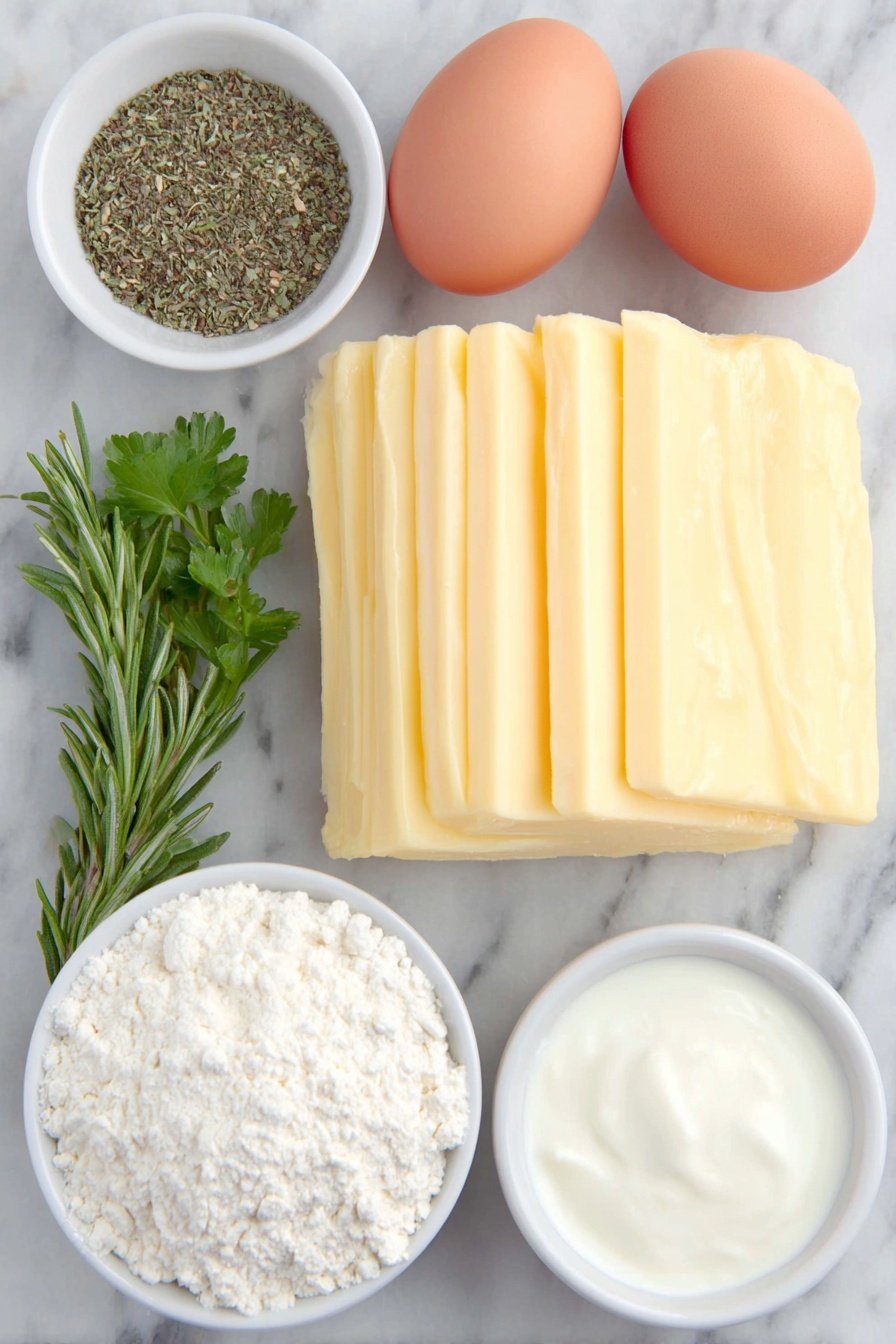
Ingredients & Why They Work
This recipe balances creamy cheese, fragrant herbs, and garlic with a quick bread base that’s rich from yogurt and butter. Each ingredient plays a perfect supporting role to keep the bread moist but structured, cheesy but savory, and bursting with herb flavor.
- Cheddar or Tasty Cheese: Cutting slices thicker helps create those beautiful cheese ribbons embedded in the bread when baked.
- Fresh Rosemary & Parsley: Fresh herbs bring brightness and an earthy aroma that dried ones can’t quite match.
- Dried Oregano & Thyme: Adding depth and classic Mediterranean warmth to the herb mix.
- Garlic Cloves: Fresh garlic pressed or grated infuses the swirl with a punch without overpowering it.
- Extra Virgin Olive Oil: Incorporated into the herb swirl, it carries flavors and keeps everything moist.
- Plain Flour & Baking Soda: The quick bread combo for a tender crumb and slight rise without yeast.
- Cooking Salt: Enhances flavors overall—remember to adjust if using finer table salt.
- Plain Yogurt: Adds moisture, richness, and a subtle tang that keeps the bread from feeling heavy.
- Milk & Eggs: Provide structure and tenderness while enriching the dough.
- Unsalted Butter & Olive Oil: Combining both adds richness and helps keep the crumb soft and flavorful.
Make It Your Way
I love how flexible this Cheese and Herb Garlic Quick Bread Recipe is. Over time, I’ve played around with herb blends and cheese choices, and you’ll definitely enjoy personalizing it to whatever you have in the fridge or garden.
- Go cheesy: Once, I swapped the sliced cheese for shredded cheddar mixed through the batter, and it made the entire loaf ooze cheesy goodness instead of ribbons. Totally delicious!
- Herb swaps: Basil and thyme make a lovely combo here if you want something a little different. Or try adding a dollop of pesto into the swirl instead of fresh herbs for a vibrant pop.
- Garlic lovers: Double the garlic in the swirl if you’re craving garlic bread vibes. Just be ready for some extra savory punch.
- Gluten-free twist: I haven’t tested it extensively, but a gluten-free baking mix swap might work—just adjust liquids as needed for texture.
Step-by-Step: How I Make Cheese and Herb Garlic Quick Bread Recipe
Step 1: Prep Your Pan and Oven
Preheat your oven to 180°C (350°F). I lightly butter my loaf pan, then line it with parchment paper to make sure the loaf releases easily after baking. This little step saves me from any frustration with sticking later.
Step 2: Make the Herb Garlic Swirl
Mix the finely chopped rosemary, parsley, oregano, thyme, crushed garlic, olive oil, and salt until you have a thick, dollop-able paste. If you want it smoother, a quick blitz with a stick blender works wonders—but I like the texture when it’s hand-chopped.
Step 3: Whisk Dry and Wet Ingredients Separately
In one bowl, whisk together the flour, baking soda, and salt. In another bowl, beat the yogurt, milk, eggs, melted butter, olive oil, and extra garlic until blended. Keeping these separate avoids overmixing when combined, which keeps the bread tender.
Step 4: Combine and Layer
Make a well in the dry ingredients, pour in the wet mix, and gently fold until just combined. Overmixing can toughen the bread, so stop as soon as no dry flour remains.
Pour one-third of the batter into the pan, dollop a third of the herb mixture evenly across, then use a knife to swirl the herbs into the batter up and down and around. Next, press one-third of the sliced cheese randomly into batter—some slices poking out creates gorgeous cheese ribbons.
Repeat this layering two more times until all ingredients are used. The surface may look rustic with herbs and cheese exposed—that’s exactly what you want for maximum flavor and texture.
Step 5: Bake and Cool
Bake for 30 minutes until golden on top, then cover loosely with foil and bake for another 20 minutes to cook through. Test with a skewer in the center—it should come out clean when done.
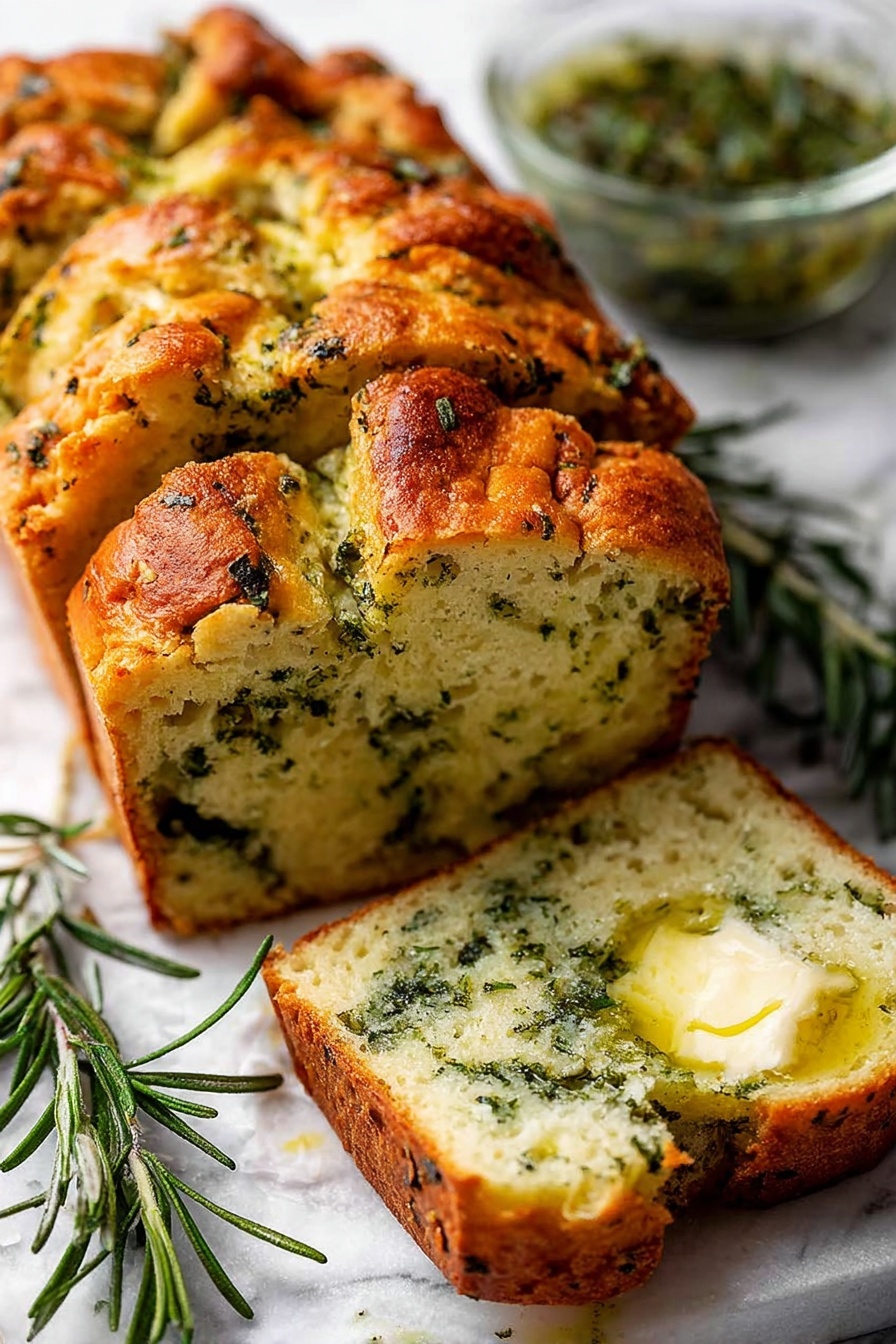
Cool the bread in the pan for 5 minutes, then carefully turn out onto a wire rack for at least 10 more minutes. I usually sneak a slice while it’s warm, slathered with butter—irresistible!
Top Tip
This recipe might seem straightforward, but I learned a few tricks that make it incredibly tasty and foolproof.
- Cheese Thickness: Cutting the cheese into uneven ribbons (some wider, some narrower) creates delightful pockets of gooey cheese instead of it melting uniformly.
- Don’t Overmix: Mixing the batter just until the dry ingredients disappear keeps the bread soft and tender; overmixing can make it dense.
- Swirling Technique: When swirling herbs into the batter, be gentle but persistent—this makes the herbs beautifully distributed and visually enticing.
- Foil Covering: Cover the bread with foil after 30 minutes to prevent over-browning while allowing it to cook through perfectly.
How to Serve Cheese and Herb Garlic Quick Bread Recipe
Garnishes
Fresh parsley sprinkled on top right after baking adds a pop of color and freshness. For extra decadence, a brush of melted herb butter on warm slices is heavenly. Sometimes, I even spread a little cream cheese mixed with chopped chives—it’s a winner every time.
Side Dishes
I love pairing this bread with soups—tomato basil or creamy pumpkin are favorites. It also goes well alongside a simple salad or with a charcuterie board for grazing. It’s versatile enough to be a snack or part of a full meal.
Creative Ways to Present
I’ve had great fun presenting this bread as mini pull-apart loaves using muffin tins, perfect for parties. You can also slice it thick, toast it lightly, and top with avocado or smoked salmon for a fancy brunch. Floating fresh herb sprigs on the plate instantly amps up the presentation.
Make Ahead and Storage
Storing Leftovers
I keep leftovers wrapped tightly in plastic wrap or stored in an airtight container on the counter for up to 4 days. After that, I move the bread to the fridge to keep it fresh longer but recommend reheating or toasting to bring back that fresh-baked texture.
Freezing
This bread freezes beautifully. I slice it before freezing, then pop slices into zip-lock bags. When you’re ready, just toast or warm them up straight from the freezer for an easy snack or side.
Reheating
For best results, I reheat slices in a toaster oven or under a grill for a few minutes to crisp the edges and warm the cheese back to melty perfection. Microwave works in a pinch but can make the bread a bit soggy.
Frequently Asked Questions:
Yes, you can substitute shredded cheese for the sliced cheese by mixing about 2 cups tightly packed (around 200g) into the batter right after combining the wet and dry ingredients. It will melt throughout the bread, giving a consistent cheesy flavor but without the visible ribbons that the slices create.
You can substitute fresh herbs with about 1 tablespoon of dried herbs for this recipe. The flavor won’t be quite as vibrant but still delicious. Alternatively, a dollop of pesto (around ⅓ to ½ cup) can be mixed into the herb swirl for an easy swap with great flavor.
Yes, covering the bread with foil after the initial 30 minutes prevents the top from over-browning while allowing the inside to continue baking thoroughly. It keeps the crust tender and the loaf moist.
I haven’t tested a gluten-free version extensively, but you could try swapping in a gluten-free all-purpose baking flour blend. You might need to adjust the liquid amounts slightly to get the right batter consistency. It’s worth experimenting if gluten-free bread is your goal!
Final Thoughts
This Cheese and Herb Garlic Quick Bread Recipe is one of those recipes I keep returning to because it makes my kitchen smell amazing and my family smile with every bite. It’s deceptively simple but packed with flavor, and the customization options make it feel like your own signature loaf. Give it a try—you’ll wonder how you ever did without it!
Print
Cheese and Herb Garlic Quick Bread Recipe
- Prep Time: 15 minutes
- Cook Time: 50 minutes
- Total Time: 1 hour 20 minutes
- Yield: 8 servings
- Category: Bread
- Method: Baking
- Cuisine: Western
- Diet: Vegetarian
Description
This Cheese, Garlic and Herb Quick Bread combines savory cheddar with fragrant fresh herbs and garlic for a deliciously moist and flavorful loaf. Perfect served warm with butter, this easy-to-make bread uses simple ingredients and a quick baking method to produce a beautiful herb swirl and cheesy ribbons throughout the bread.
Ingredients
Cheese
- 7 oz block of cheddar or tasty cheese, cut into 3mm thick slices of varying widths
Herb and Garlic Swirl
- 2 tablespoon fresh rosemary, finely chopped
- 2 tablespoon fresh parsley leaves, finely chopped
- 1 teaspoon dried oregano
- ½ teaspoon dried thyme
- 2 garlic cloves, crushed or finely grated
- 3 tablespoon extra virgin olive oil
- ½ teaspoon cooking salt or kosher salt (halve if using fine table salt)
Dry Ingredients
- 2 ¼ cups plain (all-purpose) flour
- 1 teaspoon baking soda (substitute 3 ½ teaspoon baking powder)
- ¾ teaspoon cooking salt or kosher salt (halve if using table salt)
Wet Ingredients
- ½ cup plain yogurt (Greek or regular, full fat, unsweetened)
- ¾ cup milk (full fat preferred, low fat acceptable)
- 2 large eggs (~50-55g each)
- 3 ½ tablespoon (50g) unsalted butter, melted
- 2 tablespoon olive oil
- 2 small garlic cloves, crushed or grated
Instructions
- Preheat Oven: Preheat your oven to 180°C (350°F), suitable for both fan and conventional ovens.
- Prepare Loaf Tin: Lightly grease a 21 x 11 x 7 cm loaf pan with butter or oil spray, then line it with baking paper to prevent sticking.
- Make Herb and Garlic Swirl: In a small bowl, mix together finely chopped rosemary, parsley, dried oregano, dried thyme, crushed garlic, olive oil, and salt until it forms a thick dollop-able mixture.
- Mix Dry Ingredients: Whisk together the plain flour, baking soda, and salt in a separate bowl until well combined.
- Mix Wet Ingredients: In another bowl, whisk together the plain yogurt, milk, eggs, melted unsalted butter, olive oil, and grated garlic until smooth.
- Combine Wet and Dry: Create a well in the dry ingredients and pour in the wet mixture. Gently mix just until combined to avoid overmixing, which can toughen the bread.
- Layer Batter, Herbs, and Cheese – First Layer: Pour one-third of the batter into the prepared loaf tin. Dollop one-third of the herb mixture over the top and use a knife to swirl it through the batter, mixing up and down and folding the batter to create ribbons. Add one-third of the cheese slices randomly into the batter, pushing some fully in and leaving some partially exposed.
- Layer Batter, Herbs, and Cheese – Second and Third Layers: Repeat the previous layering process two more times, each with the remaining batter, herbs, and cheese slices. Don’t worry if herbs and cheese are visible on the surface; this looks wonderful once baked.
- Bake Bread: Bake for 30 minutes or until the top turns golden brown. After 30 minutes, remove the bread and cover it loosely with foil. Return it to the oven and bake for an additional 20 minutes, making total baking time 50 minutes. Check doneness by inserting a skewer into the center; it should come out clean.
- Cool and Serve: Let the bread cool in the loaf pan for 5 minutes, then transfer it to a cooling rack. Allow to cool for at least 10 more minutes before slicing thickly. Serve with butter if desired.
Notes
- Cheese: Use sliced cheese about 3-4mm thick with varying widths to create attractive ribbons. Alternatively, you can use 2 cups (200g) tightly packed shredded cheese mixed into the batter just before baking. Avoid mozzarella as it lacks enough flavor and saltiness for this recipe.
- Herbs: Feel free to experiment with different fresh or dried herb combinations. You can substitute fresh herbs with 1 tablespoon dried herbs or use pesto (⅓ to ½ cup) for variation. Blitzing herbs with a stick blender results in a finer texture and faster preparation.
- Loaf Pan: Using a larger pan will yield a flatter loaf but does not affect the overall outcome significantly.
- Storage: Store the bread in an airtight container at room temperature for up to 4 days. For longer storage, keep it refrigerated and toast slices to refresh.
Nutrition
- Serving Size: 1 slice
- Calories: 220 kcal
- Sugar: 2 g
- Sodium: 320 mg
- Fat: 12 g
- Saturated Fat: 6 g
- Unsaturated Fat: 5 g
- Trans Fat: 0 g
- Carbohydrates: 20 g
- Fiber: 1 g
- Protein: 8 g
- Cholesterol: 60 mg


Leave a Reply