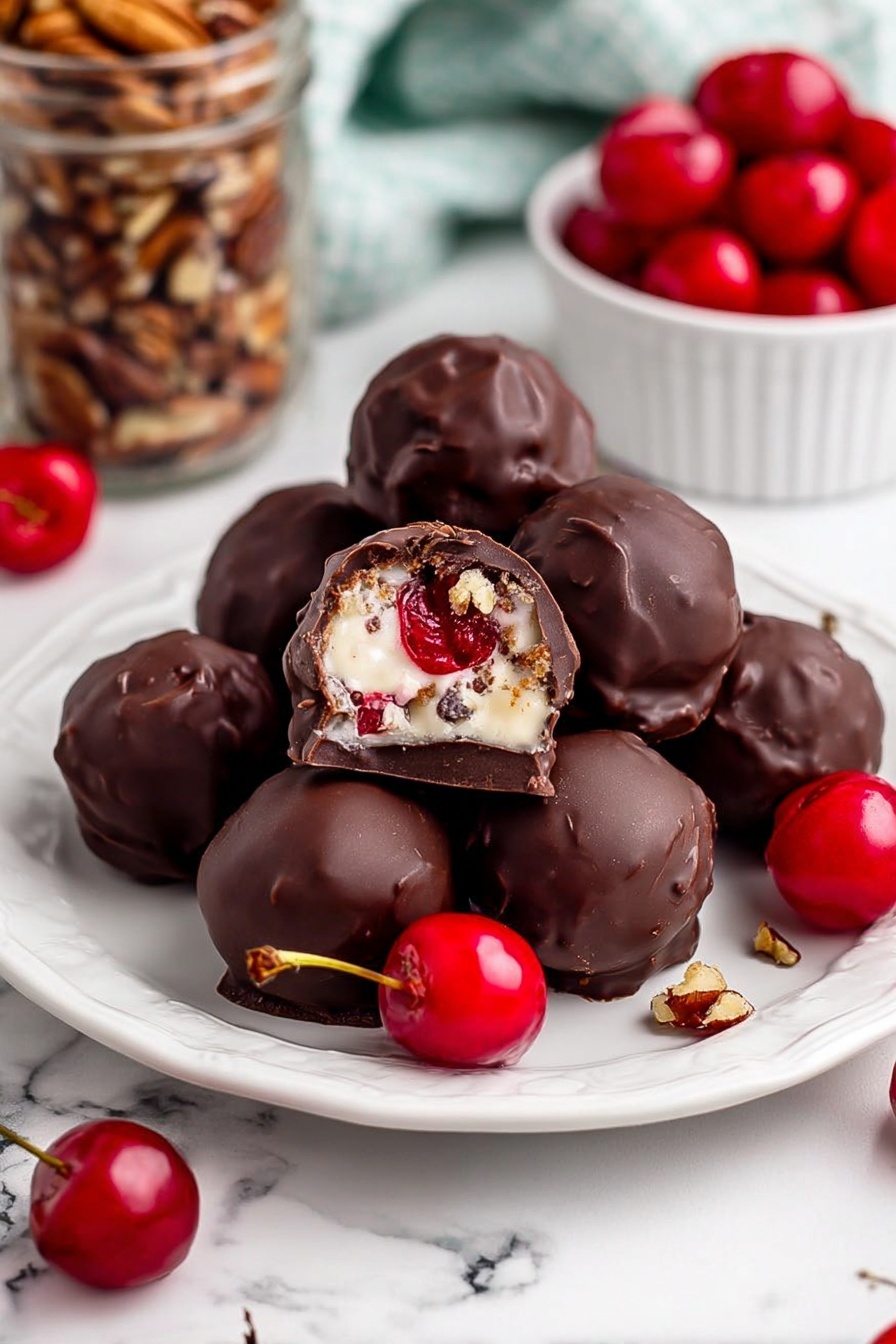
There’s something downright nostalgic about homemade treats, and the Martha Washington Candy Recipe is one of those gems that brings back the cozy warmth of family gatherings. Rich, chewy, and dipped in chocolate, these candies are a delight to make and even more fun to share with friends and loved ones.

Jump to:
Why You'll Love This Recipe
I’ve made the Martha Washington Candy Recipe more times than I can count, and each batch feels like a little celebration. The blend of creamy coconut, sweet cherries, crunchy pecans, and silky chocolate is just unbeatable — you’ll see why I keep coming back to it.
- Perfect balance of textures: chewy coconut and pecans plus smooth chocolate coating create an irresistible bite every time.
- Simple ingredients: all pantry staples that come together easily without fancy tools or complicated steps.
- Great make-ahead treat: these candies improve after chilling, so you can prepare them early for parties or gift-giving.
- Kid-friendly fun: rolling and dipping the candy balls makes for a fantastic kitchen project with little helpers.
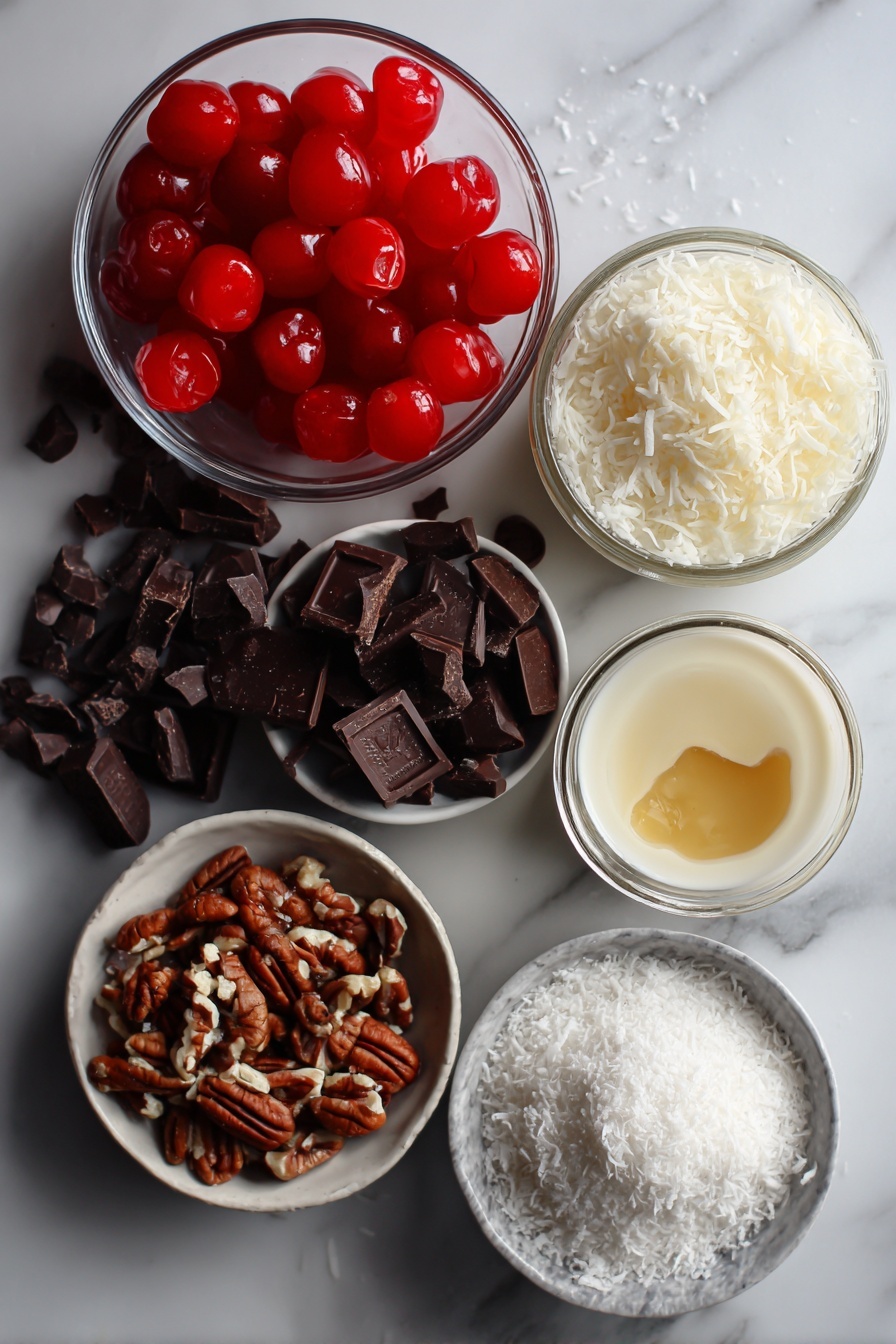
Ingredients & Why They Work
Each ingredient in the Martha Washington Candy Recipe plays a special role — from the rich butter that holds it all together, to the cherries adding bursts of juicy sweetness, and on to the toasted pecans for that crunch factor. Shopping for these isn’t tricky, but fresh, quality ingredients will definitely make your candy shine.
- Unsalted butter: Using unsalted butter lets you control the sweetness and saltiness better, plus melted butter helps everything combine smoothly.
- Powdered sugar: It dissolves quickly for a creamy texture, unlike granulated sugar which can feel grainy.
- Vanilla extract: Essential for boosting flavor depth — don’t skip it!
- Shredded coconut (sweetened): This adds chewiness and tropical flavor; sweetened coconut balances perfectly with the tart cherries.
- Sweetened condensed milk: Acts as a binder with rich sweetness and creamy consistency.
- Maraschino cherries: Chopped and drained well so they don’t add extra moisture but bring juicy pops of flavor.
- Pecans: Toasted pecans bring crunch and a nutty earthiness that contrasts the sweet coconut.
- Chocolate melting wafers: Easy to melt and smooth for coating — but you can swap for high-quality chocolate chips if you prefer.
Make It Your Way
The Martha Washington Candy Recipe is wonderfully forgiving, so I like to mix things up depending on my mood or what I have on hand. You can easily swap nuts, add a splash of almond extract, or even sprinkle some sea salt on top of the chocolate coating for a grown-up twist.
- Variation: One Christmas, I added chopped dried cranberries with the cherries for extra tartness — it was a hit with everyone.
- Nut-free option: Try sunflower seeds or omit nuts entirely if allergies are a concern, and add a little extra coconut instead.
- Chocolate choice: Dark chocolate gives these candies a richer contrast, while milk chocolate keeps them sweeter and more kid-friendly.
Step-by-Step: How I Make Martha Washington Candy Recipe
Step 1: Mix Butter, Sugar & Vanilla
Start with melting your butter — it’s easiest if you do this gently in the microwave or on the stovetop. Then, whisk it together with powdered sugar until it’s smooth and creamy. I always add the vanilla at this step so the flavor is well-distributed. It’s important not to rush; a smooth base here means your candy mixture will come together beautifully.
Step 2: Stir in Coconut & Condensed Milk
Next, fold in the shredded coconut and the sweetened condensed milk slowly. These two ingredients give the candy that signature chewiness and creamy sweetness. Make sure everything blends evenly for the best texture — you’ll end up with a thick, sticky dough that's perfect for shaping.
Step 3: Add Cherries & Pecans
Drain your maraschino cherries especially well — I pat mine with paper towels to soak up extra moisture, which helps keep your candy from getting soggy. Then gently fold in the chopped cherries and pecans. The mixture should be thick enough to hold its shape, so if it feels too loose, a bit more powdered sugar can help.
Step 4: Shape and Chill
Using a small scoop or your hands, roll the mixture into 1-inch balls. I find lining a baking sheet with parchment paper makes cleanup a breeze and stops the candies from sticking. Pop the tray into the fridge for about 30 minutes — chilling firms them up for dipping.
Step 5: Melt Chocolate and Dip
While the candy balls chill, melt your chocolate wafers carefully. I usually use the microwave in short bursts to avoid scorching. Once smooth, use a fork or dipping tool to coat each candy fully in chocolate, letting excess drip off before placing them back on the parchment. This is the messy, fun part — don’t rush it!
Step 6: Chill and Set
Return the chocolate-covered candies to the fridge for about 10-15 minutes to let the coating harden. Once firm, they're ready to enjoy — or wrap up as gifts. I promise, the wait is worth it.
Top Tip
After making Martha Washington Candy Recipe many times, I’ve picked up a few insider tricks that really help the process go smoothly and guarantee delicious results every time.
- Dry the cherries thoroughly: Extra moisture is the enemy of candy texture; I always pat my cherries dry to keep the mixture from getting too wet and sticky.
- Use a cookie scoop: This keeps your candy balls uniform in size which helps them set evenly and look prettier on the serving tray.
- Slow and steady chocolate melting: Avoid rushing this part by microwaving in 20-second intervals, stirring in between so the chocolate stays silky and doesn't seize.
- Chill before dipping: Cold candy balls hold their shape better during dipping, making it easier to coat and preventing chocolate drips or clumping.
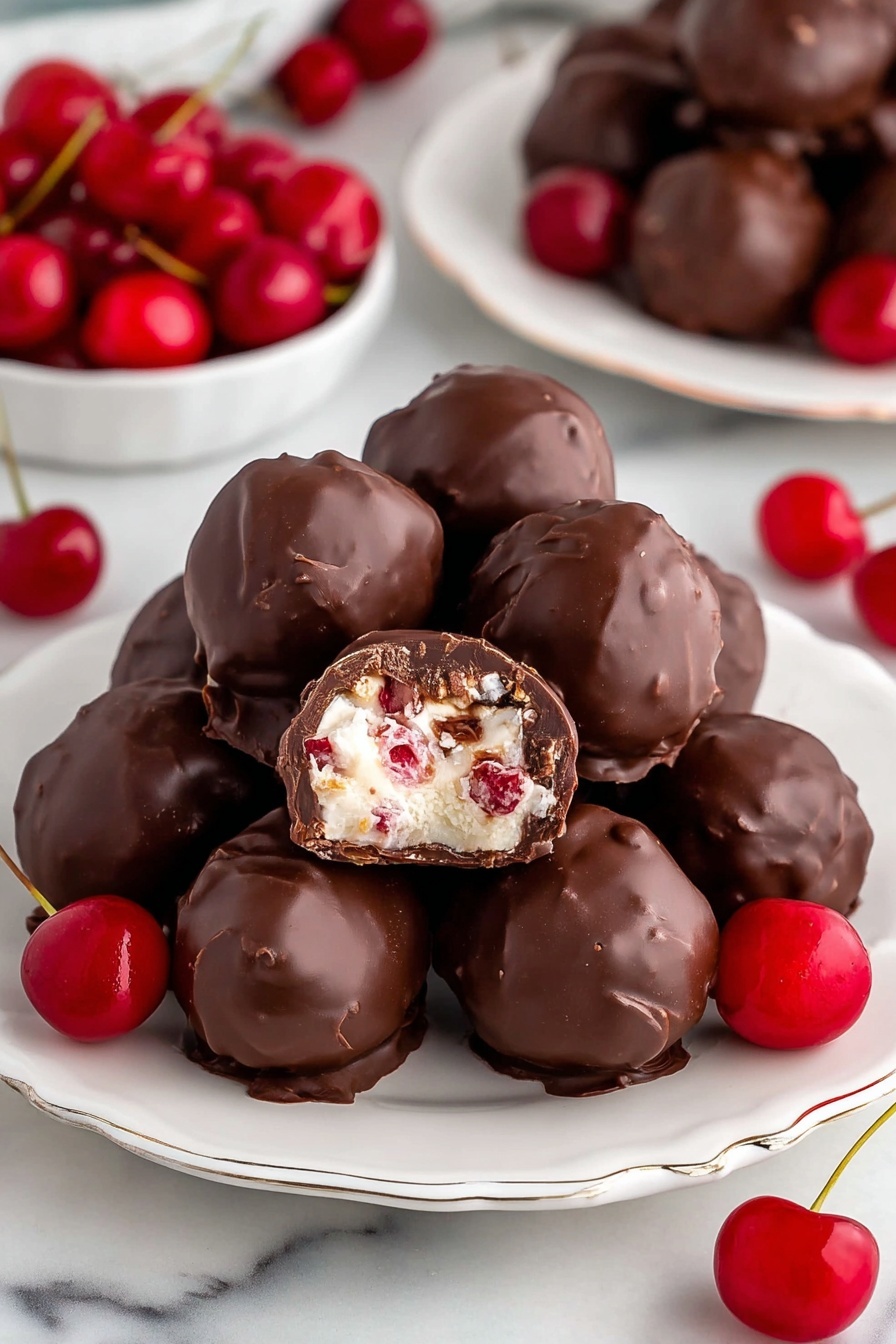
How to Serve Martha Washington Candy Recipe
Garnishes
I often sprinkle a pinch of chopped pecans or a few flaked coconut shreds on top of the wet chocolate for an extra touch of flair and texture. Sometimes I even dust them lightly with edible glitter for holiday gatherings — it always gets compliments!
Side Dishes
These candies are perfect alongside a cup of strong coffee or tea, and I love serving them with a small bowl of mixed nuts or dried fruit to keep the snack table balanced. They also pair beautifully with festive cocktails or a glass of dessert wine to round out a special evening.
Creative Ways to Present
For birthdays or holidays, I like to arrange these chocolates in pretty paper liners inside a decorative box or jar wrapped with a rustic ribbon. Another fun touch is stacking them on a tiered dessert stand for easy sharing at parties — they look just as good as they taste!
Make Ahead and Storage
Storing Leftovers
I keep leftover Martha Washington Candy refrigerated in an airtight container to maintain freshness and texture. Wrapped tightly, they last beautifully for up to two weeks. I always recommend storing them cool because the chocolate coating can soften at room temperature.
Freezing
For longer storage, these candies freeze remarkably well! I place parchment paper between layers in a freezer-safe container to prevent sticking. When you're ready, just thaw in the fridge overnight — they keep their chewy texture and rich flavor.
Reheating
Since the candy is served chilled or at room temperature, you don’t really need to reheat. If the chocolate has set hard and you want it softer, let them sit at room temperature for 10-15 minutes before enjoying — it softens just enough without losing shape.
Frequently Asked Questions:
Yes! If you have a nut allergy or simply don’t like pecans, you can omit them or substitute with chopped walnuts, almonds, or even seeds like sunflower. The texture will be slightly different but still delicious.
The easiest way is melting chocolate wafers in the microwave at 20-30 second intervals, stirring in between to prevent burning. Alternatively, a double boiler works great to gently melt the chocolate while keeping it smooth and shiny.
Stored in an airtight container in the refrigerator, the candies stay fresh for up to two weeks. They can also be frozen for up to three months if you want to prep them well in advance.
Fresh cherries have a much higher moisture content than maraschino, which can make the candy mixture too wet and difficult to form. If using fresh cherries, make sure to pit, chop, and dry them very thoroughly — or consider roasting them first to reduce moisture.
Final Thoughts
The Martha Washington Candy Recipe is more than just a sweet treat to me — it’s a connection to simpler times and joyful moments with family. I hope you give it a try and discover how easy and satisfying these candies are to make. Trust me, once you do, they’ll become a beloved tradition in your kitchen too.
Print
Martha Washington Candy Recipe
- Prep Time: 45 minutes
- Cook Time: 0 minutes
- Total Time: 1 hour 30 minutes
- Yield: 36 candies
- Category: Dessert
- Method: No-Cook
- Cuisine: American
Description
Martha Washington Candy is a delightful no-bake treat featuring a rich blend of shredded coconut, sweetened condensed milk, maraschino cherries, pecans, and creamy chocolate coating. Perfect for holidays or special occasions, these bite-sized candies offer a sweet, chewy center with a smooth chocolate exterior.
Ingredients
Base Mixture
- 1½ sticks unsalted butter melted
- 4 cups powdered sugar
- 1 teaspoon vanilla extract
- 3 cups shredded coconut sweetened
- 14 ounce (1 can) sweetened condensed milk
Add-ins
- 10 ounce (1 jar) maraschino cherries drained and chopped
- 1½ cups pecans chopped
Coating
- 16 ounces chocolate melting wafers
Instructions
- Combine Butter and Sugar: In a large mixing bowl, blend the melted unsalted butter and powdered sugar until the mixture is smooth and well combined. Add the vanilla extract and stir thoroughly to incorporate.
- Add Coconut and Condensed Milk: Mix in the shredded sweetened coconut and sweetened condensed milk evenly until the mixture becomes thick and sticky.
- Fold in Cherries and Pecans: Gently fold the chopped maraschino cherries and pecans into the mixture ensuring everything is fully combined for consistent texture and flavor.
- Form Balls and Chill: Roll the mixture into 1-inch balls and arrange them on a baking sheet lined with parchment or wax paper. Chill the balls in the refrigerator for about 30 minutes or until firm.
- Melt Chocolate: While the balls chill, melt the chocolate wafers using either a microwave or double boiler, stirring frequently until the chocolate is smooth and ready for dipping.
- Dip Candies in Chocolate: Remove the chilled balls and, using a fork or dipping tool, dip each ball into the melted chocolate to fully coat them. Allow any excess chocolate to drip off before placing them back onto the parchment-lined sheet.
- Set Chocolate and Serve: Refrigerate the chocolate-coated candies for 10-15 minutes or until the chocolate is set and firm. Serve chilled or at room temperature, storing leftovers in an airtight container.
Notes
- Pat the maraschino cherries completely dry before adding to prevent excess moisture, which can affect texture.
- Use a small cookie scoop for evenly sized candies, which ensures consistent chilling and coating times.
- Keep the candies in a cool spot if serving at room temperature to prevent the chocolate from melting.
- Make up to 2 weeks in advance and store in the refrigerator; the flavors often improve after chilling for a day or two.
- Store candies in an airtight container in the refrigerator for up to 2 weeks for best freshness.
- Freeze candies up to 3 months in a freezer-safe container with parchment paper between layers to prevent sticking.
Nutrition
- Serving Size: 1 candy
- Calories: 180 kcal
- Sugar: 20 g
- Sodium: 40 mg
- Fat: 10 g
- Saturated Fat: 6 g
- Unsaturated Fat: 3 g
- Trans Fat: 0 g
- Carbohydrates: 22 g
- Fiber: 1 g
- Protein: 2 g
- Cholesterol: 15 mg

Leave a Reply